") HarmonyOS開發(fā)案例:【UIAbility內(nèi)和UIAbility間頁面的跳轉(zhuǎn)】
HarmonyOS開發(fā)案例:【UIAbility內(nèi)和UIAbility間頁面的跳轉(zhuǎn)】

UIAbility內(nèi)和UIAbility間頁面的跳轉(zhuǎn)(ArkTS)
介紹
基于Stage模型下的UIAbility開發(fā),實現(xiàn)UIAbility內(nèi)和UIAbility間頁面的跳轉(zhuǎn)。包含如下功能:
- UIAbility內(nèi)頁面的跳轉(zhuǎn)。
- 跳轉(zhuǎn)到指定UIAbility的首頁。
- 跳轉(zhuǎn)到指定UIAbility的指定頁面(非首頁)。
最終效果圖如下:
相關(guān)概念
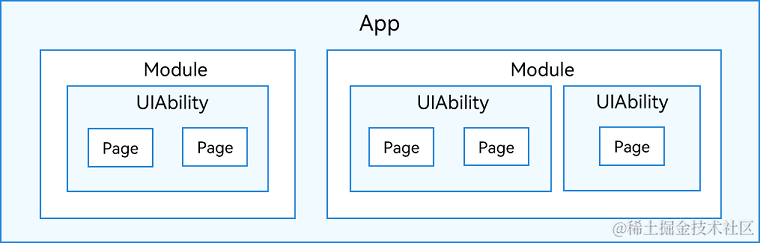
- [UIAbility組件概述]:UIAbility組件是一種包含UI界面的應(yīng)用組件,主要用于和用戶交互。UIAbility組件是系統(tǒng)調(diào)度的基本單元,為應(yīng)用提供繪制界面的窗口。一個應(yīng)用可以包含一個或多個UIAbility組件。
- [UIAbilityContext]:UIAbilityContext是[UIAbility]的上下文環(huán)境,繼承自[Context],提供UIAbility的相關(guān)配置信息以及操作UIAbility和ServiceExtensionAbility的方法。
- [頁面路由]:提供通過不同的url訪問不同的頁面,包括跳轉(zhuǎn)到應(yīng)用內(nèi)的指定頁面、用應(yīng)用內(nèi)的某個頁面替換當(dāng)前頁面、返回上一頁面或指定的頁面等。
- [Text]:文本組件,用于呈現(xiàn)一段文本信息。
- [Button]:按鈕組件,可快速創(chuàng)建不同樣式的按鈕。
環(huán)境搭建
軟件要求
- [DevEco Studio]版本:DevEco Studio 3.1 Release。
- OpenHarmony SDK版本:API version 9。
硬件要求
- 開發(fā)板類型:[潤和RK3568開發(fā)板]。
- OpenHarmony系統(tǒng):3.2 Release。
環(huán)境搭建
完成本篇Codelab我們首先要完成開發(fā)環(huán)境的搭建,本示例以RK3568開發(fā)板為例,參照以下步驟進行:
- [獲取OpenHarmony系統(tǒng)版本]:標準系統(tǒng)解決方案(二進制)。以3.2 Release版本為例:

- 搭建燒錄環(huán)境。
- [完成DevEco Device Tool的安裝]
- [完成RK3568開發(fā)板的燒錄]
- 搭建開發(fā)環(huán)境。
代碼結(jié)構(gòu)解讀
本篇Codelab只對核心代碼進行講解,完整代碼可以直接從gitee獲取。
├──device/src/main/ets              // device模塊的代碼區(qū)
│  ├──pages
│  │  ├──Index.ets                  // SecondAbility的Index頁面
│  │  └──Second.ets                 // SecondAbility的Second頁面
│  ├──secondability
│  │  └──SecondAbility.ets          // 程序入口類
├──device/src/main/resources        // device模塊的資源文件目錄
├──entry/src/main/ets               // entry模塊的代碼區(qū)
│  ├──common
│  │  ├──constants
│  │  │  ├──CommonConstants.ets     // 公共常量類
│  │  │  └──StyleConstants.ets	    // 樣式常量類
│  │  ├──utils
│  │  │  ├──GlobalContext.ets       // 全局變量控制類
│  │  │  └──Logger.ets	            // 日志打印類
│  ├──entryability
│  │  └──EntryAbility.ts            // 程序入口類
│  ├──model
│  │  └──ButtonClickMethod.ets      // 按鈕點擊后調(diào)用的方法類
│  ├──pages
│  │  ├──Index.ets                  // EntryAbility的Index頁面
│  │  └──Second.ets                 // EntryAbility的Second頁面
└──entry/src/main/resources         // entry模塊的資源文件目錄

`HarmonyOS與OpenHarmony鴻蒙文檔籽料:mau123789是v直接拿`

UIAbility內(nèi)頁面的跳轉(zhuǎn)
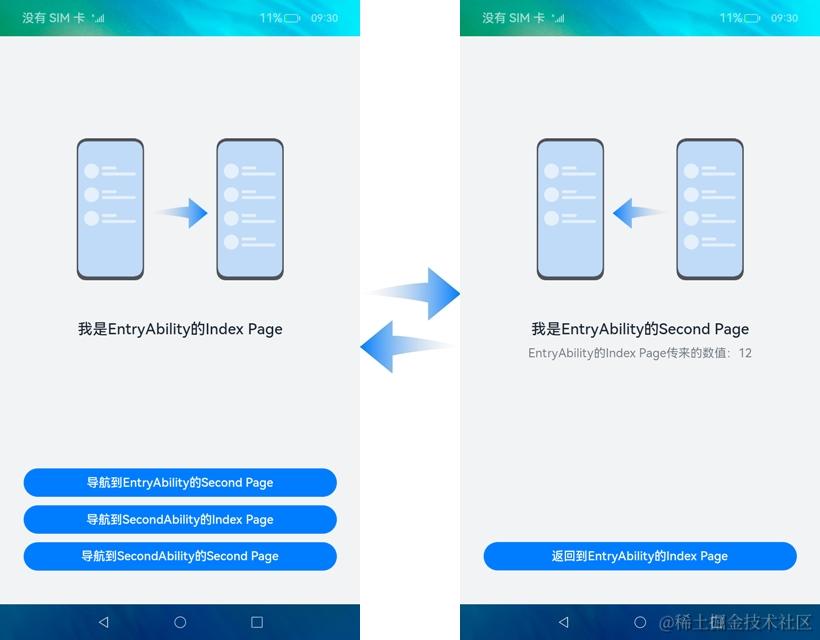
entry模塊中,EntryAbility內(nèi)頁面的跳轉(zhuǎn)可以通過頁面路由router來實現(xiàn)。頁面路由router根據(jù)頁面url找到目標頁面,從而實現(xiàn)跳轉(zhuǎn)。效果圖如下:
實現(xiàn)UIAbility內(nèi)頁面的跳轉(zhuǎn),我們首先需要構(gòu)建兩個頁面。在“Project”窗口,點擊“entry > src > main > ets > pages”,打開“Index.ets”文件,可以看到EntryAbility的Index頁面由一個Image組件、兩個Text組件、三個Button組件組成。“Index.ets”文件的示例代碼如下:
@Entry
@Component
struct Index {
  @State text: string = '';
  @State bottomMargin: string = StyleConstants.MAIN_INDEX_BUTTON_MARGIN_BOTTOM;

  build() {
    Column() {
      Image($r('app.media.right'))
        ...

      Text($r('app.string.main_index_page_name'))
        ...

      // 條件渲染:當(dāng)text的值不為空時,顯示該組件
      if (this.text !== '') {
        Text(this.text)
          ...
      }

      // 導(dǎo)航到EntryAbility的Second Page
      Button($r('app.string.to_main_second_page_btn_text'), { type: ButtonType.Capsule, stateEffect: true })
        ...

      // 導(dǎo)航到SecondAbility的Index Page
      Button($r('app.string.to_second_index_page_btn_text'), { type: ButtonType.Capsule, stateEffect: true })
        ...

      // 導(dǎo)航到SecondAbility的Second Page
      Button($r('app.string.to_second_second_page_btn_text'), { type: ButtonType.Capsule, stateEffect: true })
        ...
    }
    ...
  }
}
在“Project”窗口,打開“entry > src > main > ets”,右鍵點擊“pages”文件夾,選擇“New > Page”,命名為“Second”。可以看到EntryAbility的Second頁面由一個Image組件、兩個Text組件、一個Button組件組成。“Second.ets”文件的示例代碼如下:
@Entry
@Component
struct Second {
  ...

  build() {
    Column() {
      Image($r('app.media.left'))
        ...

      Text($r('app.string.main_second_page_name'))
        ...

      Text(`${this.src}:${this.count}`)
        ...

      // 返回到EntryAbility的Index Page
      Button($r('app.string.back_main_index_page_btn_text'), { type: ButtonType.Capsule, stateEffect: true })
        ...
    }
    ...
  }
}
從entry模塊的Index頁面跳轉(zhuǎn)到Second頁面,并進行數(shù)據(jù)傳遞,通過頁面路由router來實現(xiàn)。需要如下幾個步驟:
- 給兩個頁面導(dǎo)入router模塊。
- 在EntryAbility的Index頁面中,點擊“導(dǎo)航到EntryAbility的Second Page”按鈕后,調(diào)用ButtonClickMethod類中的toEntryAbilitySecond方法,跳轉(zhuǎn)到EntryAbility的Second頁面。使用router.pushUrl實現(xiàn)跳轉(zhuǎn),可以通過params來向新頁面?zhèn)魅雲(yún)?shù),示例代碼如下:
// 導(dǎo)入router模塊 import router from '@ohos.router'; // 導(dǎo)航到EntryAbility的Second Page toEntryAbilitySecond() { router.pushUrl({ url: 'pages/Second', params: { src: textMessage, count: CommonConstants.NUM_VALUES[0] } }); }- Second頁面通過router.getParams()方法獲取Index頁面?zhèn)鬟f過來的自定義參數(shù),并用一個Text文本展示從Index頁面?zhèn)鬟f過來的數(shù)據(jù),示例代碼如下:
@Entry
@Component
struct Second {
  ...
  // 獲取Index頁面?zhèn)鬟f過來的自定義參數(shù)
  params = router?.getParams();
  @State src: string = this.params == undefined ? '-' : (this.params as Record< string,Object >)['src'] as string;
  @State count: number = this.params == undefined ? 0 : (this.params as Record< string,Object >)['count'] as number;

  build() {
    Column() {
      Image($r('app.media.left'))
        ...

      Text($r('app.string.main_second_page_name'))
        ...

      // 用一個Text文本展示從Index頁面?zhèn)鬟f過來的數(shù)據(jù)
      Text(`${this.src}:${this.count}`)
        ...

      // 返回到EntryAbility的Index Page
      Button($r('app.string.back_main_index_page_btn_text'), { type: ButtonType.Capsule, stateEffect: true })
        ...
    }
    ...
  }
}
從entry模塊的Second返回到Index頁面,使用router.back來實現(xiàn)。在EntryAbility的Second頁面中,點擊“返回到EntryAbility的Index Page”按鈕后,返回到EntryAbility的Index頁面,示例代碼如下:
// 返回到EntryAbility的Index Page
router.back();
跳轉(zhuǎn)到指定UIAbility的首頁
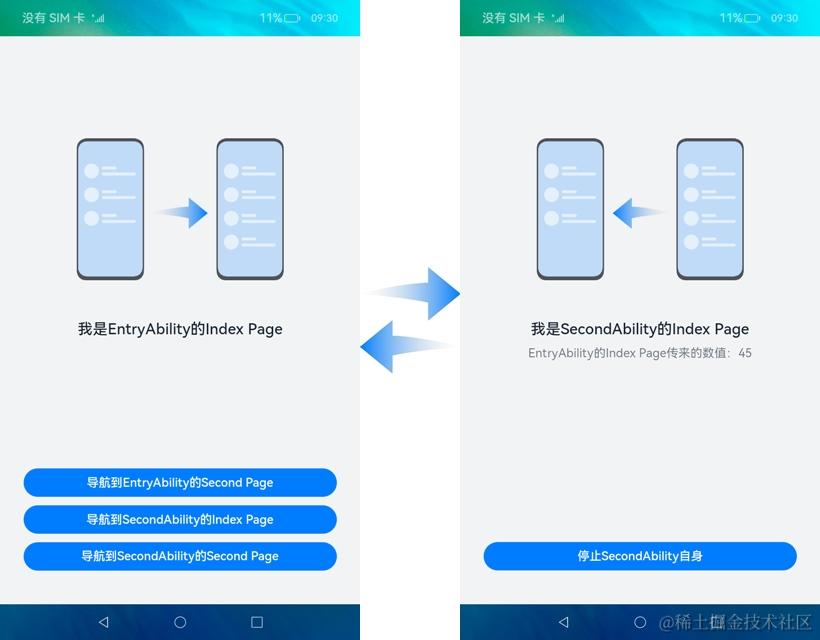
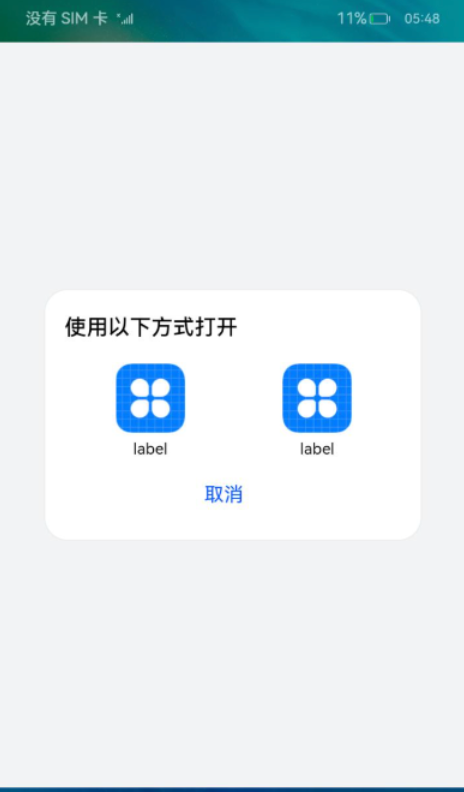
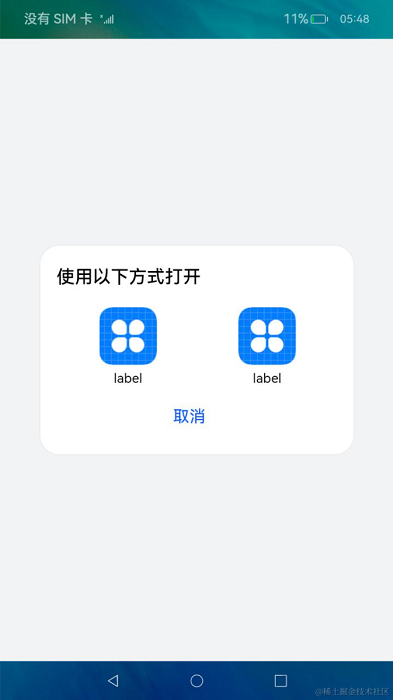
實現(xiàn)UIAbility間頁面的跳轉(zhuǎn),需要啟動另外一個UIAbility,可以通過UIAbilityContext的startAbility的方法來完成。本篇Codelab是用兩個模塊(entry和device),實現(xiàn)UIAbility間頁面的跳轉(zhuǎn)。跳轉(zhuǎn)到指定UIAbility的首頁,效果圖如下:
- 在本章節(jié)中,實現(xiàn)跳轉(zhuǎn)到指定UIAbility的首頁,我們需要新建一個模塊。在“Project”窗口,右鍵點擊“entry 文件夾”,選擇“New > Module > Empty Ability > Next”,在“Module name”中給新建的模塊命名為“device”,點擊“Next”,在“Ability name”中給新建模塊的Ability命名為“SecondAbility”,點擊“Finish”。可以看到文件目錄結(jié)構(gòu)如下:

- 構(gòu)建SecondAbility的首頁。在“Project”窗口,點擊“device > src > main > ets > pages”,打開“Index.ets”文件,可以看到SecondAbility的Index頁面由一個Image組件、兩個Text組件、一個Button組件組成。“Index.ets”文件的示例代碼如下:
@Entry @Component struct Index { ... build() { Column() { Image($r('app.media.left')) ... Text($r('app.string.second_index_page_name')) ... Text(`${this.src}:${this.count}`) ... // 停止SecondAbility自身 Button($r('app.string.terminate_second_btn_text'), { type: ButtonType.Capsule, stateEffect: true }) ... } ... } } - 從entry模塊的EntryAbility的首頁,跳轉(zhuǎn)到SecondAbility的首頁,即從EntryAbility的Index頁面跳轉(zhuǎn)到SecondAbility的Index頁面。通過UIAbilityContext的startAbility方法來實現(xiàn)。
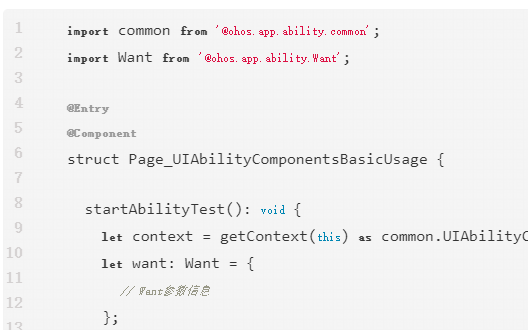
首先需要在EntryAbility的“Index.ets”文件中獲取UIAbilityContext,示例代碼如下:
// 獲取UIAbilityContext
let context = getContext(this) as common.UIAbilityContext;
說明: 如果需要使用UIAbilityContext中的方法,需要在對應(yīng)的頁面獲取相應(yīng)的UIAbilityContext。
在EntryAbility的Index頁面中,點擊“導(dǎo)航到SecondAbility的Index Page”按鈕后,調(diào)用ButtonClickMethod類中的toSecondAbilityIndex方法,拉起SecondAbility的Index頁面。使用UIAbilityContext.startAbility來實現(xiàn),可以通過parameters來向被拉起方傳遞參數(shù),示例代碼如下:
// 導(dǎo)航到SecondAbility的Index Page
toSecondAbilityIndex(context: common.UIAbilityContext) {
  let want: Want = {
    'deviceId': '',
    'bundleName': CommonConstants.BUNDLE_NAME,
    'abilityName': CommonConstants.SECOND_ABILITY_NAME,
    'moduleName': CommonConstants.DEVICE_MODULE_NAME,
    'parameters': {
       src: textMessage,
       count: CommonConstants.NUM_VALUES[1]
     }
  };
  context.startAbility(want).then(() = > {
    Logger.info(CommonConstants.TAG, `start second ability index page succeed with ${JSON.stringify(want)}`);
  }).catch((error: Error) = > {
    Logger.error(CommonConstants.TAG, `start second ability index page failedwith ${error}`);
  });
}
在SecondAbility的Index頁面,獲取從EntryAbility的Index頁面?zhèn)鬟f過來的自定義參數(shù),并用一個Text文本展示從Index頁面?zhèn)鬟f過來的數(shù)據(jù),示例代碼如下:
@Entry
@Component
struct Index {
  // 獲取從EntryAbility的Index頁面?zhèn)鬟f過來的自定義參數(shù)
  secondAbilityWant?: Want = GlobalContext.getContext().getObject('secondAbilityWant');
  @State src: string = this.secondAbilityWant?.parameters?.src as string ?? '-';
  @State count: number = this.secondAbilityWant?.parameters?.count as number ?? 0;

  build() {
    Column() {
      Image($r('app.media.left'))
        ...

      Text($r('app.string.second_index_page_name'))
        ...

      // 用一個Text文本展示從Index頁面?zhèn)鬟f過來的數(shù)據(jù)
      Text(`${this.src}:${this.count}`)
        ...

      // 停止SecondAbility自身
      Button($r('app.string.terminate_second_btn_text'), { type: ButtonType.Capsule, stateEffect: true })
        ...
    }
    ...
  }
}
- 在SecondAbility的Index頁面,點擊“停止SecondAbility自身”按鈕,使用UIAbilityContext.terminateSelf方法手動銷毀Ability。示例代碼如下:
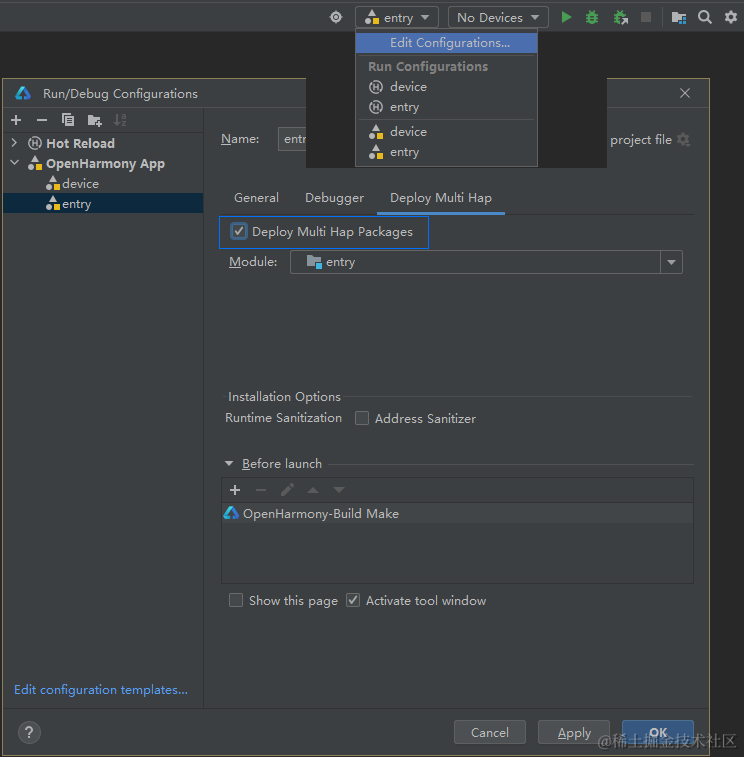
// 停止SecondAbility自身 terminateSecondAbility(context: common.UIAbilityContext) { context.terminateSelf().then(() = > { Logger.info(CommonConstants.TAG, 'terminate second ability self succeed'); }).catch((error: Error) = > { Logger.error(CommonConstants.TAG, `terminate second ability self failed with ${error}`); }); } - 運行時,需要在DevEco Studio的entry模塊中勾選“Deploy Multi Hap Packages”,如下圖所示:
跳轉(zhuǎn)到指定UIAbility的指定頁面(非首頁)
跳轉(zhuǎn)到指定UIAbility的指定頁面(非首頁),本章節(jié)以從EntryAbility的Index頁面跳轉(zhuǎn)到SecondAbility的Second頁面為例。只需要在本文檔“跳轉(zhuǎn)到指定UIAbility的首頁”章節(jié)的基礎(chǔ)上,另外在device模塊中構(gòu)建一個Second頁面。效果圖如下:

- 構(gòu)建SecondAbility的Second頁面。在“Project”窗口,打開“device > src > main > ets”,右鍵點擊“pages”文件夾,選擇“New > Page”,命名為“Second”。可以看到文件目錄結(jié)構(gòu)如下:

- 可以看到SecondAbility的Second頁面由一個Image組件、兩個Text組件、一個Button組件組成。“Second.ets”文件的示例代碼如下:
@Entry @Component struct Second { // 用來接收parameters參數(shù)傳過來的值 secondAbilityWant?: Want = GlobalContext.getContext().getObject('secondAbilityWant'); @State src: string = this.secondAbilityWant?.parameters?.src as string ?? '-'; @State count: number = this.secondAbilityWant?.parameters?.count as number ?? 0; build() { Column() { Image($r('app.media.left')) ... Text($r('app.string.second_second_page_name')) ... Text(`${this.src}:${this.count}`) ... // 停止SecondAbility自身并返回結(jié)果 Button($r('app.string.terminate_second_for_result_btn_text'), { type: ButtonType.Capsule, stateEffect: true }) ... } ... } } - 在EntryAbility的Index頁面中,點擊“導(dǎo)航到SecondAbility的Second Page”按鈕后,調(diào)用ButtonClickMethod類中的toSecondAbilitySecond方法,拉起SecondAbility的Second頁面。
- 使用UIAbilityContext.startAbilityForResult來實現(xiàn),并獲取被拉起側(cè)銷毀后的返回結(jié)果。可以通過parameters來向被拉起方傳遞參數(shù),示例代碼如下:
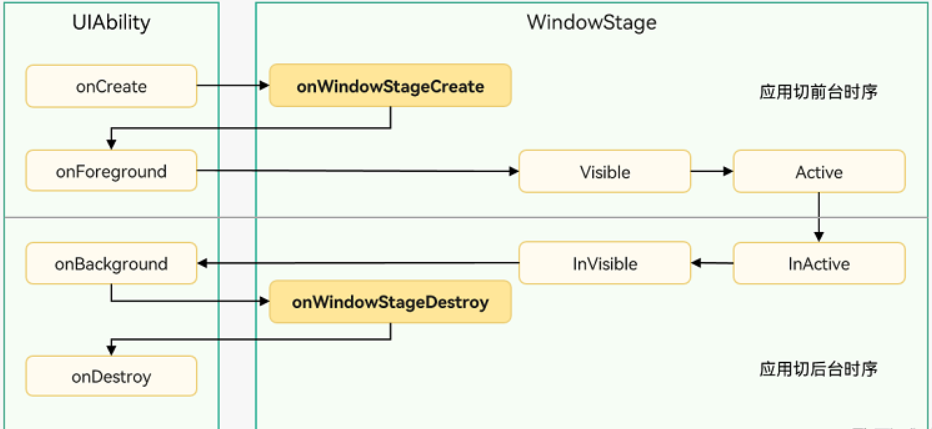
// 導(dǎo)航到SecondAbility的Second Page toSecondAbilitySecond(context: common.UIAbilityContext, callback: (abilityResult: common.AbilityResult) = > void) { let want: Want = { 'deviceId': '', 'bundleName': CommonConstants.BUNDLE_NAME, 'abilityName': CommonConstants.SECOND_ABILITY_NAME, 'moduleName': CommonConstants.DEVICE_MODULE_NAME, 'parameters': { url: 'pages/Second', src: textMessage, count: CommonConstants.NUM_VALUES[2] } }; // 被拉起側(cè)銷毀后,在startAbilityForResult回調(diào)中可以獲取到被拉起側(cè)銷毀時傳遞過來的AbilityResult context.startAbilityForResult(want).then((result) = > { callback(result); Logger.info(CommonConstants.TAG, `start second ability second page succeed with ${JSON.stringify(want)}`); }).catch((error: Error) = > { Logger.error(CommonConstants.TAG, `start second ability second page failed with ${error}`); }); } - 在“Project”窗口,點擊“device > src > main > ets > SecondAbility”,打開“SecondAbility.ets”文件,在onWindowStageCreate的生命周期回調(diào)函數(shù)中獲取拉起方的意圖,展示SecondAbility的指定頁面到界面。示例代碼如下:
onWindowStageCreate(windowStage: Window.WindowStage) {
  ...
  let parameters: Record< string, Object > = (GlobalContext.getContext().getObject('secondAbilityWant') as Want)?.parameters as Record< string, Object >;
  let url = parameters?.url ?
    parameters.url as string : 'pages/Index';
  windowStage.loadContent(url, (err, data) = > {
    ...
  });
}
- 使用UIAbilityContext.startAbilityForResult來實現(xiàn),并獲取被拉起側(cè)銷毀后的返回結(jié)果。可以通過parameters來向被拉起方傳遞參數(shù),示例代碼如下:
- 在SecondAbility的Second頁面,點擊“停止SecondAbility自身并返回結(jié)果”按鈕,使用UIAbilityContext.terminateSelfWithResult方法,傳入不同的resultCode和want,手動銷毀Ability。成功后發(fā)起拉起側(cè)會收到abilityResult的值。示例代碼如下:
// 停止SecondAbility自身并返回結(jié)果
terminateSecondAbilityForResult(context: common.UIAbilityContext) {
  let abilityResult: common.AbilityResult = {
    resultCode: CommonConstants.RESULT_CODE,
    want: {
      'deviceId': '',
      'bundleName': CommonConstants.BUNDLE_NAME,
      'abilityName': CommonConstants.SECOND_ABILITY_NAME,
      'moduleName': CommonConstants.DEVICE_MODULE_NAME,
      'parameters': {
         src: returnMessage,
         count: CommonConstants.RESULT_NUM_VALUE
       }
    }
  };

  // 停止SecondAbility自身,并將abilityResult返回給startAbilityForResult接口調(diào)用方
  context.terminateSelfWithResult(abilityResult).then(() = > {
    Logger.info(CommonConstants.TAG, `terminate second ability self with
      result succeed with ${JSON.stringify(abilityResult)}`);
  }).catch((error: Error) = > {
    Logger.error(CommonConstants.TAG, `terminate second ability self with
      result failed with ${error}`);
  });
}
審核編輯 黃宇
-
開發(fā)板
+關(guān)注
關(guān)注
25文章
5675瀏覽量
104574 -
鴻蒙
+關(guān)注
關(guān)注
60文章
2617瀏覽量
44033 -
HarmonyOS
+關(guān)注
關(guān)注
80文章
2126瀏覽量
32993 -
OpenHarmony
+關(guān)注
關(guān)注
29文章
3851瀏覽量
18587
發(fā)布評論請先 登錄
深入理解HarmonyOS UIAbility:生命周期、WindowStage與啟動模式探析
鴻蒙OS開發(fā)實例:【頁面傳值跳轉(zhuǎn)】
鴻蒙開發(fā)-應(yīng)用程序框架UIAbility的使用
UIAbility組件間交互(設(shè)備內(nèi))說明
ArkTS語言HarmonyOS/OpenHarmony應(yīng)用開發(fā)-router事件跳轉(zhuǎn)到指定UIAbility
HarmonyOS/OpenHarmony應(yīng)用開發(fā)-Stage模型UIAbility組件使用(一)
HarmonyOS/OpenHarmony應(yīng)用開發(fā)-Stage模型UIAbility組件使用(一)
鴻蒙開發(fā)丨設(shè)備內(nèi) UIAbility 的幾種交互方式
HarmonyOS開發(fā)案例:【Ability內(nèi)頁面間的跳轉(zhuǎn)】
HarmonyOS開發(fā)案例:【UIAbility和自定義組件生命周期】

鴻蒙Ability Kit(程序框架服務(wù))【UIAbility組件基本用法】
鴻蒙Ability Kit(程序框架服務(wù))【UIAbility組件間交互(設(shè)備內(nèi))】
鴻蒙Ability Kit(程序框架服務(wù))【UIAbility內(nèi)和UIAbility間頁面的跳轉(zhuǎn)】

【HarmonyOS 5】鴻蒙中的UIAbility詳解(三)
【HarmonyOS 5】鴻蒙中的UIAbility詳解(二)


 工商網(wǎng)監(jiān)
評論