 如何在arduino上設置基本恒溫器
步驟1:設置
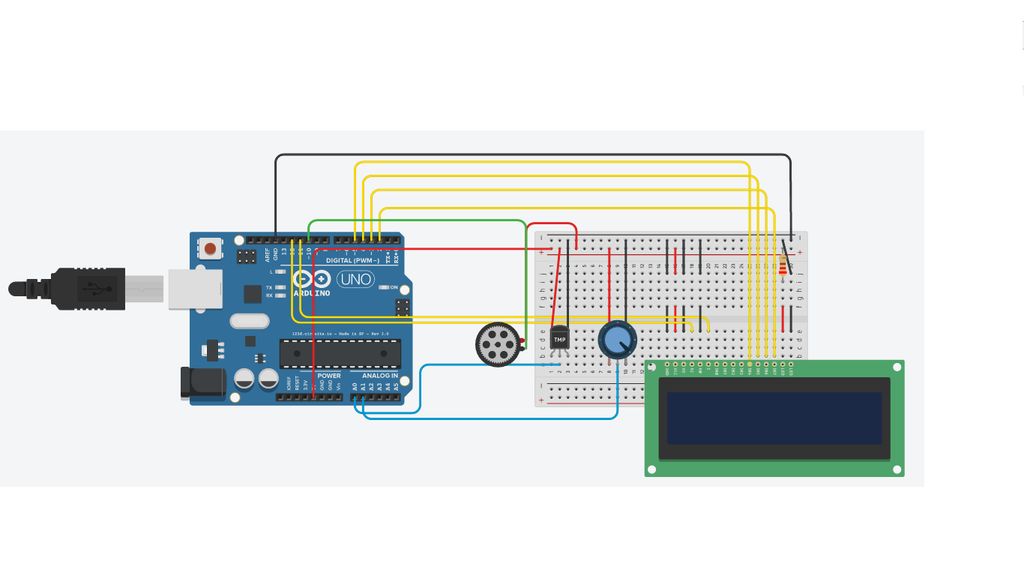
需要的項目清單
Arduino Uno
面包板
四個電阻器-220歐姆
LCD屏幕
按鈕
TMP 36傳感器
步驟2:代碼
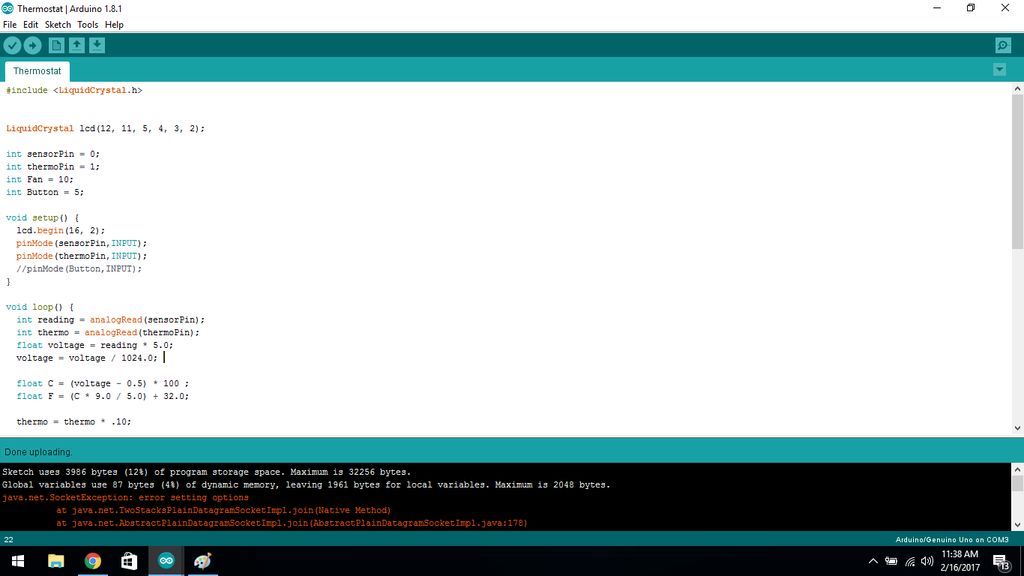
這是代碼的基本設置。
代碼:
#include
液晶LCD(12,11,5,4,4,3,2);
int sensorPin = 0;
int thermoPin = 1;
int Fan = 10;
int Button = 5;
void setup(){
lcd.begin(16,2 );
pinMode(sensorPin,INPUT);
pinMode(thermoPin,INPUT);
//pinMode(Button,INPUT); }
void loop(){
int熱=模擬讀取(thermoPin);
浮動電壓=讀數* 5.0;
電壓=電壓/1024.0;
浮動C =(電壓-0.5)* 100;
浮動F =(C * 9.0/5.0)+ 32.0;
熱=熱* .10;
int更改= AnalogRead(按鈕);
lcd.setCursor(0, 0);
lcd.println(“ D Temp-》”);
lcd.println(thermo);
lcd.setCursor(0, 1);
if(Change 《1023)
{lcd.println(“ Temp in F”);
lcd.println(F);
} else
{lcd.println(“ Temp in C”);
lcd.println(C);
}
if(thermo
{
digitalWrite(Fan,HIGH);
} else {
digitalWrite(Fan,LOW);
}
}
責任編輯:wv
-
恒溫器
+關注
關注
4文章
143瀏覽量
21004 -
Arduino
+關注
關注
188文章
6491瀏覽量
190087
發布評論請先 登錄
物聯網智能恒溫器解決方案
如何在iMX8MM EVK上啟用紅外接收器?
i.MX8M Plus PSPLASH如何在顯示器上設置不同的行為?
解決方案 | 恒溫器精準控溫 原來有這些“芯”科技!

如何在Linux系統上設置站群服務器IP地址
使用CC3220 Simplelink單芯片Wi-Fi MCU SoC設計恒溫器

使用MSP430 MCU和TPS60313實現單節電池恒溫器
LM26NV 采用 SOT-23 封裝、具有 ±3°C 精度的出廠預設恒溫器數據表
LM27 SOT-23,±3°C精確,120°C-150°C出廠預設恒溫器數據表
如何在Micro SD卡上設置寫保護?
電子恒溫器的工作原理,簡單的電子恒溫器電路


 工商網監
工商網監
評論