 OpenHarmony南向開發案例:【 智能家居中控】
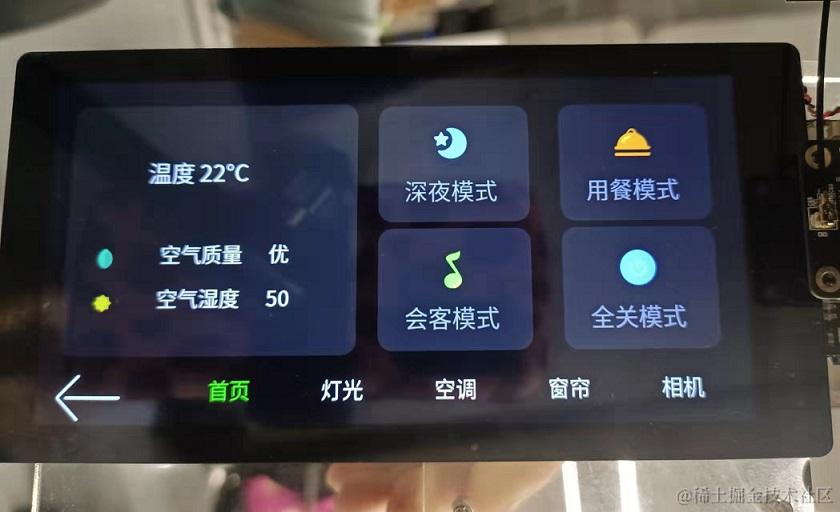
應用場景簡介
- 智能家居。
今天打造的這一款全新智能家庭控制系統,凸顯應用在智能控制和用戶體驗的特點,開創國內智能家居系統體驗新局面。新的系統主要應用在鴻蒙生態。
工程版本
- 系統版本/API版本:OpenHarmony SDK API 8
- IDE版本:DevEco Studio 3.0 Beta4
快速上手
準備硬件環境
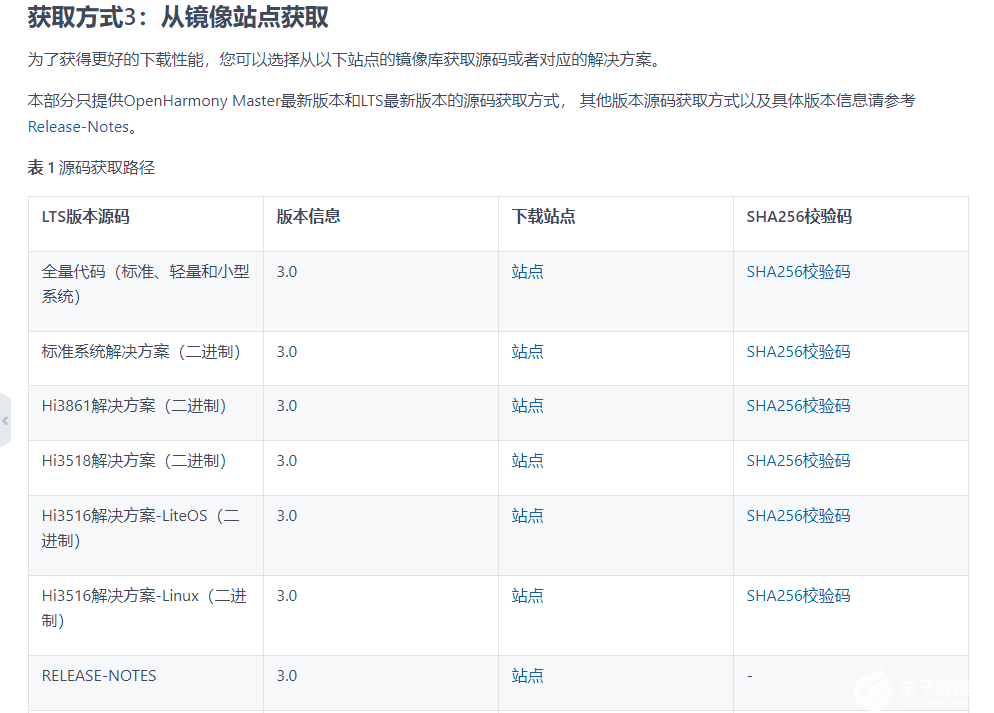
- [獲取OpenHarmony系統版本]:標準系統解決方案(二進制)
- [搭建標準系統環境]
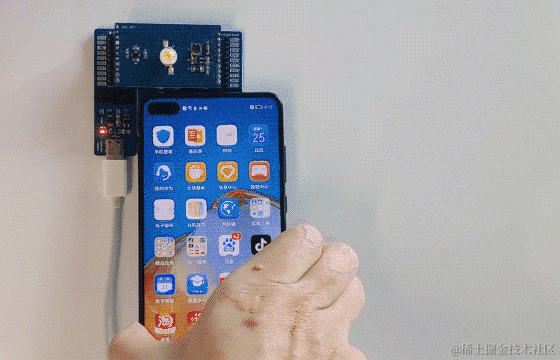
- [完成Dayu200開發板的燒錄]
準備開發環境
- 安裝最新版[DevEco Studio]。
- 請參考[配置OpenHarmony SDK],完成DevEco Studio的安裝和開發環境配置。
- 開發環境配置完成后,請參考[使用工程向導] 創建工程(模板選擇“Empty Ability”),選擇eTS語言開發。
- 工程創建完成后,選擇使用[真機進行調測]。
HarmonyOS與OpenHarmony鴻蒙文檔籽料:mau123789是v直接拿
準備工程
工程下載
git clone https://gitee.com/openharmony-sig/knowledge_demo_smart_home.git --depth=1
工程導入
- DevEco Studio導入本工程;
打開DevEco Studio,點擊File->Open->下載路徑/FA/SmartHomeCenter
編譯
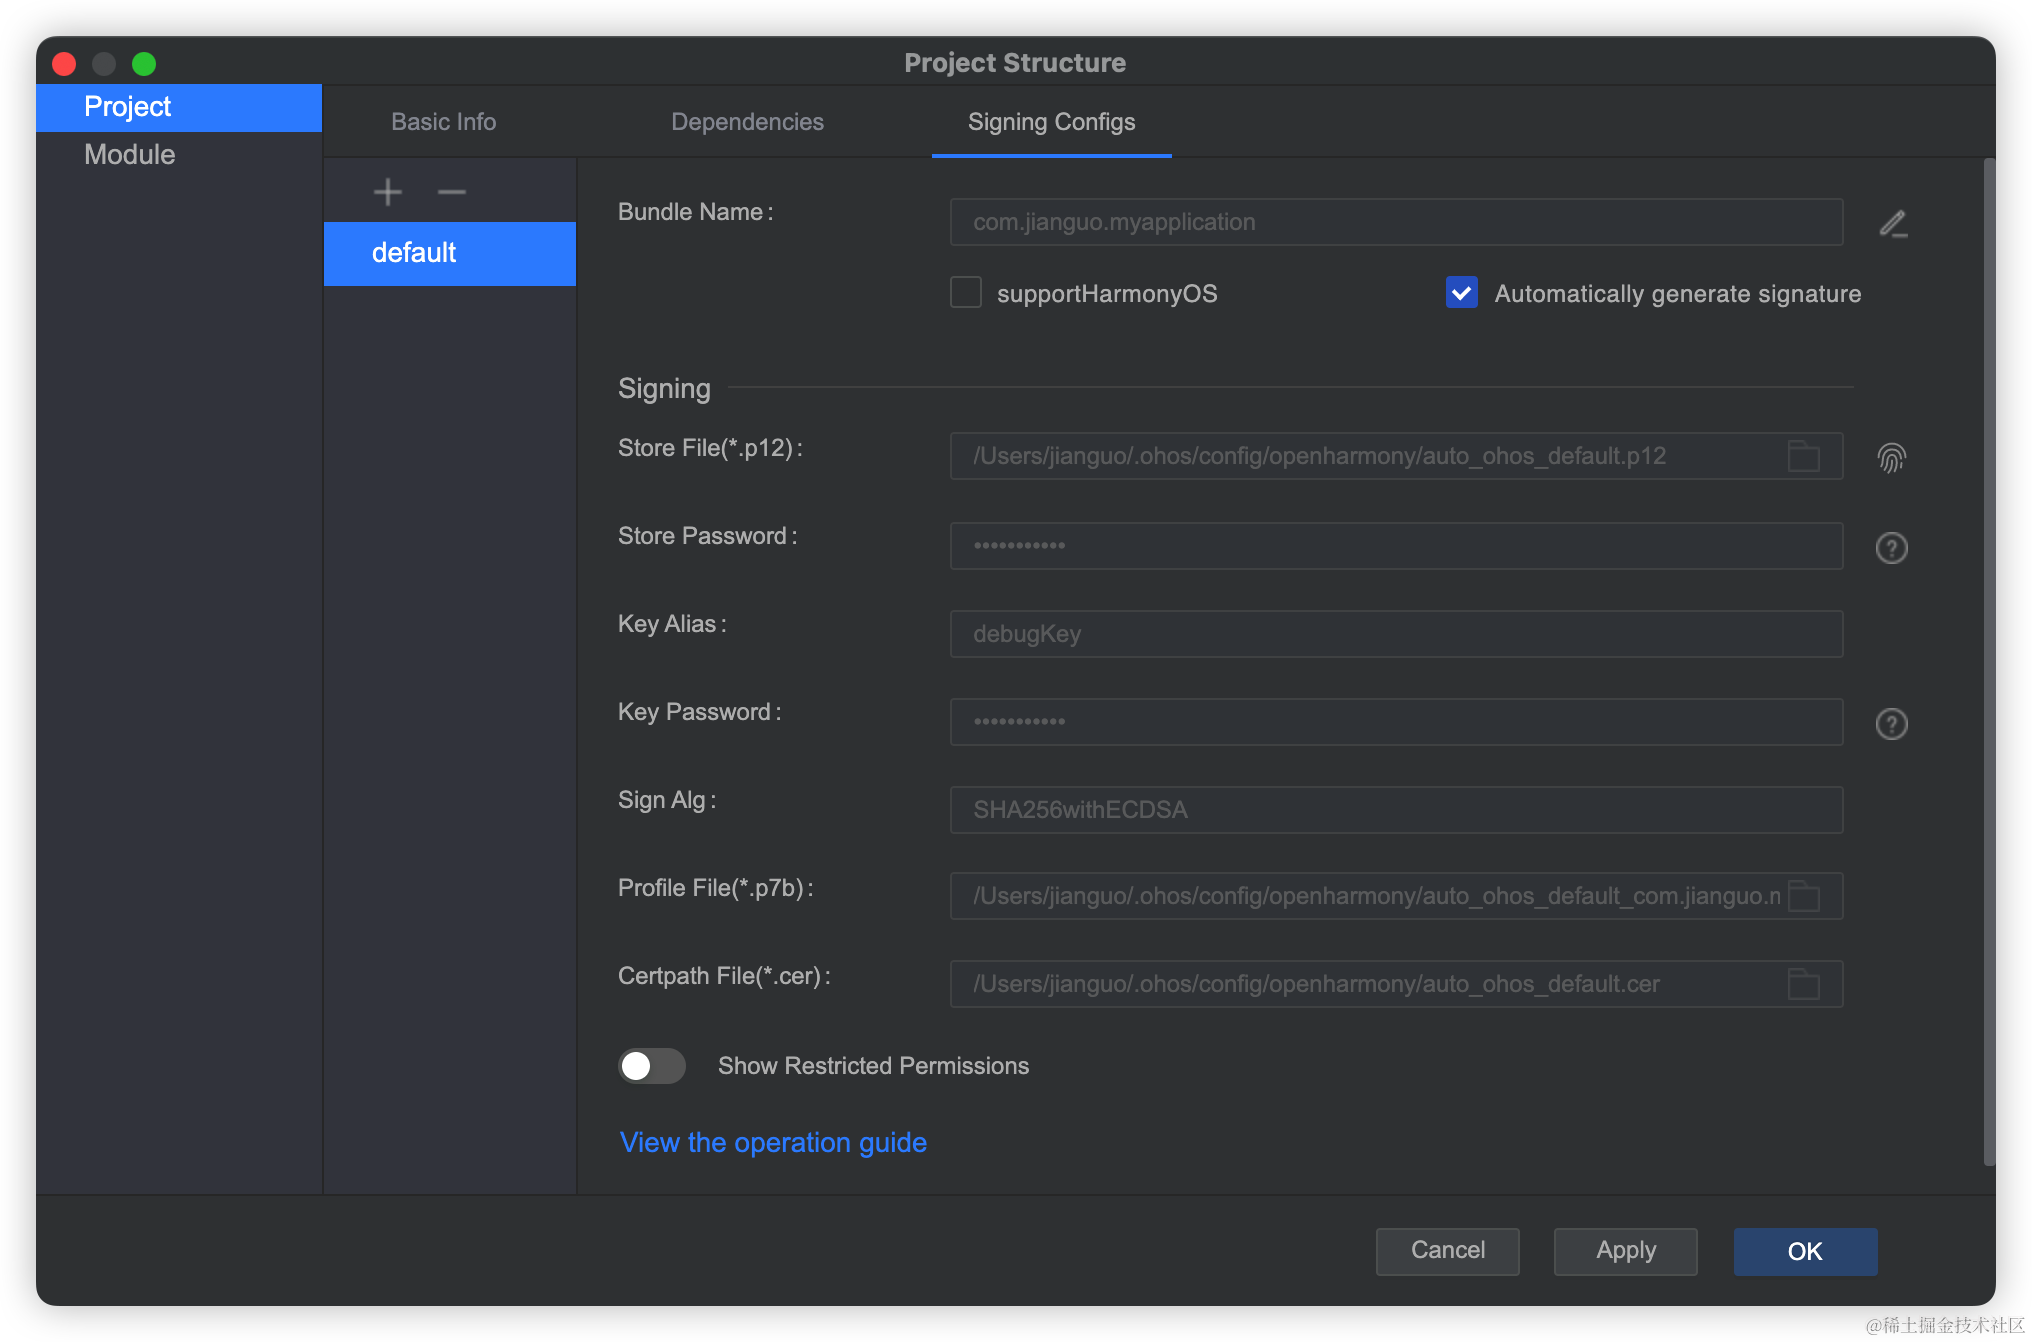
- 點擊File > Project Structure > Project > Signing Configs界面勾選“ Automatically generate signing ”,等待自動簽名完成即可,點擊“ OK ”。如下圖所示:
- 點擊Build->Build Hap/APPs 編譯,編譯成功生成entry-debug-rich-signed.hap
燒錄/安裝
- 識別到設備后點擊,或使用默認快捷鍵Shift+F10(macOS為Control+R)運行應用。

- [安裝應用]如果IDE沒有識別到設備就需要通過命令安裝,如下
打開OpenHarmony SDK路徑 toolchains 文件夾下,執行如下hdc_std命令,其中path為hap包所在絕對路徑。hdc_std install -r pathentry-debug-rich-signed.hap//安裝的hap包需為xxx-signed.hap,即安裝攜帶簽名信息的hap包。
好的接下來我將詳細講解如何制作
開發教學
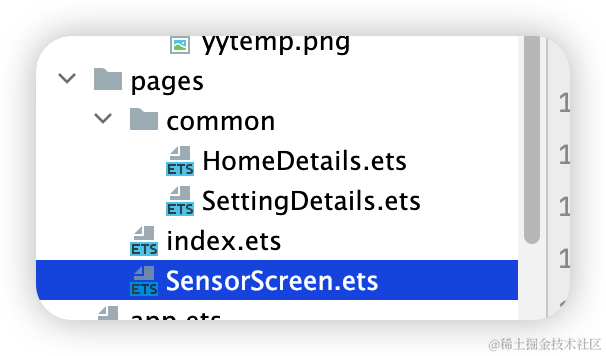
創建好的 eTS工程目錄
新建工程的ETS目錄如下圖所示。
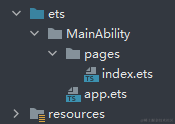
各個文件夾和文件的作用:
- index.ets :用于描述UI布局、樣式、事件交互和頁面邏輯。
- app.ets :用于全局應用邏輯和應用生命周期管理。
- pages :用于存放所有組件頁面。
- resources :用于存放資源配置文件。
接下來開始正文。
我們的主要操作都是在在pages目錄中,然后我將用不到10分鐘的時間,帶大家實現這個功能。
鴻蒙開發參考指導文件
鴻蒙開發指導文檔:[gitee.com/li-shizhen-skin/harmony-os/blob/master/README.md]
拆解
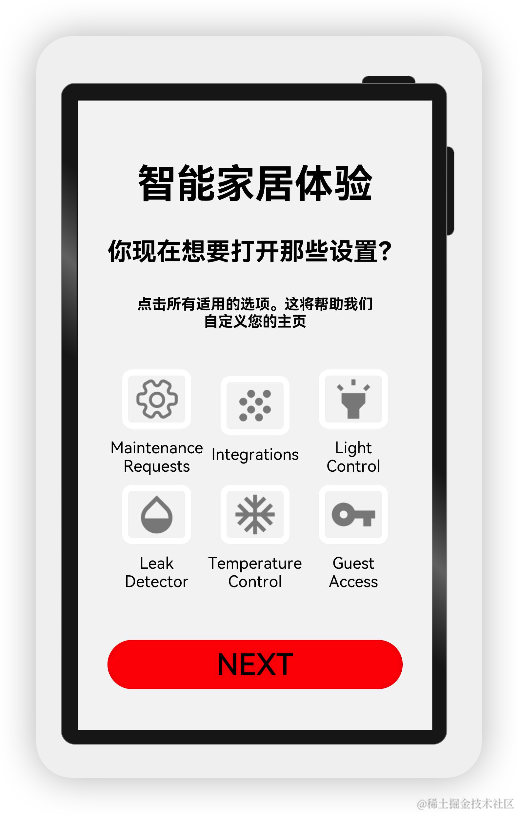
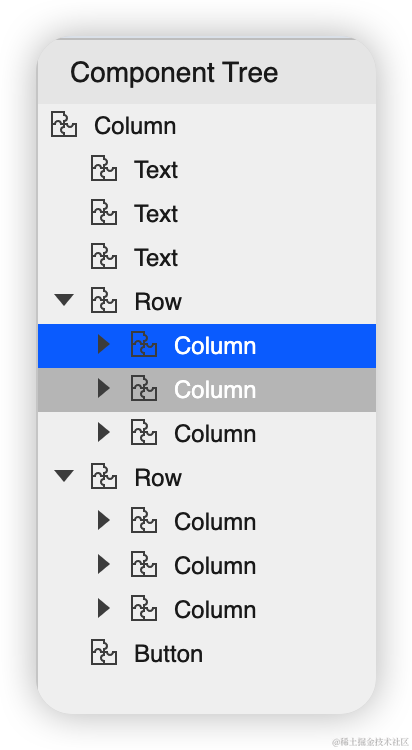
根據設計圖,我們可以分層展示,用Column包裹,大致分為這幾步
可以看下本頁的結構:
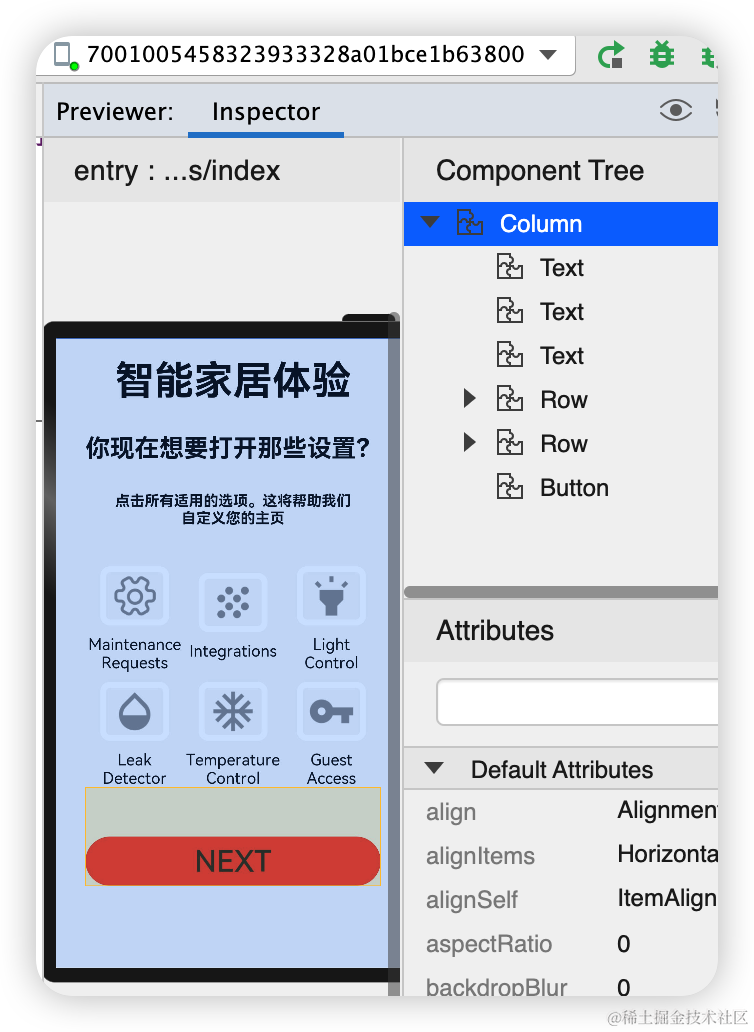
再詳細一點:
import { SettingDetails } from './common/SettingDetails';
import router from '@ohos.router';
@Entry
@Component
struct Index {
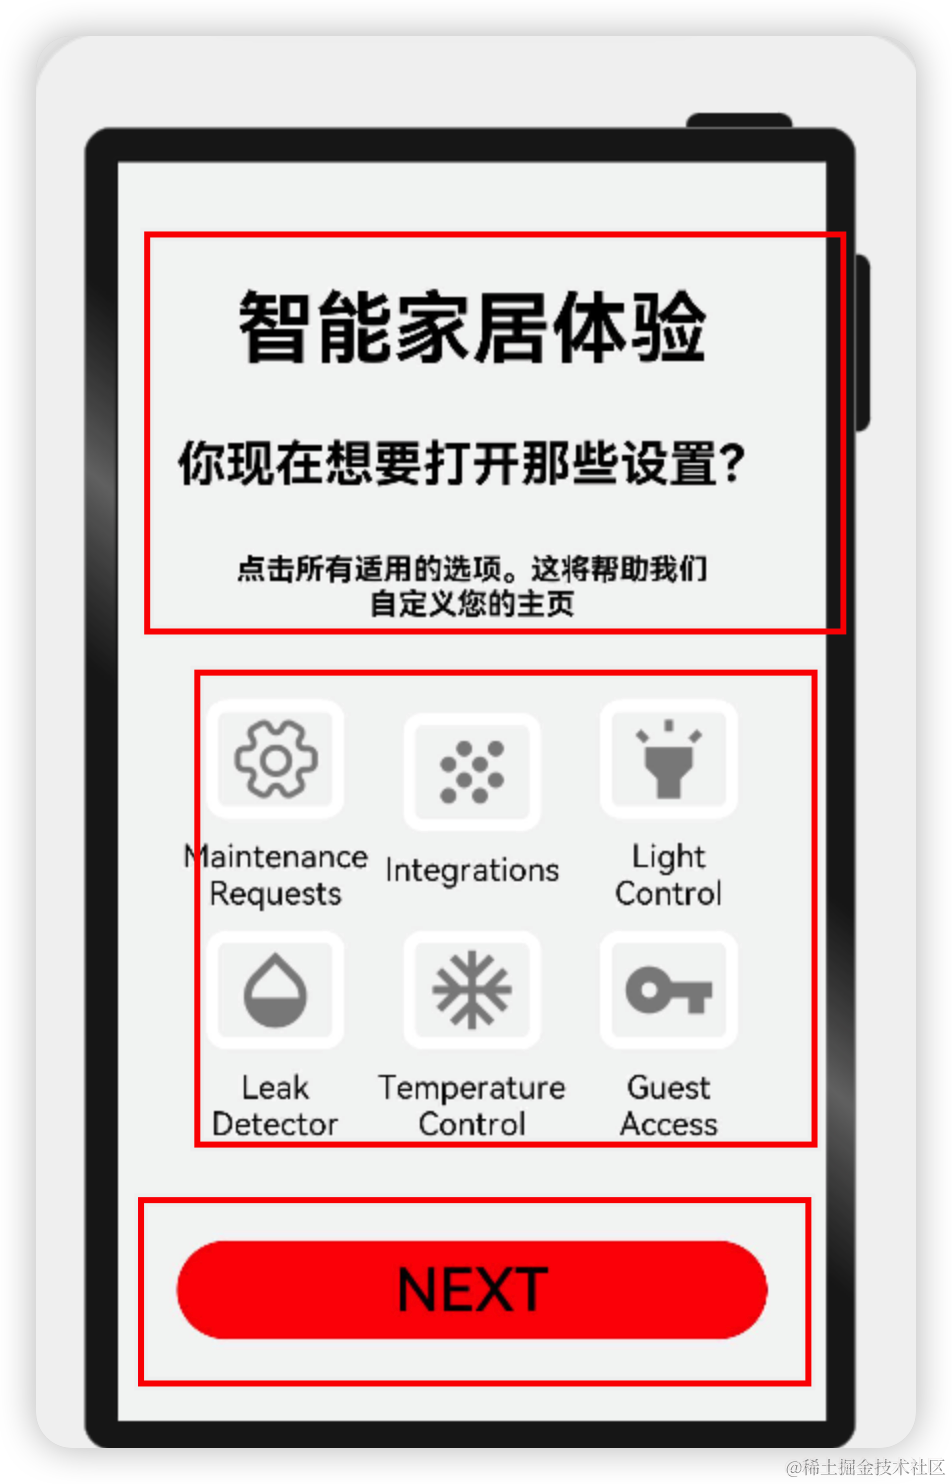
@State title: string = '智能家居體驗'
@State message: string = '你現在想要打開那些設置?'
@State desc: string = '點擊所有適用的選項。這將幫助我們n自定義您的主頁'
@State Number: String[] = ['0', '1', '2', '3', '4']
@State private isSelect: boolean = true;
build() {
Column() {
Text(this.title)
.fontSize(80)
.fontWeight(FontWeight.Bold).onClick(() = > {
router.push({ url: 'pages/SensorScreen' })
}).margin({ bottom: 60, top: 40 })
Text(this.message)
.fontSize(50)
.fontWeight(FontWeight.Bold).onClick(() = > {
router.push({ url: 'pages/SensorScreen' })
}).margin({ bottom: 60 })
Text(this.desc)
.fontSize(30)
.textAlign(TextAlign.Center)
.fontWeight(FontWeight.Bold)
.onClick(() = > {
})
.margin({ bottom: 60 })
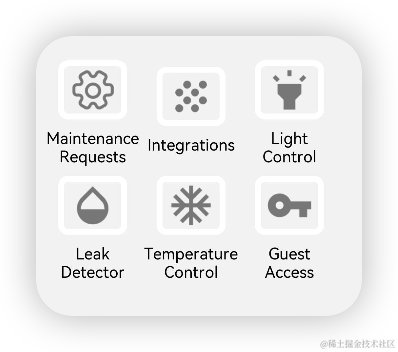
Row() {
SettingDetails({
image: "common/images/setting.png",
title: "MaintenancenRequests",
isSelected: this.isSelect!
})
SettingDetails({ image: "common/images/grain.png", title: "Integrationsn", isSelected: this.isSelect! })
SettingDetails({
image: "common/images/ic_highlight.png",
title: "LightnControl",
isSelected: this.isSelect!
})
}
Row() {
SettingDetails({ image: "common/images/opacity.png", title: "LeaknDetector", isSelected: this.isSelect! })
SettingDetails({
image: "common/images/ac_unit.png",
title: "TemperaturenControl",
isSelected: this.isSelect!
})
SettingDetails({ image: "common/images/key.png", title: "GuestnAccess", isSelected: this.isSelect! })
}
Button("NEXT")
.fontSize(60)
.fontColor(Color.Black)
.width(600)
.height(100)
.backgroundColor(Color.Red)
.margin({ top: 100 })
.onClick(() = > {
router.push({ url: 'pages/SensorScreen' })
})
}
.width('100%')
.height('100%').backgroundColor("#F5F5F5")
}
}
具體布局
具體布局設計到一些細節的地方,例如間隔,邊框,當前組件尺寸設置等一些特殊情況,基本上就是嵌套,一層一層去實現。
代碼結構
編碼
Index.ets
import { SettingDetails } from './common/SettingDetails';
import router from '@ohos.router';
@Entry
@Component
struct Index {
  @State title: string = '智能家居體驗'
  @State message: string = '你現在想要打開那些設置?'
  @State desc: string = '點擊所有適用的選項。這將幫助我們n自定義您的主頁'
  @State Number: String[] = ['0', '1', '2', '3', '4']
  @State private isSelect: boolean = true;
  build() {

      Column() {
        Text(this.title)
          .fontSize(80)
          .fontWeight(FontWeight.Bold).onClick(() = > {
          router.push({ url: 'pages/SensorScreen' })
        }).margin({ bottom: 60, top: 40 })
        Text(this.message)
          .fontSize(50)
          .fontWeight(FontWeight.Bold).onClick(() = > {
          router.push({ url: 'pages/SensorScreen' })
        }).margin({ bottom: 60 })
        Text(this.desc)
          .fontSize(30)
          .textAlign(TextAlign.Center)
          .fontWeight(FontWeight.Bold)
          .onClick(() = > {
          })
          .margin({ bottom: 60 })
        Row() {
          SettingDetails({
            image: "common/images/setting.png",
            title: "MaintenancenRequests",
            isSelected: this.isSelect!
          })
          SettingDetails({ image: "common/images/grain.png", title: "Integrationsn", isSelected: this.isSelect! })

          SettingDetails({
            image: "common/images/ic_highlight.png",
            title: "LightnControl",
            isSelected: this.isSelect!
          })
        }
        Row() {
          SettingDetails({ image: "common/images/opacity.png", title: "LeaknDetector", isSelected: this.isSelect! })
          SettingDetails({
            image: "common/images/ac_unit.png",
            title: "TemperaturenControl",
            isSelected: this.isSelect!
          })
          SettingDetails({ image: "common/images/key.png", title: "GuestnAccess", isSelected: this.isSelect! })
        }
        Button("NEXT")
          .fontSize(60)
          .fontColor(Color.Black)
          .width(600)
          .height(100)
          .backgroundColor(Color.Red)
          .margin({ top: 100 })
          .onClick(() = > {
            router.push({ url: 'pages/SensorScreen' })
          })
      }
      .width('100%')
    .height('100%').backgroundColor("#F5F5F5")
  }
}
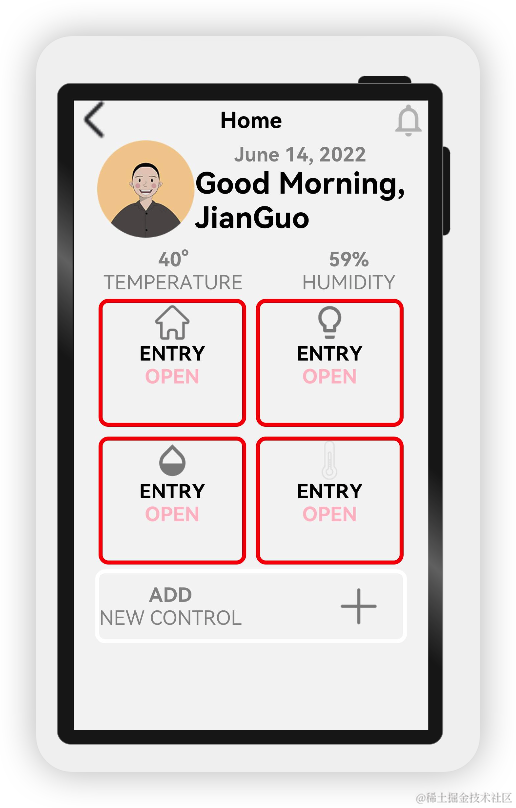
針對這一頁:首先是頭部
代碼如下:
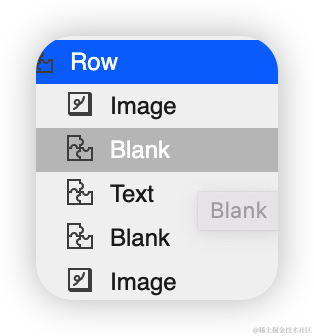
Row() {

        Image($r("app.media.back"))
          .objectFit(ImageFit.Contain)
          .width(80)
          .height(80)
          .onClick(() = > {
            router.back()
          })
        Blank()
        Text('Home')
          .fontSize(45)
          .fontWeight(FontWeight.Bold)
        Blank()
        Image($r("app.media.notifications_none"))
          .objectFit(ImageFit.Contain)
          .width(80)
          .height(80)
          .onClick(() = > {
            router.back()
          })
      }
      .width('100%')
其次是個人信息,包括頭像等信息:
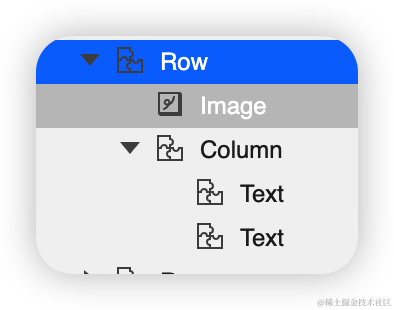
代碼如下:
Row() {

        Image($r("app.media.logo"))//頭像
          .objectFit(ImageFit.Contain)
          .width(200)
          .height(200)
          .borderRadius(21)
        Column() {
          Text('June 14, 2022')
            .fontSize(40).opacity(0.4)
            .fontWeight(FontWeight.Bold)
          Text('Good Morning,nJianGuo',)
            .fontSize(60)
            .fontWeight(FontWeight.Bold)
        }
      }
接下來就是溫度和濕度

代碼如下:
ow({ space: 120 }) {
        Column() {
          Text('40°',)
            .fontSize(40).opacity(0.4)
            .fontWeight(FontWeight.Bold)
          Text('TEMPERATURE',)
            .fontSize(40).opacity(0.4)
        }.margin({ left: 60 })

        Column() {
          Text('59%',)
            .fontSize(40).opacity(0.4)
            .fontWeight(FontWeight.Bold)
          Text('HUMIDITY',)
            .fontSize(40).opacity(0.4)
        }.margin({ right: 60 })
      }.margin({ top: 20 })
SensorScreen.ets
import { HomeDetails } from './common/homedetails';
// second.ets
import router from '@ohos.router';

@Entry
@Component
struct Second {
  @State message: string = 'Hi there'
  @State private isSelect: boolean = true;
  build() {
    Column() {
      Row() {
        Image($r("app.media.back"))
          .objectFit(ImageFit.Contain)
          .width(80)
          .height(80)
          .onClick(() = > {
            router.back()
          })
        Blank()
        Text('Home')
          .fontSize(45)
          .fontWeight(FontWeight.Bold)
        Blank()
        Image($r("app.media.notifications_none"))
          .objectFit(ImageFit.Contain)
          .width(80)
          .height(80)
          .onClick(() = > {
            router.back()
          })
      }
      .width('100%')
      Row() {

        Image($r("app.media.logo"))
          .objectFit(ImageFit.Contain)
          .width(200)
          .height(200)
          .borderRadius(21)
        Column() {
          Text('June 14, 2022')
            .fontSize(40).opacity(0.4)
            .fontWeight(FontWeight.Bold)
          Text('Good Morning,nJianGuo',)
            .fontSize(60)
            .fontWeight(FontWeight.Bold)
        }
      }

      Row({ space: 120 }) {
        Column() {
          Text('40°',)
            .fontSize(40).opacity(0.4)
            .fontWeight(FontWeight.Bold)
          Text('TEMPERATURE',)
            .fontSize(40).opacity(0.4)
        }.margin({ left: 60 })

        Column() {
          Text('59%',)
            .fontSize(40).opacity(0.4)
            .fontWeight(FontWeight.Bold)
          Text('HUMIDITY',)
            .fontSize(40).opacity(0.4)
        }.margin({ right: 60 })
      }.margin({ top: 20 })
      Row() {
        HomeDetails({})
        HomeDetails({ image: "common/images/lightbull.png", isSelected: this.isSelect! })
      }
      Row() {
        HomeDetails({ image: "common/images/opacity.png" })
        HomeDetails({ image: "common/images/yytem0.png" })
      }

      Row(){
       Column(){
         Text('ADD',)
           .fontSize(40).opacity(0.4)
           .fontWeight(FontWeight.Bold)
         Text('NEW CONTROL',)
           .fontSize(40).opacity(0.4)
       }
       Blank()
       Image($r("app.media.add"))
         .objectFit(ImageFit.Contain)
         .width(100)
         .height(100)
         .borderRadius(21).margin({right:40})
      }.border({
        color:Color.White,
        width:8,
        radius:20
      }).width("88%").height(150)
    }.width("100%")
    .height('100%').backgroundColor("#F5F5F5")
  }
}
我們可以對下面的這塊進行封裝
代碼如下
@Entry
@Component
export struct SettingDetails {
  @State  private image: string = "common/images/setting.png"
  @State  private title: string = "MaintenancenRequests"
  @State private isSelected: boolean = true;
  build() {
  Column() {
    Image(this.image)
      .objectFit(ImageFit.Contain)
      .width(140)
      .height(120)
      .margin(20)
      .border({
        width: 12, color: this.isSelected ? Color.White : Color.Red,
        radius: 20
      })
      .onClick(() = > {
        this.isSelected = !this.isSelected;
      })
    Text(this.title).fontSize(32).width(200).textAlign(TextAlign.Center)
  }
}}
我們可以對,下面的這塊進行封裝

代碼如下
@Entry
@Component
export struct SettingDetails {
  @State  private image: string = "common/images/setting.png"
  @State  private title: string = "MaintenancenRequests"
  @State private isSelected: boolean = true;
  build() {
  Column() {
    Image(this.image)
      .objectFit(ImageFit.Contain)
      .width(140)
      .height(120)
      .margin(20)
      .border({
        width: 12, color: this.isSelected ? Color.White : Color.Red,
        radius: 20
      })
      .onClick(() = > {
        this.isSelected = !this.isSelected;
      })
    Text(this.title).fontSize(32).width(200).textAlign(TextAlign.Center)
  }
}}
最后就是底部
代碼如下:
Row(){
       Column(){
         Text('ADD',)
           .fontSize(40).opacity(0.4)
           .fontWeight(FontWeight.Bold)
         Text('NEW CONTROL',)
           .fontSize(40).opacity(0.4)
       }
       Blank()
       Image($r("app.media.add"))
         .objectFit(ImageFit.Contain)
         .width(100)
         .height(100)
         .borderRadius(21).margin({right:40})
      }.border({
        color:Color.White,
        width:8,
        radius:20
      }).width("88%").height(150)
審核編輯 黃宇
聲明:本文內容及配圖由入駐作者撰寫或者入駐合作網站授權轉載。文章觀點僅代表作者本人,不代表電子發燒友網立場。文章及其配圖僅供工程師學習之用,如有內容侵權或者其他違規問題,請聯系本站處理。
舉報投訴
-
智能家居
+關注
關注
1933文章
9749瀏覽量
189604 -
鴻蒙
+關注
關注
59文章
2508瀏覽量
43767 -
OpenHarmony
+關注
關注
26文章
3824瀏覽量
18134
發布評論請先 登錄
相關推薦
熱點推薦
OpenHarmony應用場景 鴻蒙智能家居【1.0】
的效果。 智能家居中控 是不是很炫酷呢? ? 搭建OpenHarmony環境 完成本篇Codelab我們首先要完成開發環境的搭建,本示例以 DaYu200 開發板為例,參照以下步驟進行
【orangepi zero申請】智能家居中繼器
項目名稱:智能家居中繼器試用計劃:1,作為智能家居的中繼器,向下鏈接各種傳感器板,向上連接服務器,以便實現數據的管理與中轉2,之前實用樹莓派完成了,由于成本原因,考慮換一個性價比更高的替代板
發表于 12-27 11:16
【NXP LPC54110試用申請】智能家居中控系統
。項目計劃1、閱讀文檔,對此款開發板有一個大概認識;2、學習例子程序,熟悉開發過程3、結合開發板,學習語音處理模塊4、完成外圍傳感器的控制4、完成智能家居控制,如風扇轉速,臺燈明亮調節
發表于 07-31 18:12
【HarmonyOS HiSpark AI Camera】智能家居中控系統
項目名稱:智能家居中控系統試用計劃:申請理由本人在物聯網和智能家居領域有十年多的學習和開發經驗,曾設參與多個物聯網和智能家居項目的開發,對物
發表于 11-18 18:12
ISM頻段在物聯網智能家居中的應用是什么
物聯網智能家居的發展物聯網隨著互聯網的發展,可以通過互聯網實現物和物的互聯,就有了物聯網的概念。傳統家居電器 有了物聯網之后,在家居電器范圍中,就是通過物聯網技術將家中的各種設備連接到一起,家
發表于 07-26 07:43
智能家居中的無線技術解析
在物聯網蓬勃發展的浪潮下,智能家居的熱度也隨之不斷升溫。由于智能家居的安全、節能、舒適、便利、高效等諸多特點,越來越多的客戶開始接受和開發智能家居單品和系統。在中國推廣Zigbee技術
發表于 08-21 10:30
?2248次閱讀
中軟國際智能家居中控屏通過OpenHarmony兼容性測評
近日,中軟國際有限公司 (以下簡稱“中軟國際”) 推出的智能家居中控屏順利通過OpenAtom OpenHarmony (以下簡稱“OpenHarmony”) 3.1 Release版本兼容性測評

工業交換機在智能家居中的關鍵應用
隨著科技的不斷進步和智能家居概念的不斷普及,人們對于家居生活的要求也越來越高。而工業交換機作為一個重要的網絡設備,可以在智能家居中發揮關鍵作用。本文將詳細介紹工業交換機在智能家居中的應
OpenHarmony南向開發案例:【智能中控屏】
基于Hi3516開發板,使用開源OpenHarmony開發的應用。通過控制面板可以控制同一局域網內的空調,窗簾,燈等智能家居設備。


 工商網監
工商網監
評論