") Spring Boot 3.1 中如何整合Spring Security和Keycloak
Spring Boot 3.1 中如何整合Spring Security和Keycloak

在今年2月14日的時候,Keycloak 團隊宣布他們正在棄用大多數(shù) Keycloak 適配器。其中包括Spring Security和Spring Boot的適配器,這意味著今后Keycloak團隊將不再提供針對Spring Security和Spring Boot的集成方案。

但是,如此強大的Keycloak,還要用怎么辦呢?本文就來聊聊,在最新的Spring Boot 3.1版本之下,如何將Keycloak和Spring Security一起跑起來。
準(zhǔn)備工作
這里所采用的框架與工具版本信息如下:
- Spring Boot 3.1.0
- Keycloak 21.1.1
如果您采用的是其他版本,本文內(nèi)容不一定有效,但可以作為參考。
基于 Spring Boot + MyBatis Plus + Vue & Element 實現(xiàn)的后臺管理系統(tǒng) + 用戶小程序,支持 RBAC 動態(tài)權(quán)限、多租戶、數(shù)據(jù)權(quán)限、工作流、三方登錄、支付、短信、商城等功能
- 項目地址:https://github.com/YunaiV/ruoyi-vue-pro
- 視頻教程:https://doc.iocoder.cn/video/
配置Keycloak
第一步:為Spring Boot應(yīng)用創(chuàng)建Realm,并在下面創(chuàng)建一個Client
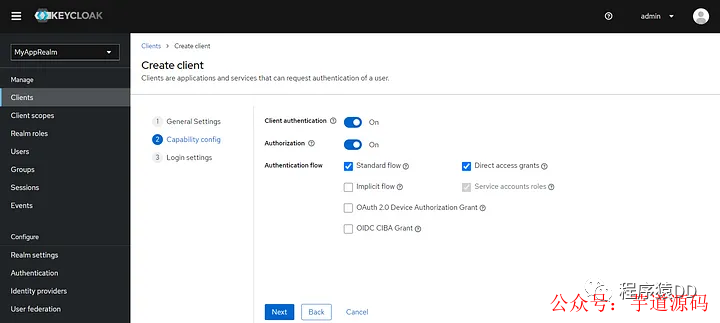
第二步:創(chuàng)建一個SYS_ADMIN角色,并創(chuàng)建一個用戶賦予SYS_ADMIN角色
第三步:調(diào)用Keycloak接口生成Access Token,可以用下面的curl命令或者其他任何發(fā)請求的工具,比如:Postman等。
curl--location'http://localhost:9090/realms/MyAppRealm/protocol/openid-connect/token'
--header'Content-Type:application/x-www-form-urlencoded'
--data-urlencode'username='
--data-urlencode'password='
--data-urlencode'grant_type=password'
--data-urlencode'client_id=My-Awesome-App'
--data-urlencode'client_secret='
--data-urlencode'scope=openid'
記住獲得到Access Token,后續(xù)驗證時候要用。
基于 Spring Cloud Alibaba + Gateway + Nacos + RocketMQ + Vue & Element 實現(xiàn)的后臺管理系統(tǒng) + 用戶小程序,支持 RBAC 動態(tài)權(quán)限、多租戶、數(shù)據(jù)權(quán)限、工作流、三方登錄、支付、短信、商城等功能
配置Spring Boot應(yīng)用
第一步:創(chuàng)建一個Spring Boot應(yīng)用,這個很簡單,這里不贅述了。
第二步:在pom.xml中添加依賴:
<dependency>
<groupId>org.springframework.securitygroupId>
<artifactId>spring-security-oauth2-joseartifactId>
dependency>
第三步:修改配置文件
spring:
security:
oauth2:
resourceserver:
jwt:
issuer-uri:http://localhost:9090/realms/MyAppRealm
jwk-set-uri:http://localhost:9090/realms/MyAppRealm/protocol/openid-connect/certs
第四步:創(chuàng)建一個需要鑒權(quán)的測試接口
@RequestMapping("/test")
@RestController
publicclassMySuperSecuredController{

@GetMapping("/hello")
publicStringhello(){
return"hello";
}

}
第五步:創(chuàng)建SecurityFilterChain,用來告知Spring Security在JWT令牌中查找角色信息的位置。
@Configuration
@EnableWebSecurity
publicclassWebSecurityConfig{


@Bean
publicSecurityFilterChainsecurityFilterChain(HttpSecurityhttpSecurity)throwsException{
httpSecurity
.authorizeHttpRequests(registry->registry
.requestMatchers("/test/**").hasRole("SYS_ADMIN")
.anyRequest().authenticated()
)
.oauth2ResourceServer(oauth2Configurer->oauth2Configurer.jwt(jwtConfigurer->jwtConfigurer.jwtAuthenticationConverter(jwt->{
Map>realmAccess=jwt.getClaim("realm_access");
Collectionroles=realmAccess.get("roles");
vargrantedAuthorities=roles.stream()
.map(role->newSimpleGrantedAuthority("ROLE_"+role))
.toList();
returnnewJwtAuthenticationToken(jwt,grantedAuthorities);
})))
;

returnhttpSecurity.build();
}
}
驗證一下
在完成了上面配置所有之后之后,啟動Spring Boot應(yīng)用,同時保證Keycloak也在運行中。
嘗試請求/test/hello接口:
-
當(dāng)不包含
Authorization頭信息的時候,將返回401錯誤 -
當(dāng)包含
Authorization頭信息(前文用調(diào)接口獲取的Access Token)的時候,才能正確訪問到。
小結(jié)
雖然Keycloak 團隊宣布了不再對Spring Security提供適配,但Spring Security長期以來一直為OAuth和OIDC提供強大的內(nèi)置支持。所以,只要我們理解Spring Security是如何處理OAuth和OIDC的,那么與Keyloak的集成依然不復(fù)雜。
-
適配器
+關(guān)注
關(guān)注
9文章
2032瀏覽量
69321 -
框架
+關(guān)注
關(guān)注
0文章
404瀏覽量
17796 -
spring
+關(guān)注
關(guān)注
0文章
340瀏覽量
14887
原文標(biāo)題:Spring Boot 3.1 中如何整合Spring Security和Keycloak
文章出處:【微信號:芋道源碼,微信公眾號:芋道源碼】歡迎添加關(guān)注!文章轉(zhuǎn)載請注明出處。
發(fā)布評論請先 登錄
Mybatis整合spring的思路和步驟
啟動Spring Boot項目應(yīng)用的三種方法
Spring Boot嵌入式Web容器原理是什么
Spring Boot從零入門1 詳述
「Spring認(rèn)證」什么是Spring GraphQL?
Spring Boot特有的實踐
強大的Spring Boot 3.0要來了
Spring Boot中整合兩種定時任務(wù)的方法
在Spring Boot中如何使用定時任務(wù)
Spring Boot Actuator快速入門
Spring Boot啟動 Eureka流程
Spring Boot的啟動原理
Spring Boot 的設(shè)計目標(biāo)


 工商網(wǎng)監(jiān)
評論