") OLED顯示器如何與Raspberry Pi一起使用?
OLED顯示器如何與Raspberry Pi一起使用?

我們大多數(shù)人都熟悉16×2點(diǎn)陣LCD顯示器,在大多數(shù)項(xiàng)目中用于向用戶顯示一些信息。但是這些LCD顯示器有很多局限性。在本教程中,我們將了解OLED顯示器以及如何將它們與Raspberry Pi一起使用。市場上有很多類型的OLED顯示器,有很多方法可以讓它們工作。我們已經(jīng)將 7 針 OLED 與 Arduino 一起使用。
所需硬件:
128×64 OLED 顯示模組 (SSD1306)
面包板
連接線
了解OLED顯示器:
術(shù)語OLED代表“有機(jī)發(fā)光二極管”,它使用與我們大多數(shù)電視中使用的相同技術(shù),但與它們相比像素更少。將這些看起來很酷的顯示模塊與Raspberry Pi連接真的很有趣,因?yàn)樗鼤屛覀兊捻?xiàng)目看起來很酷。我們在這里介紹了有關(guān)OLED顯示器及其類型的完整文章。在這里,我們使用單色 4 針 SSD1306 0.96 英寸 OLED 顯示屏。此液晶屏只能與 I2C 模式配合使用。
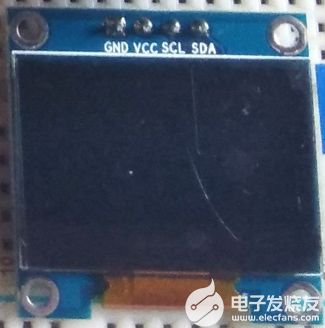

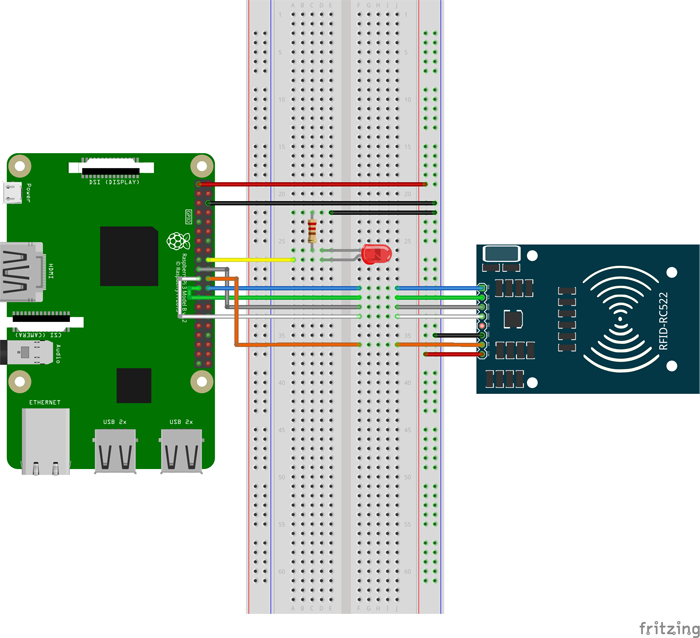
以下是OLED與樹莓派的連接:
| 有機(jī)硅引腳 | RPI 引腳 |
| 可變資本公司 | 3.3V |
| 接地 | 接地 |
| 自主權(quán)評估 | SDA(物理引腳 3) |
| 標(biāo)準(zhǔn)及校正實(shí)驗(yàn)所 | SCL(物理引腳 5) |
電路圖:
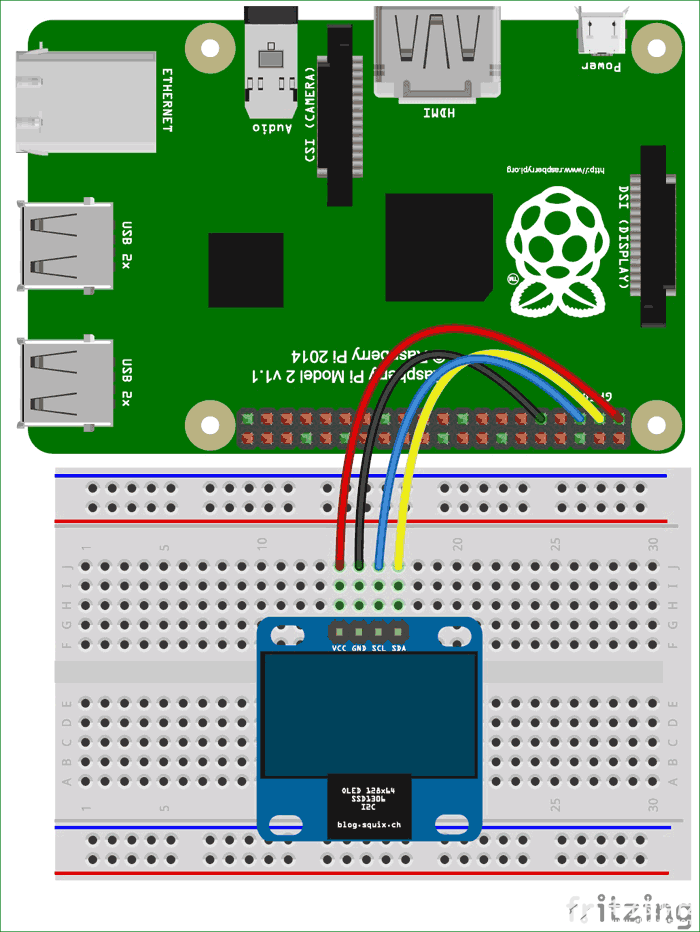
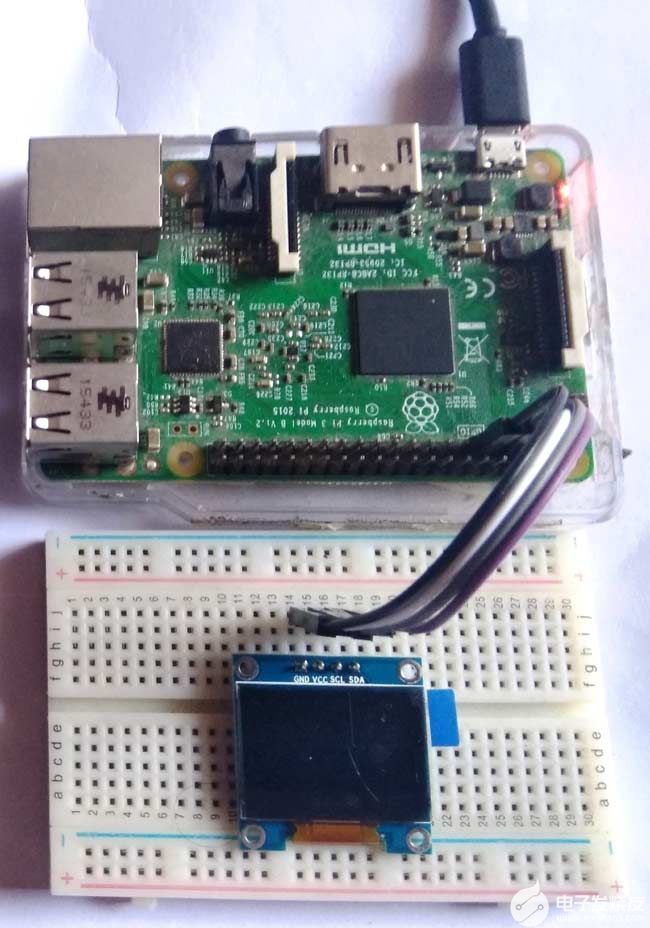
將OLED與樹莓派連接:
RPI社區(qū)已經(jīng)為我們提供了很多庫,可以直接用于使這變得更加簡單。我嘗試了一些庫,發(fā)現(xiàn)Adafruit_SSD1306 OLED庫非常易于使用,并且有一些圖形選項(xiàng),因此我們將在本教程中使用相同的選項(xiàng)。
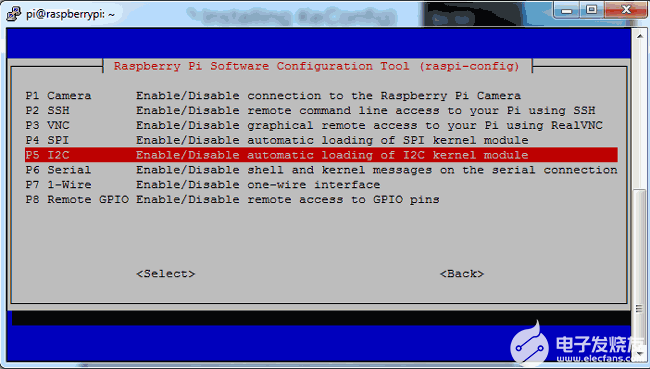
步驟 1:啟用 I2C 通信
在安裝 Adafruit SSD1306 庫之前,我們需要在樹莓派中啟用 I2C 通信。
要在樹莓派控制臺中執(zhí)行此操作:
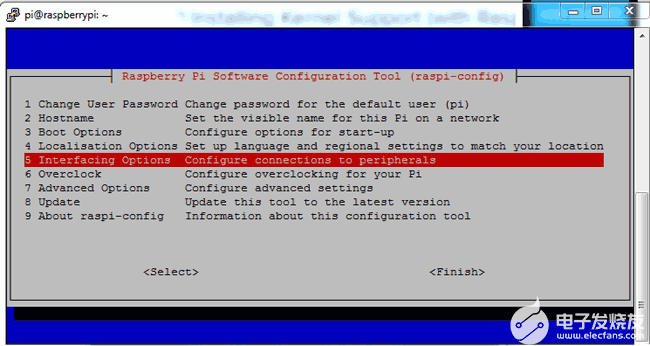
sudo raspi-config
然后會出現(xiàn)藍(lán)屏。現(xiàn)在選擇接口選項(xiàng)
在此之后,我們需要選擇I2C
在此之后,我們需要選擇是并按回車鍵,然后確定
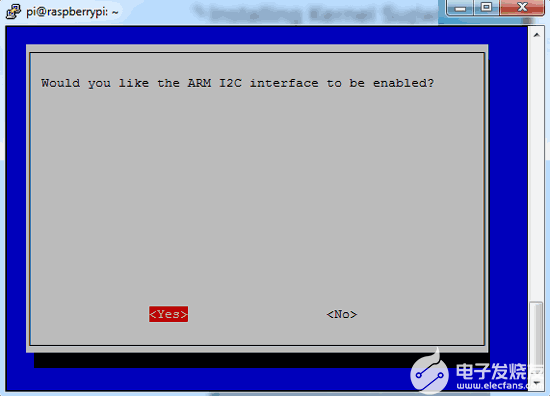
在此之后,我們需要通過發(fā)出以下命令重新啟動樹莓派:
sodo reboot
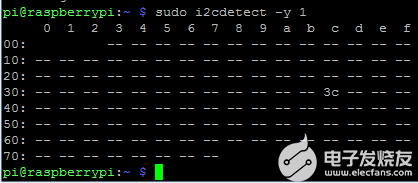
第 2 步:查找 OLED I2C 地址并更新它
然后我們需要使用給定的命令找到OLED I2C地址,您將看到一個十六進(jìn)制地址。
sudo i2cdetect –y 1
然后使用給定的命令更新樹莓派:
sudo apt-get update
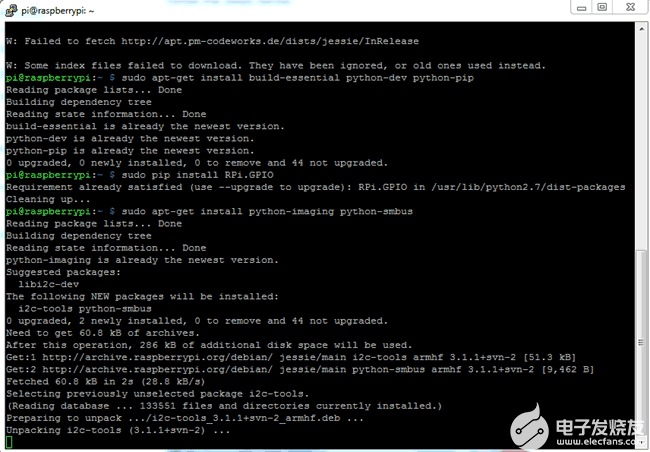
第 3 步:安裝 python-pip 和 GPIO 庫
在此之后,我們需要使用給定的命令安裝pip:
sudo apt-get install build-essential python-dev python-pip
并安裝樹莓派 GPIO 庫
sudo pip installs RPi.GPIO
步驟 4:安裝Python 映像庫和smbus庫
最后,我們需要使用給定的命令在 Raspberry Pi 中安裝 Python 映像庫和 smbus 庫:
sudo apt-get install python-imaging python-smbus
第 5 步:安裝 Adafruit SSD1306 python 庫
現(xiàn)在是時候使用給定的命令安裝 Adafruit SSD1306 python 庫代碼和示例了:
sudo apt-get install git
git clone
https://github.com/adafruit/Adafruit_Python_SSD1306.git
cd Adafruit_Python_SSD1306 sudo python setup.py install
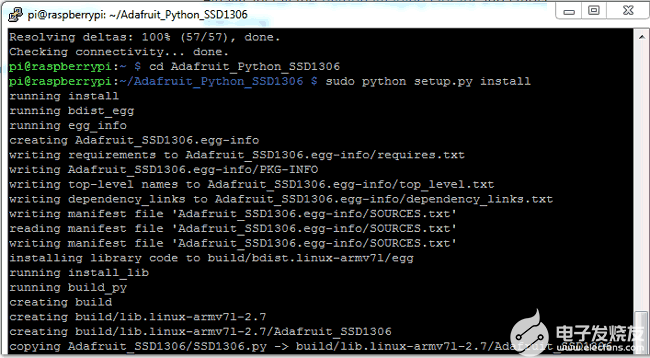
現(xiàn)在用戶可以在樹莓派中找到OLED接口的代碼,您可以直接播放或自己自定義。在這里,我們自定義了一個示例代碼進(jìn)行演示。您可以在文章末尾找到完整的 Python 代碼。
編程說明:
用于將OLED與RPi項(xiàng)目接口的編程部分很容易。首先,我們需要導(dǎo)入一些必要的庫。
import time
import Adafruit_GPIO.SPI as SPI
import Adafruit_SSD1306
from PIL import Image
from PIL import ImageDraw
from PIL import ImageFont
import subprocess
在此初始化后初始化顯示
RST = 0
disp = Adafruit_SSD1306.SSD1306_128_64(rst=RST)
disp.begin()
disp.clear()
disp.display()
width = disp.width
height = disp.height
image1 = Image.new('1', (width, height))
draw = ImageDraw.Draw(image1)
draw.rectangle((0,0,width,height), outline=0, fill=0)
padding = -2
top = padding
bottom = height-padding
x = 0
font = ImageFont.load_default()
在此之后,我們可以使用給定的代碼將數(shù)據(jù)或圖像發(fā)送到OLED
# Write two lines of text.
disp.clear()
disp.display()
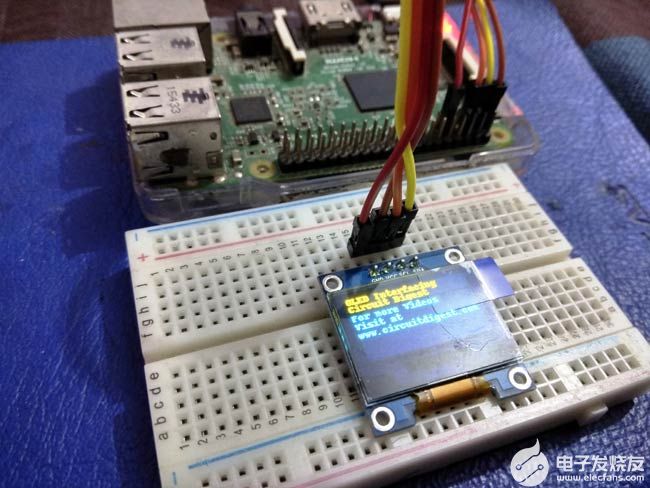
draw.text((x, top), "OLED Interfacing " , font=font, fill=255)
draw.text((x, top+8), "Circuit Digest", font=font, fill=255)
draw.text((x, top+16), "For more Videos", font=font, fill=255)
draw.text((x, top+25), "Visit at", font=font, fill=255)
draw.text((x, top+34), "www.circuitdigest.com", font=font, fill=255)
# Display image.
disp.image(image1)
disp.display()
time.sleep(2)
if disp.height == 64:
image = Image.open('img1.png').convert('1')
else:
image = Image.open('img1.png').convert('1')
disp.image(image)
disp.display()
time.sleep(2)
if disp.height == 64:
image = Image.open('img3.jpg').convert('1')
else:
image = Image.open('img3.jpg').convert('1')
這款OLED有兩種變體,一種是128 * 32,另一種是128 * 64,因此用戶可以在初始化OLED時相應(yīng)地選擇任何人。在這里,我們?yōu)閮烧呔帉懥舜舜a。用戶只需要初始化128 * 64像素的OLED,例如:
disp = Adafruit_SSD1306.SSD1306_128_64(rst=RST)
所有代碼和函數(shù)都易于理解,無需進(jìn)一步解釋。只需開始并嘗試使用高度,寬度和圖像,并嘗試其他一些功能來創(chuàng)建一些更酷的幾何圖形。
import time
import Adafruit_GPIO.SPI as SPI
import Adafruit_SSD1306
from PIL import Image
from PIL import ImageDraw
from PIL import ImageFont
import subprocess
RST = 0
disp = Adafruit_SSD1306.SSD1306_128_64(rst=RST)
disp.begin()
disp.clear()
disp.display()
width = disp.width
height = disp.height
image1 = Image.new('1', (width, height))
draw = ImageDraw.Draw(image1)
draw.rectangle((0,0,width,height), outline=0, fill=0)
padding = -2
top = padding
bottom = height-padding
x = 0
font = ImageFont.load_default()
while True:
draw.rectangle((0,0,width,height), outline=0, fill=0)
# Write two lines of text.
disp.clear()
disp.display()
draw.text((x, top), "OLED Interfacing " , font=font, fill=255)
draw.text((x, top+8), "Circuit Digest", font=font, fill=255)
draw.text((x, top+16), "For more Videos", font=font, fill=255)
draw.text((x, top+25), "Visit at", font=font, fill=255)
draw.text((x, top+34), font=font, fill=255)
# Display image.
disp.image(image1)
disp.display()
time.sleep(2)
if disp.height == 64:
image = Image.open('img1.png').convert('1')
else:
image = Image.open('img1.png').convert('1')
disp.image(image)
disp.display()
time.sleep(2)
if disp.height == 64:
image = Image.open('img3.jpg').convert('1')
else:
image = Image.open('img3.jpg').convert('1')
disp.image(image)
disp.display()
time.sleep(2)
if disp.height == 64:
image = Image.open('img4.jpg').convert('1')
else:
image = Image.open('img4.jpg').convert('1')
disp.image(image)
disp.display()
time.sleep(2)
-
OLED顯示器
+關(guān)注
關(guān)注
0文章
66瀏覽量
13642
發(fā)布評論請先 登錄
如何在Raspbian上設(shè)置沒有顯示器和鍵盤的Raspberry Pi
通過以太網(wǎng)線與VEE一起使用Raspberry Pi不起作用
一個Raspberry Pi擴(kuò)展板
Raspberry Pi 4機(jī)械開關(guān)和OLED屏幕護(hù)罩的資料分享
Raspberry Pi 2機(jī)械開關(guān)和OLED屏幕護(hù)罩的資料分享
oled顯示器
TFT LCD與Raspberry Pi連接的方式

三星顯示器計(jì)劃將透明PI基板應(yīng)用于柔性OLED
如何在Raspberry Pi Pico中使用OLED顯示器

Raspberry Pi 3B機(jī)械開關(guān)和OLED屏幕護(hù)罩
Raspberry Pi 2機(jī)械開關(guān)和OLED屏幕護(hù)罩
Raspberry Pi 3B+機(jī)械開關(guān)和OLED屏幕護(hù)罩
如何將RFID模塊與Raspberry Pi集成在一起
將Arduino庫與Raspberry Pi Pico C/C++ SDK一起使用
為Raspberry Pi添加15美元的顯示器


 工商網(wǎng)監(jiān)
評論