") 超聲波距離傳感器的制作
超聲波距離傳感器的制作
步驟1:所需的電氣組件
這是電氣零件的列表一個人需要完成這個項目-br-Arduino板
-跳線
-RGB led(我使用的是公共陰極,但單個LED也可以工作)
-3電阻。
-面包板
-HC-SRO4。
所有這些都連接起來
步驟2:連接
從Arduino + 5v向面包板提供+ 5v并執(zhí)行相同的操作為地面。
將HC-SR04安裝在試驗板上。請記住,在數(shù)字電子產(chǎn)品類別中,+規(guī)則垂直針腳在板上橫檔連接在一起,而水平針腳在電源橫檔上連接在一起。
將傳感器連接到GND和+ 5v。
連接回波針將HC-SR04的引腳連接到Arduino的引腳5,并通過Trig引腳將其連接到Arduino板的引腳6。
安裝面包板上的LED。將電阻連接到RGB引腳,分別將它們分別連接到Arduino的引腳7,8和9,并將陰極接地。
步驟3:代碼
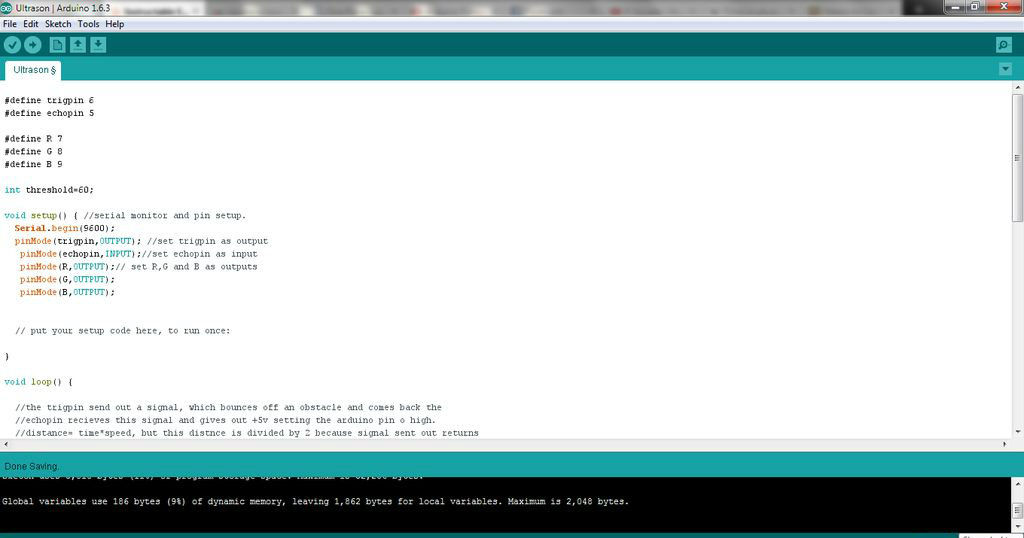
連接后,編寫并上傳以下代碼。
************************* ************************************************** *************
#define trigpin 6
#define echopin 5
#define R 7
#define G 8
#define B 9
void setup()
{ //serial monitor and pin setup.
Serial.begin(9600);
pinMode(trigpin,OUTPUT); //set trigpin as output
pinMode(echopin,INPUT);//set echopin as input
pinMode(R,OUTPUT);// set R,G and B as outputs
pinMode(G,OUTPUT);
pinMode(B,OUTPUT);
// put your setup code here, to run once:
}
void loop()
{
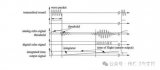
//the trigpin sends out a signal, which bounces off an obstacle and comes back, the
//echopin recieves this signal and gives out +5v setting the arduino pin on which it is connected to high.
//distance= time*speed, but this distnce is divided by 2 because signal sent out returns
//so distance= (the time it takes for the signal to leave and return)/2.
//i.e if the time is 6s the distance = (6s/2) = 3m or cm.
int duration, distance;//declare distance and duration as integers
digitalWrite(trigpin,HIGH);// trigin send out signal
_delay_ms(1000);//coninously for 1000ms
digitalWrite(trigpin, LOW);// then goes low
duration=pulseIn(echopin,HIGH); // duration is the pulseIn to the echopin
distance=(duration/2)/29.1; // the 29.1 is used to convert the distnce to cm, the value varies for other units.
if(distance 》 0 && distance 《= 20){//distcance is greater than 0 and less than 20cm
digitalWrite(G,LOW);//green led is off
digitalWrite(B,LOW);//blue led is off
_delay_ms(500);//delay
digitalWrite(R,HIGH);//red led is on
_delay_ms(500);
}
else if(distance 》 20 && distance 《= 80){//distcance is greater than 20 and less than 80cm
digitalWrite(R,LOW);//red led is off
digitalWrite(G,LOW);//green led is off
_delay_ms(500);
digitalWrite(B,HIGH);//blue led is on
}
else if(distance 》 80 && distance 《= 120 ){//distcance is greater than 80 and less than 120cm
digitalWrite(R,LOW);//red led is off
digitalWrite(B,LOW);//blue led is off
_delay_ms(500);
digitalWrite(G,HIGH);//green led is on
}
Serial.print(“cm”);
Serial.println(distance);//print values on serial monitor
_delay_ms(100);
}
// put your main code here, to run repeatedly:
步驟4:測試
我公寓的地板上有瓷磚,您可以看到距我的櫥柜和冰箱的距離。 LED呈綠色,當(dāng)距離減半時變?yōu)樗{(lán)色,而當(dāng)傳感器確實靠近時變?yōu)榧t色。我希望你喜歡這個。我打算做類似的事情,但我將使用MQ-2煙霧傳感器來更改LED的顏色。
-
超聲波
+關(guān)注
關(guān)注
63文章
3105瀏覽量
139885 -
距離傳感器
+關(guān)注
關(guān)注
3文章
76瀏覽量
15374
發(fā)布評論請先 登錄
TC系列密閉式超聲波傳感器產(chǎn)品說明書
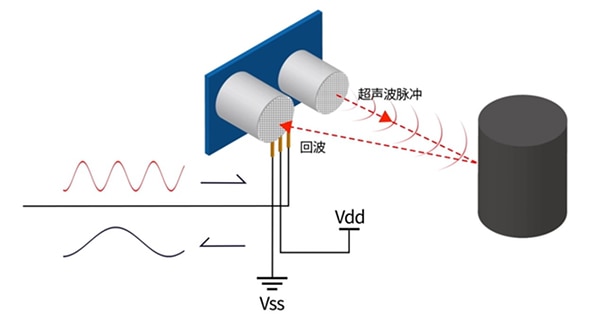
超聲波傳感器的工作原理與應(yīng)用
超聲波傳感器的種類原理與設(shè)計應(yīng)用的注意要點
倍加福發(fā)布USi-industry超聲波傳感器系統(tǒng)
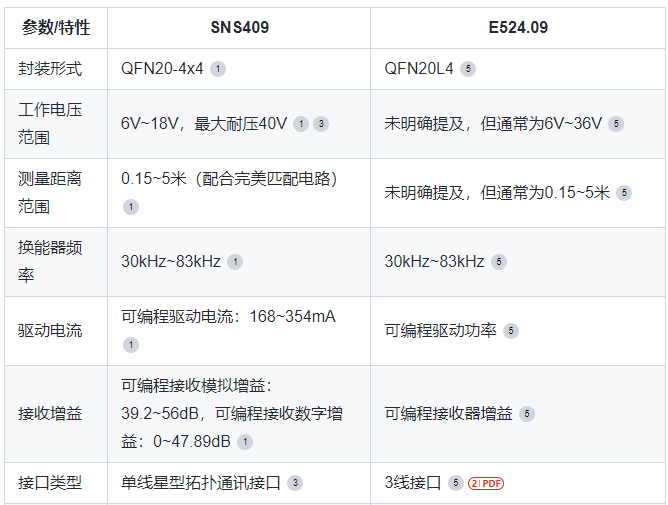
汽車超聲波傳感器 SNS409替代E524.09 (性能對比)
安森美(onsemi)的超聲波傳感器解決方案的未來趨勢和創(chuàng)新
典型的超聲波傳感器及其應(yīng)用領(lǐng)域
超聲波傳感器是模擬還是數(shù)字
超聲波傳感器輸出的是什么信號
電應(yīng)普傳感器?|?窖井水位監(jiān)測超聲波傳感器應(yīng)用方案
超聲波傳感器的工作原理解析
單片機如何使用超聲波傳感器進(jìn)行距離測量
高達(dá)5 m的精確距離測量 超聲波ToF傳感器

解讀工業(yè)機器人避障常用的視覺傳感器、激光傳感器、紅外傳感器、超聲波傳感器


 工商網(wǎng)監(jiān)
評論