") 聲音響應(yīng)Cheap Ir Led Strip的制作
聲音響應(yīng)Cheap Ir Led Strip的制作

耗材:
1。明顯帶有電源
2的LED燈條。 esp8266/節(jié)點(diǎn)mcu
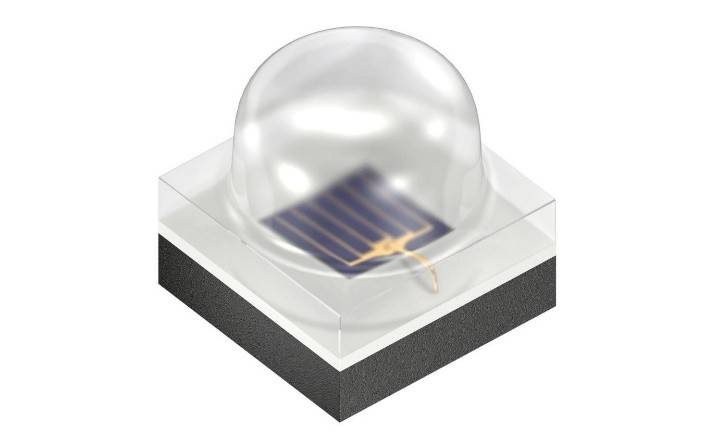
3。 Ir Emitter領(lǐng)導(dǎo)
4。電阻
5。編程電纜
6。 arduino ide
7。烙鐵(一些基本的焊接)
8。 7805 ic(用于使用led電源作為esp電源)
9。步驟1:準(zhǔn)備Esp
首先,將Nodemcu與計(jì)算機(jī)或筆記本電腦連接。
現(xiàn)在安裝nodemcu(使用谷歌搜索)的驅(qū)動(dòng)程序。
打開(kāi)后,Arduino IDE(當(dāng)然,您需要下載并安裝它)單擊Arduino工具欄上的“工具”,然后單擊“木板”選擇“Board Manager”并搜索esp8266安裝(需要一些時(shí)間才能完成)
現(xiàn)在,從中選擇“素描” Arduino工具欄選擇“包含庫(kù)”,然后選擇“管理庫(kù)”,搜索“ IRremoteESP8266”并安裝
現(xiàn)在,僅通過(guò)“工具”完成配置需要轉(zhuǎn)到“主板”,選擇“NodeMcu 1.0(ESP 12-E)”或其他版本的ESP8266。
步驟2:準(zhǔn)備和測(cè)試IR LED
首先,我們需要安裝
轉(zhuǎn)到此處
標(biāo)識(shí)您的led燈帶,無(wú)論是24鍵還是44鍵(更大的一個(gè))遙控器
以獲取遙控器代碼在這里
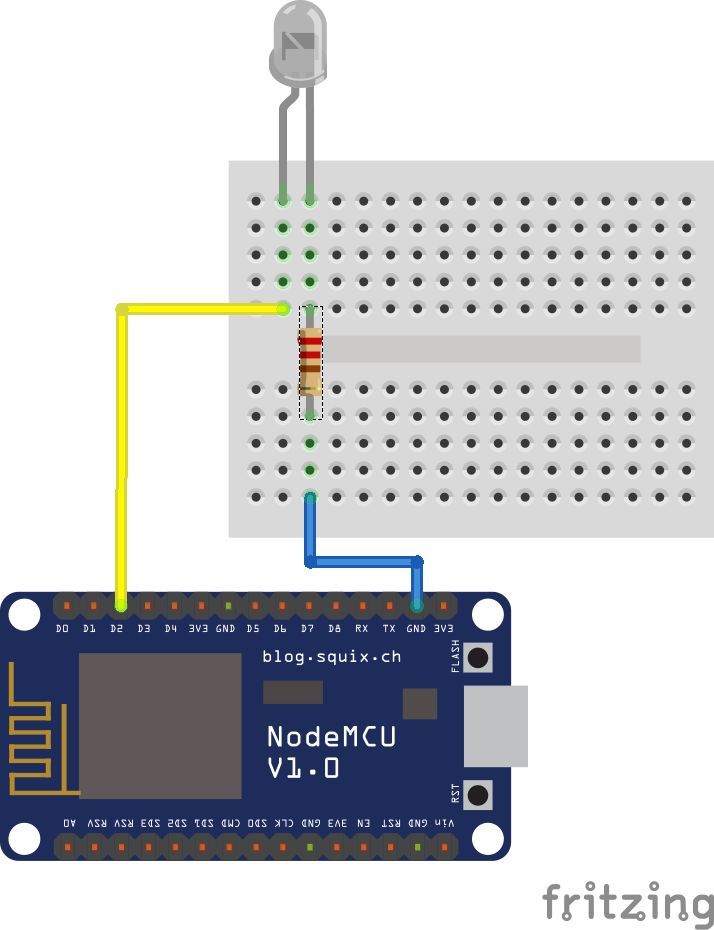
安裝庫(kù)后,我們ed通過(guò)按圖所示連接IR LED來(lái)準(zhǔn)備我們的IR LED。在其上連接IR LED,然后上傳以下草圖并將IR LED指向控制器。 LED燈條應(yīng)閃爍(打開(kāi)和關(guān)閉)。//可同時(shí)使用24和44鍵的遙控器。
HERE是執(zhí)行此操作的代碼。
#define IR_OFF 0xF740BF //Resective ir codes in 32 bits
#define IR_ON 0xF7C0
#includeIRsend irsend(4); // IR pin
void setup() {
irsend.begin();
}
void loop() {
irsend.sendNEC(IR_ON, 32);
delay(5000);
irsend.sendNEC(IR_OFF, 32);
delay(5000);
}
步驟3:接線和準(zhǔn)備麥克風(fēng)
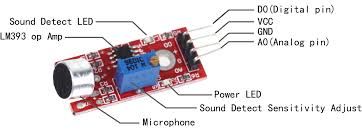
我們將僅使用Espe8266 A0的模擬引腳作為輸入作為模擬信號(hào),并使用它來(lái)觸發(fā)基于聲音的紅外信號(hào)
將Out Pin連接到a0
將5V連接到Vin(AS節(jié)點(diǎn)mcu沒(méi)有5v輸出)
就是這樣,我們將對(duì)準(zhǔn)連接的IR LED D2引腳連接到LED燈條的接收器。
a
步驟4:上傳代碼并準(zhǔn)備就緒
#include
#include
#define microphonePin A0
int sound;
int sound1;
const int irPin = 4; //d2IRsend irsend(irPin);void setup() {
Serial.begin(9600);
pinMode(microphonePin, INPUT);
pinMode(irPin, OUTPUT);}
// ir led Codes
#define IR_BPlus 0xFF3AC5 //
#define IR_BMinus 0xFFBA45 //
#define IR_ON 0xFF827D //
#define IR_OFF 0xFF02FD //
#define IR_R 0xFF1AE5 //
#define IR_G 0xFF9A65 //
#define IR_B 0xFFA25D //
#define IR_W 0xFF22DD //
#define IR_B1 0xFF2AD5 //
#define IR_B2 0xFFAA55 //
#define IR_B3 0xFF926D //
#define IR_B4 0xFF12ED //
#define IR_B5 0xFF0AF5 //
#define IR_B6 0xFF8A75 //
#define IR_B7 0xFFB24D //
#define IR_B8 0xFF32CD //
#define IR_B9 0xFF38C7 //
#define IR_B10 0xFFB847 //
#define IR_B11 0xFF7887 //
#define IR_B12 0xFFF807 //
#define IR_B13 0xFF18E7 //
#define IR_B14 0xFF9867 //
#define IR_B15 0xFF58A7 //
#define IR_B16 0xFFD827 //
#define IR_UPR 0xFF28D7 //
#define IR_UPG 0xFFA857 //
#define IR_UPB 0xFF6897 //
#define IR_QUICK 0xFFE817 //
#define IR_DOWNR 0xFF08F7 //
#define IR_DOWNG 0xFF8877 //
#define IR_DOWNB 0xFF48B7 //
#define IR_SLOW 0xFFC837 //
#define IR_DIY1 0xFF30CF //
#define IR_DIY2 0xFFB04F //
#define IR_DIY3 0xFF708F //
#define IR_AUTO 0xFFF00F //
#define IR_DIY4 0xFF10EF //
#define IR_DIY5 0xFF906F //
#define IR_DIY6 0xFF50AF //
#define IR_FLASH 0xFFD02F //
#define IR_JUMP3 0xFF20DF //
#define IR_JUMP7 0xFFA05F //
#define IR_FADE3 0xFF609F //
#define IR_FADE7 0xFFE01F //
void loop() {
sound = analogRead(microphonePin); // getting input audio signal reading
Serial.print(sound); // input audio signal readings to Serial display
Serial.print(“ ”);
if (sound 》 415)
{
sound1 = map(sound, 415, 750, 140, 255); // mapping higher frequency values which are above offset to the scale of 150 - 255
}
else if (sound 》 340 && sound 《 415) // keeping offset reading to zero scale..here offset value in the range of 340 - 415(offset value at 1.45v) 。.its depends on componets used in circuit.。
{
sound1 = map(sound, 340, 415, 0, 9);
}
else if (sound 《 340)
{
sound1 = map(sound, 0, 340, 10, 139); // keeping below offset readings to scale of 1-139.。
}
if (sound1 》 240)
{
irsend.sendNEC(IR_FLASH, 32);
irsend.sendNEC(IR_QUICK, 32);
irsend.sendNEC(IR_QUICK, 32);
irsend.sendNEC(IR_QUICK, 32);
irsend.sendNEC(IR_QUICK, 32);
irsend.sendNEC(IR_QUICK, 32);
irsend.sendNEC(IR_QUICK, 32);
}
else if ((sound1) 》 200)
{
irsend.sendNEC(IR_G, 32);
irsend.sendNEC(IR_B, 32);
delay(120);}
else if (sound1 》 160)
{
irsend.sendNEC(IR_R, 32);
irsend.sendNEC(IR_B, 32);
delay(120);
}
else if (sound1 》 120)
{
irsend.sendNEC(IR_B, 32);
delay(120);
}
else if (sound1 》 80)
{
irsend.sendNEC(IR_B, 32);
delay(120);
}
else if (sound1 》 40)
{
irsend.sendNEC(IR_G, 32);
delay(120);
}
else if (sound1 》 10)
{
irsend.sendNEC(IR_R, 32);
delay(120);}
else耗材:
1。明顯帶有電源
2的LED燈條。 esp8266/節(jié)點(diǎn)mcu
3。 Ir Emitter領(lǐng)導(dǎo)
4。電阻
5。編程電纜
6。 arduino ide
7。烙鐵(一些基本的焊接)
8。 7805 ic(用于使用led電源作為esp電源)
9。步驟1:準(zhǔn)備Esp
首先,將Nodemcu與計(jì)算機(jī)或筆記本電腦連接。
現(xiàn)在安裝nodemcu(使用谷歌搜索)的驅(qū)動(dòng)程序。
打開(kāi)后,Arduino IDE(當(dāng)然,您需要下載并安裝它)單擊Arduino工具欄上的“ 工具”,然后單擊“ 木板”選擇“ Board Manager ”并搜索esp8266安裝(需要一些時(shí)間才能完成)
現(xiàn)在,從中選擇“ 素描” Arduino工具欄選擇“包含庫(kù)”,然后選擇“管理庫(kù)”,搜索“ IRremoteESP8266”并安裝
現(xiàn)在,僅通過(guò)“ 工具”完成配置需要轉(zhuǎn)到“ 主板”,選擇“ NodeMcu 1.0(ESP 12-E)”或其他版本的 ESP8266 。
步驟2:準(zhǔn)備和測(cè)試IR LED
首先,我們需要安裝
轉(zhuǎn)到此處
標(biāo)識(shí)您的led燈帶,無(wú)論是24鍵還是44鍵(更大的一個(gè))遙控器
以獲取遙控器代碼在這里
安裝庫(kù)后,我們ed通過(guò)按圖所示連接IR LED來(lái)準(zhǔn)備我們的IR LED。在其上連接IR LED,然后上傳以下草圖并將IR LED指向控制器。 LED燈條應(yīng)閃爍(打開(kāi)和關(guān)閉)。//可同時(shí)使用24和44鍵的遙控器。
HERE是執(zhí)行此操作的代碼。
#define IR_OFF 0xF740BF //Resective ir codes in 32 bits
#define IR_ON 0xF7C0
#include
IRsend irsend(4); // IR pin
void setup() {
irsend.begin();
}
void loop() {
irsend.sendNEC(IR_ON, 32);
delay(5000);
irsend.sendNEC(IR_OFF, 32);
delay(5000);
}
步驟3:接線和準(zhǔn)備麥克風(fēng)
我們將僅使用Espe8266 A0的模擬引腳作為輸入作為模擬信號(hào),并使用它來(lái)觸發(fā)基于聲音的紅外信號(hào)
將Out Pin連接到a0
將5V連接到Vin(AS節(jié)點(diǎn)mcu沒(méi)有5v輸出)
就是這樣,我們將對(duì)準(zhǔn)連接的IR LED D2引腳連接到LED燈條的接收器。
a
步驟4:上傳代碼并準(zhǔn)備就緒
#include
#include
#define microphonePin A0
int sound;
int sound1;
const int irPin = 4; //d2IRsend irsend(irPin);void setup() {
Serial.begin(9600);
pinMode(microphonePin, INPUT);
pinMode(irPin, OUTPUT);}
// ir led Codes
#define IR_BPlus 0xFF3AC5 //
#define IR_BMinus 0xFFBA45 //
#define IR_ON 0xFF827D //
#define IR_OFF 0xFF02FD //
#define IR_R 0xFF1AE5 //
#define IR_G 0xFF9A65 //
#define IR_B 0xFFA25D //
#define IR_W 0xFF22DD //
#define IR_B1 0xFF2AD5 //
#define IR_B2 0xFFAA55 //
#define IR_B3 0xFF926D //
#define IR_B4 0xFF12ED //
#define IR_B5 0xFF0AF5 //
#define IR_B6 0xFF8A75 //
#define IR_B7 0xFFB24D //
#define IR_B8 0xFF32CD //
#define IR_B9 0xFF38C7 //
#define IR_B10 0xFFB847 //
#define IR_B11 0xFF7887 //
#define IR_B12 0xFFF807 //
#define IR_B13 0xFF18E7 //
#define IR_B14 0xFF9867 //
#define IR_B15 0xFF58A7 //
#define IR_B16 0xFFD827 //
#define IR_UPR 0xFF28D7 //
#define IR_UPG 0xFFA857 //
#define IR_UPB 0xFF6897 //
#define IR_QUICK 0xFFE817 //
#define IR_DOWNR 0xFF08F7 //
#define IR_DOWNG 0xFF8877 //
#define IR_DOWNB 0xFF48B7 //
#define IR_SLOW 0xFFC837 //
#define IR_DIY1 0xFF30CF //
#define IR_DIY2 0xFFB04F //
#define IR_DIY3 0xFF708F //
#define IR_AUTO 0xFFF00F //
#define IR_DIY4 0xFF10EF //
#define IR_DIY5 0xFF906F //
#define IR_DIY6 0xFF50AF //
#define IR_FLASH 0xFFD02F //
#define IR_JUMP3 0xFF20DF //
#define IR_JUMP7 0xFFA05F //
#define IR_FADE3 0xFF609F //
#define IR_FADE7 0xFFE01F //
void loop() {
sound = analogRead(microphonePin); // getting input audio signal reading
Serial.print(sound); // input audio signal readings to Serial display
Serial.print(“ ”);
if (sound 》 415)
{
sound1 = map(sound, 415, 750, 140, 255); // mapping higher frequency values which are above offset to the scale of 150 - 255
}
else if (sound 》 340 && sound 《 415) // keeping offset reading to zero scale..here offset value in the range of 340 - 415(offset value at 1.45v) 。.its depends on componets used in circuit.。
{
sound1 = map(sound, 340, 415, 0, 9);
}
else if (sound 《 340)
{
sound1 = map(sound, 0, 340, 10, 139); // keeping below offset readings to scale of 1-139.。
}
if (sound1 》 240)
{
irsend.sendNEC(IR_FLASH, 32);
irsend.sendNEC(IR_QUICK, 32);
irsend.sendNEC(IR_QUICK, 32);
irsend.sendNEC(IR_QUICK, 32);
irsend.sendNEC(IR_QUICK, 32);
irsend.sendNEC(IR_QUICK, 32);
irsend.sendNEC(IR_QUICK, 32);
}
else if ((sound1) 》 200)
{
irsend.sendNEC(IR_G, 32);
irsend.sendNEC(IR_B, 32);
delay(120);}
else if (sound1 》 160)
{
irsend.sendNEC(IR_R, 32);
irsend.sendNEC(IR_B, 32);
delay(120);
}
else if (sound1 》 120)
{
irsend.sendNEC(IR_B, 32);
delay(120);
}
else if (sound1 》 80)
{
irsend.sendNEC(IR_B, 32);
delay(120);
}
else if (sound1 》 40)
{
irsend.sendNEC(IR_G, 32);
delay(120);
}
else if (sound1 》 10)
{
irsend.sendNEC(IR_R, 32);
delay(120);}
else
{
irsend.sendNEC(IR_FADE7, 32);
delay(120);
} Serial.println(sound1);
delay(50);
}
{
irsend.sendNEC(IR_FADE7, 32);
delay(120);
} Serial.println(sound1);
delay(50);
}
責(zé)任編輯:wv
-
led
+關(guān)注
關(guān)注
242文章
23857瀏覽量
674767 -
Arduino
+關(guān)注
關(guān)注
190文章
6499瀏覽量
192430
發(fā)布評(píng)論請(qǐng)先 登錄
零知開(kāi)源——玩轉(zhuǎn)WS2812B燈條模塊
一個(gè)藍(lán)牙音響模式DIY過(guò)程遇到的困境
6050 Ultimate Channel Strip介紹

thd在音響系統(tǒng)中的影響
艾邁斯歐司朗發(fā)布紅外LED新品,搭載全新IR:6技術(shù)
艾邁斯歐司朗推出IR:6紅外LED芯片技術(shù)
艾邁斯歐司朗發(fā)布紅外LED新品,搭載全新IR:6技術(shù),助力提升安防與生物識(shí)別應(yīng)用效率

自己制作了aic3254模塊,aic3254中各寄存器的值都能寫進(jìn)去,為什么出不來(lái)聲音?
愛(ài)普生SG2520CAA晶振用于汽車音響控制器應(yīng)用
TAS5731采樣率改為16k的時(shí)候,就沒(méi)有聲音了,為什么?
TLV320DAC3100音頻播放偶爾出一聲比正常聲音響的聲音是怎么回事?
峰值電流模式降壓LED驅(qū)動(dòng)器應(yīng)用的環(huán)路響應(yīng)考慮

無(wú)線時(shí)鐘音響怎么使用
簡(jiǎn)述功放和音響的區(qū)別
音響后殼氣密性檢測(cè)儀的檢測(cè)流程是什么


 工商網(wǎng)監(jiān)
評(píng)論