") 如何給尤克里里琴添加LED燈光效果
如何給尤克里里琴添加LED燈光效果

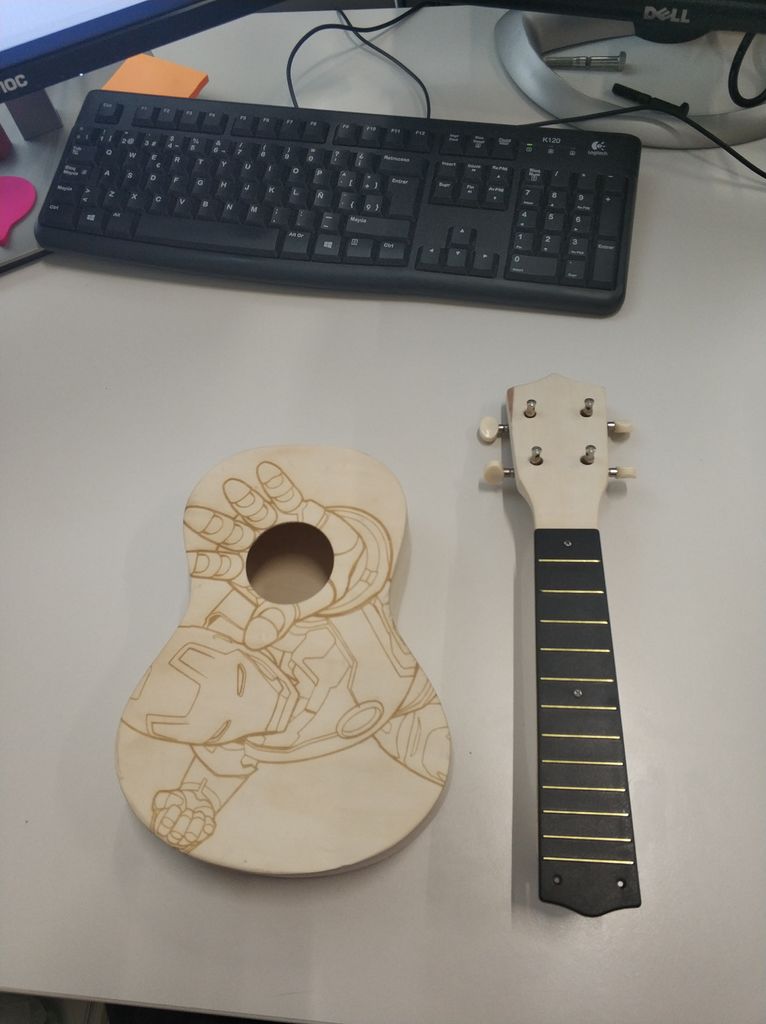
第1步:材料
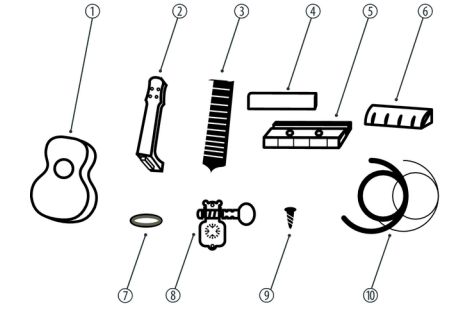

結(jié)構(gòu)材料:
DIY ukelele安裝套件(可能是另一種不同的套件)由以下組成:
1- Body。
2-neck。
3-Saddle
4-Rope Support
5-Bridge
6-String nut 。
7-機(jī)頭固定環(huán)(x4)。
8機(jī)頭(x4)。
9-機(jī)頭安裝螺絲(x8)用于機(jī)橋(x2)的10個(gè)安裝螺釘。
11-用于橋接安裝螺釘(x2)的蓋帽。
12弦( x4)。
電子資料:
NANO Arduino。
Leds輪WS2812。
加速度計(jì)BMA220(可選)。
電池連接器。
9V電池。
轉(zhuǎn)移。
其他
木器清漆。
魔術(shù)貼。
焊錫。
用于上漆的保護(hù)性塑料。
熱熔硅膠。
工具:
激光雕刻。
砂紙
星形螺絲刀。
畫(huà)筆。
熱熔槍。
錫烙鐵。
第2步:自定義尤克里里琴


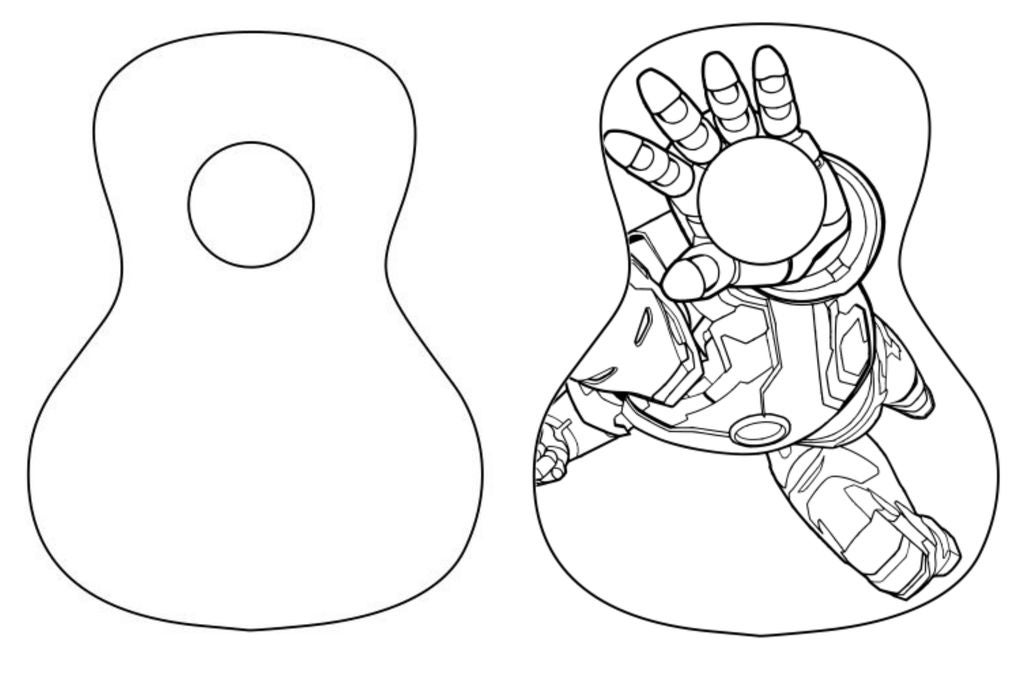


為了使我們的夏威夷四弦琴成型,我們可以在身體上用激光切割機(jī)雕刻圖紙。在沒(méi)有該工具的情況下,我們可以繪制它。
我們選擇的圖片是第一個(gè)出現(xiàn)的圖片。
首先,我們必須設(shè)計(jì)繪圖模板來(lái)進(jìn)行雕刻。
為了實(shí)現(xiàn)這一點(diǎn),我們將使用一個(gè)名為“Inkscape”的軟件,我們可以從這個(gè)鏈接獲得:https://inkscape.org/es/descargas/。
使用它,我們必須調(diào)整我們想要使用的圖片,就像我們?cè)诘诙垐D片中顯示的那樣。您可以看到我們已經(jīng)旋轉(zhuǎn)了初始圖像,可以用儀器的圓圈調(diào)整手的cicle。就像我們之前說(shuō)的那樣,你可以放任何圖像。
第3步:使用Inkscape對(duì)圖像進(jìn)行矢量化


我們將看到如何從像素圖創(chuàng)建矢量文件(jpg,png,Inkscape可以打開(kāi)的任何柵格格式)。
Inkscape Inkscape是一個(gè)開(kāi)源矢量圖形編輯器,正如標(biāo)題所暗示的,這是我將用來(lái)矢量化徽標(biāo)的工具。矢量化步驟這些步驟對(duì)于我們可能想要進(jìn)行的任何矢量化都是常見(jiàn)的。
在Inkscape中打開(kāi)圖像
打開(kāi)跟蹤位圖工具路徑 - 》跟蹤位圖
圍繞跟蹤位圖選項(xiàng)進(jìn)行游戲
運(yùn)行跟蹤
清理結(jié)果(如有必要)
注意“游戲”部分。我不是追蹤專(zhuān)家,所以我把這個(gè)工具當(dāng)作一個(gè)帶旋鈕和燈光的黑盒子,扭曲和改變直到我得到最好的結(jié)果
第4步:徽標(biāo)雕刻


為此,重要的是要有一個(gè)表面的輪廓,其上的雕刻將制作。
為了制作雕刻,我們將使用‘T2Laser’軟件。我們可以從以下網(wǎng)站獲取此軟件:http://descargar.cnet.com/windows/t2-laser/3260-2.。.
一旦我們打開(kāi)軟件,我們必須加載圖像我們?cè)谧詈笠徊絼?chuàng)建了。然后,按“控制激光”按鈕,出現(xiàn)cnc控件。
兩張照片顯示了我們激光切割機(jī)雕刻的過(guò)程和結(jié)果。
步驟5:打磨和上漆


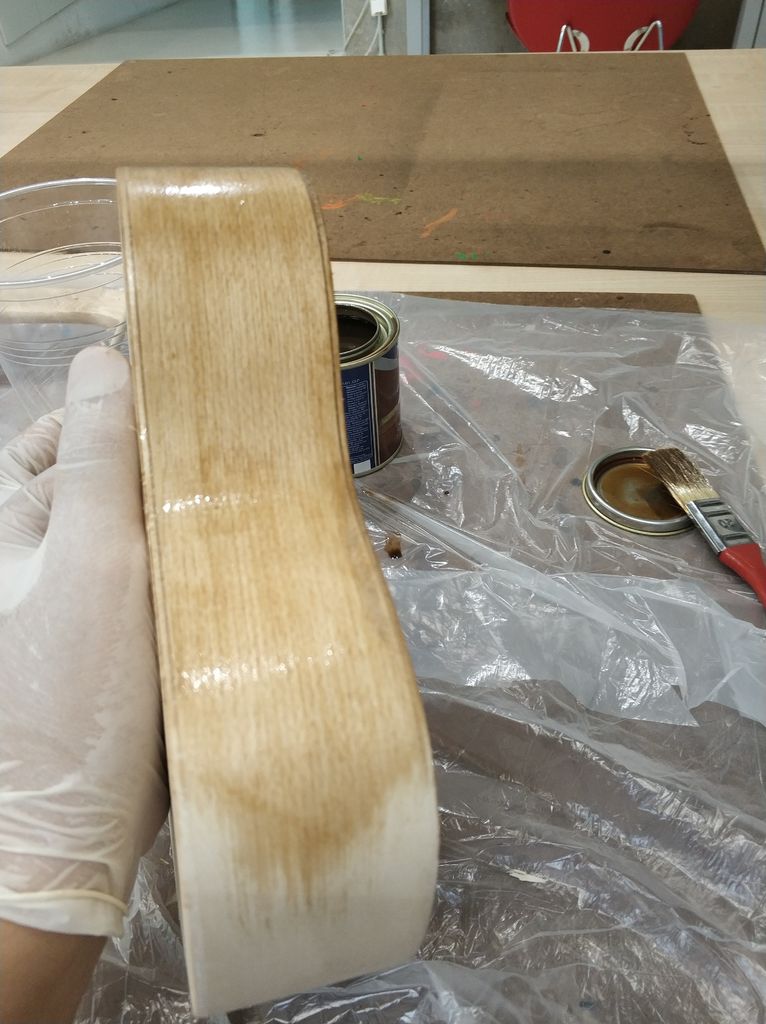

為了讓我們的夏威夷四弦琴明亮,并且沒(méi)有粗糙的層,我們可以順利地打磨構(gòu)成我們樂(lè)器的兩個(gè)部分,因?yàn)槲覀兛赡軙?huì)損壞已經(jīng)制作的圖紙(如果您選擇繪制尤克里里琴,則必須先將其打磨)。然后我們將清漆我們的兩個(gè)部分,使它們獲得更深的顏色,木材呈現(xiàn)出更大的阻力。我們可以使用普通的木材清漆,它不需要特殊。
一旦我們有清漆,我們將它與少量溶劑混合,使其溶解一點(diǎn)。接下來(lái),我們用刷子將混合物涂在頸部和儀器的主體上,讓它干燥。
如果我們發(fā)現(xiàn)產(chǎn)品需要第二層涂層,我們可以將這兩個(gè)部分打磨一下重新涂抹一層稀釋的清漆。
**預(yù)防措施:清漆是一種化學(xué)產(chǎn)品,因此必須在通風(fēng)處進(jìn)行此過(guò)程,戴上口罩以避免吸入異味和護(hù)目鏡。
我們需要能夠正常工作的材料是照片中出現(xiàn)的材料。主要是我們將使用刷子,清漆罐(在我們的情況下是紅色),一點(diǎn)溶劑和視覺(jué)保護(hù)。最重要的是在通風(fēng)良好的空間工作。
第6步:硬件
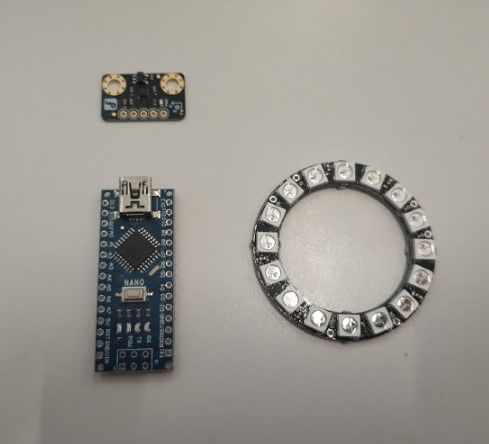


我們帶有Arduino,acelerometer和帶LED指示燈的銘牌將在一個(gè)小支架中引入,以避免所有組件在儀器中移動(dòng)。
我們還添加了一個(gè)電池座和一個(gè)開(kāi)關(guān),使其更舒適,我們不使用儀器時(shí)也不會(huì)耗盡電池。我們將這個(gè)支架用一塊維可牢尼龍搭扣(它也適用于硅膠和熱熔槍?zhuān)┻B接到尤克里里琴琴體的內(nèi)表面。
另一方面,LED輪小于孔,所以它會(huì)下降。已經(jīng)設(shè)計(jì)了一個(gè)支持,以便它可以很好地執(zhí)行其功能。
步驟7:軟件


為了給我們的夏威夷四弦琴做一個(gè)特殊的裝飾,我們可以通過(guò)一個(gè)LED輪來(lái)增加燈光效果。我們將使用WS2812,但您可以按照數(shù)據(jù)表的說(shuō)明使用任何其他產(chǎn)品。我們也將使用一個(gè)acelerometer(BMA220),它可以讓我們產(chǎn)生重力效應(yīng)。
事實(shí)上,我們將有4個(gè)光源,包括在Arduino的名為“Adafruit”的計(jì)算機(jī)庫(kù)中。為此,我們必須在三個(gè)組件之間做出正確的共識(shí):Arduino NANO,WS2812和BMA220,就像出現(xiàn)在第一張圖片中一樣。
紅色線用于供電,GND黑色和其余部分是正確操作所必需的連接。
我們用于燈具的代碼附在一個(gè)名為“play_of_light_v0”的文件中。鮑”。確保已包含必要的庫(kù)以正確操作程序。我們?cè)陔娐吠獠刻砑拥碾姵乇仨毦哂?V的最小電壓,我們必須確保它能夠提供為整個(gè)電路供電所需的最小電流。
//Variables contador e interrupción
int counter;
//Variables Ejemplo gravedad
#include
#include
#include
#define NUMBER_OF_LEDS_ON_RING 16
#define NEOPIXEL_RING_DATA_PIN 9
byte Version[3];
int8_t x_data;
int8_t y_data;
int8_t z_data;
byte range=0x00;
float divi=16;
float x,y,z;
float pi = 3.14159265359;
float nx,ny,angle;
int led, previousLed;
QueueList ledQueue;
Adafruit_NeoPixel neoring = Adafruit_NeoPixel(NUMBER_OF_LEDS_ON_RING, NEOPIXEL_RING_DATA_PIN, NEO_GRB + NEO_KHZ800);
//Variables Luces arcoiris
#include
#ifdef __AVR__
#include
#endif
#define PIN 9
// Parameter 1 = number of pixels in strip
// Parameter 2 = Arduino pin number (most are valid)
// Parameter 3 = pixel type flags, add together as needed:
// NEO_KHZ800 800 KHz bitstream (most NeoPixel products w/WS2812 LEDs)
// NEO_KHZ400 400 KHz (classic ‘v1’ (not v2) FLORA pixels, WS2811 drivers)
// NEO_GRB Pixels are wired for GRB bitstream (most NeoPixel products)
// NEO_RGB Pixels are wired for RGB bitstream (v1 FLORA pixels, not v2)
// NEO_RGBW Pixels are wired for RGBW bitstream (NeoPixel RGBW products)
Adafruit_NeoPixel strip = Adafruit_NeoPixel(16, PIN, NEO_GRB + NEO_KHZ800);
// IMPORTANT: To reduce NeoPixel burnout risk, add 1000 uF capacitor across
// pixel power leads, add 300 - 500 Ohm resistor on first pixel‘s data input
// and minimize distance between Arduino and first pixel. Avoid connecting
// on a live circuit.。.if you must, connect GND first.
//Variables Rueda de colores
// NeoPixel Ring simple sketch (c) 2013 Shae Erisson
// released under the GPLv3 license to match the rest of the AdaFruit NeoPixel library
#include
#ifdef __AVR__
#include
#endif
// Which pin on the Arduino is connected to the NeoPixels?
// On a Trinket or Gemma we suggest changing this to 1
#define PIN 9
// How many NeoPixels are attached to the Arduino?
#define NUMPIXELS 16
// When we setup the NeoPixel library, we tell it how many pixels, and which pin to use to send signals.
// Note that for older NeoPixel strips you might need to change the third parameter--see the strandtest
// example for more information on possible values.
Adafruit_NeoPixel pixels = Adafruit_NeoPixel(NUMPIXELS, PIN, NEO_GRB + NEO_KHZ800);
int delayval = 50; // delay for 50ms
//Variables colores aleatorios
#include
#ifdef __AVR__
#include
#endif
#define PIN 9
#define NUM_LEDS 16
#define BRIGHTNESS 200
//Adafruit_NeoPixel strip = Adafruit_NeoPixel(NUM_LEDS, PIN, NEO_GRBW + NEO_KHZ800);
byte neopix_gamma[] = {
0, 0, 0, 0, 0, 0, 0, 0, 0, 0, 0, 0, 0, 0, 0, 0,
0, 0, 0, 0, 0, 0, 0, 0, 0, 0, 0, 0, 1, 1, 1, 1,
1, 1, 1, 1, 1, 1, 1, 1, 1, 2, 2, 2, 2, 2, 2, 2,
2, 3, 3, 3, 3, 3, 3, 3, 4, 4, 4, 4, 4, 5, 5, 5,
5, 6, 6, 6, 6, 7, 7, 7, 7, 8, 8, 8, 9, 9, 9, 10,
10, 10, 11, 11, 11, 12, 12, 13, 13, 13, 14, 14, 15, 15, 16, 16,
17, 17, 18, 18, 19, 19, 20, 20, 21, 21, 22, 22, 23, 24, 24, 25,
25, 26, 27, 27, 28, 29, 29, 30, 31, 32, 32, 33, 34, 35, 35, 36,
37, 38, 39, 39, 40, 41, 42, 43, 44, 45, 46, 47, 48, 49, 50, 50,
51, 52, 54, 55, 56, 57, 58, 59, 60, 61, 62, 63, 64, 66, 67, 68,
69, 70, 72, 73, 74, 75, 77, 78, 79, 81, 82, 83, 85, 86, 87, 89,
90, 92, 93, 95, 96, 98, 99,101,102,104,105,107,109,110,112,114,
115,117,119,120,122,124,126,127,129,131,133,135,137,138,140,142,
144,146,148,150,152,154,156,158,160,162,164,167,169,171,173,175,
177,180,182,184,186,189,191,193,196,198,200,203,205,208,210,213,
215,218,220,223,225,228,231,233,236,239,241,244,247,249,252,255 };
///////////////////////////////////////////////////////////////////////////////////
//////////////////////////////////////////////////////////////////////////////////
/METODO SETUP
void setup()
{
//Código: Dirección de la gravedad
neoring.begin();
neoring.setBrightness(200);
Serial.begin(9600);
Wire.begin();
Wire.beginTransmission(0x0A); // address of the accelerometer
// range settings
Wire.write(0x22); //register address
Wire.write(range); //can be set at“0x00”“0x01”“0x02”“0x03”, refer to Datashhet on wiki
// low pass filter
Wire.write(0x20); //register address
Wire.write(0x05); //can be set at“0x05”“0x04”。..。..“0x01”“0x00”, refer to Datashhet on wiki
Wire.endTransmission();
//Codigo; Luces Arcoiris
// This is for Trinket 5V 16MHz, you can remove these three lines if you are not using a Trinket
#if defined (__AVR_ATtiny85__)
if (F_CPU == 16000000) clock_prescale_set(clock_div_1);
#endif
// End of trinket special code
strip.begin();
strip.show(); // Initialize all pixels to ’off‘
//Código Rueda de colores
// This is for Trinket 5V 16MHz, you can remove these three lines if you are not using a Trinket
#if defined (__AVR_ATtiny85__)
if (F_CPU == 16000000) clock_prescale_set(clock_div_1);
#endif
// End of trinket special code
pixels.begin(); // This initializes the NeoPixel library.
//Codigo Interrupcion
counter = 1;
//Codigo Colores varios
// This is for Trinket 5V 16MHz, you can remove these three lines if you are not using a Trinket
#if defined (__AVR_ATtiny85__)
if (F_CPU == 16000000) clock_prescale_set(clock_div_1);
#endif
// End of trinket special code
strip.setBrightness(BRIGHTNESS);
strip.begin();
strip.show(); // Initialize all pixels to ’off‘
}
///////////////////////////////////////////////////////////////////////////////////
//////////////////////////////////////////////////////////////////////////////////
/Bucle infinito
void loop() {
//Caso 1: Juego de luces de la gravedad;
if(counter == 1){
for(int i=0;i《100;i++){
switch(range) //change the data dealing method based on the range u’ve set
{
case 0x00:divi=16; break;
case 0x01:divi=8; break;
case 0x02:divi=4; break;
case 0x03:divi=2; break;
default: Serial.println(“range setting is Wrong,range:from 0to 3.Please check!”);while(1);
}
AccelerometerInit();
delay(100);
nx=x/2;
ny=y/2;
angle=atan((ny/nx))*180/pi;
if(angle 》 0.0){
if(nx《0.0)
angle+=180;
}
else{
if(ny 》 0.0)
angle+=180;
else
angle += 360;
}//end else
if(angle == 360.0)
angle = 0.0;
led = circularize(angle / (360 / NUMBER_OF_LEDS_ON_RING));
// make led movement smooth
if(previousLed == led){
// nothing to do
}
else if (counterClockwiseDistanceBetweenLeds(previousLed, led) 《= 8)
led = circularize(previousLed + 1);
else
led = circularize(previousLed - 1);
ledQueue.push(led);
makeLightShow();
previousLed = led;
delay(25);
}
counter = 2;
}//End if counter==1
//Caso 2: Codigo del juego de luces del arcoiris
else if(counter == 2){
for(int j=0; j《5;j++){
// Some example procedures showing how to display to the pixels:
colorWipe1(strip.Color(255, 0, 0), 50); // Red
colorWipe1(strip.Color(0, 255, 0), 50); // Green
colorWipe1(strip.Color(0, 0, 255), 50); // Blue
colorWipe1(strip.Color(0, 0, 0, 255), 50); // White RGBW
// Send a theater pixel chase in.。.
theaterChase(strip.Color(127, 127, 127), 50); // White
theaterChase(strip.Color(127, 0, 0), 50); // Red
theaterChase(strip.Color(0, 0, 127), 50); // Blue
rainbow(5);
rainbowCycle(5);
theaterChaseRainbow(5);
}
counter = 3;
}//End if counter==2
//Caso 3: Luces Aleatorias
else if(counter == 3){
for(int k=0;k《50;k++){
// For a set of NeoPixels the first NeoPixel is 0, second is 1, all the way up to the count of pixels minus one.
int a=random(255);
int b=random(255);
int c=random(255);
for(int i=0;i
// pixels.Color takes RGB values, from 0,0,0 up to 255,255,255
pixels.setPixelColor(i, pixels.Color(a,b,c)); // Moderately bright green color.
pixels.show(); // This sends the updated pixel color to the hardware.
delay(delayval); // Delay for a period of time (in milliseconds)。
}
a=random(255);
b=random(255);
c=random(255);
for(int i=NUMPIXELS;i》0;i--){
// pixels.Color takes RGB values, from 0,0,0 up to 255,255,255
pixels.setPixelColor(i, pixels.Color(a,b,c)); // Moderately bright green color.
pixels.show(); // This sends the updated pixel color to the hardware.
delay(delayval); // Delay for a period of time (in milliseconds)。
}
}
counter = 4;
}
else if(counter == 4){
for(int g=0;g《=6;g++){
// Some example procedures showing how to display to the pixels:
colorWipe(strip.Color(255, 0, 0), 50); // Red
colorWipe(strip.Color(0, 255, 0), 50); // Green
colorWipe(strip.Color(0, 0, 255), 50); // Blue
colorWipe(strip.Color(0, 0, 0, 255), 50); // White
whiteOverRainbow(20,75,5);
pulseWhite(5);
// fullWhite();
// delay(2000);
rainbowFade2White(3,3,1);
}
counter = 1;
}
}
///////////////////////////////////////////////////////////////////////////////////
//////////////////////////////////////////////////////////////////////////////////
/Metodos del Ejemplo de la gravedad
void AccelerometerInit()
{
Wire.beginTransmission(0x0A); // address of the accelerometer
// reset the accelerometer
Wire.write(0x04); // X data
Wire.endTransmission();
Wire.requestFrom(0x0A,1); // request 6 bytes from slave device #2
while(Wire.available()) // slave may send less than requested
{
Version[0] = Wire.read(); // receive a byte as characte
}
x_data=(int8_t)Version[0]》》2;
Wire.beginTransmission(0x0A); // address of the accelerometer
// reset the accelerometer
Wire.write(0x06); // Y data
Wire.endTransmission();
Wire.requestFrom(0x0A,1); // request 6 bytes from slave device #2
while(Wire.available()) // slave may send less than requested
{
Version[1] = Wire.read(); // receive a byte as characte
}
y_data=(int8_t)Version[1]》》2;
Wire.beginTransmission(0x0A); // address of the accelerometer
// reset the accelerometer
Wire.write(0x08); // Z data
Wire.endTransmission();
Wire.requestFrom(0x0A,1); // request 6 bytes from slave device #2
while(Wire.available()) // slave may send less than requested
{
Version[2] = Wire.read(); // receive a byte as characte
}
z_data=(int8_t)Version[2]》》2;
x=(float)x_data/divi;
y=(float)y_data/divi;
z=(float)z_data/divi;
Serial.print(“X=”);
Serial.print(x); // print the character
Serial.print(“ ”);
Serial.print(“Y=”);
Serial.print(y); // print the character
Serial.print(“ ”);
Serial.print(“Z=”); // print the character
Serial.println(z);
}
int circularize(int pos){
if(pos 》= NUMBER_OF_LEDS_ON_RING)
return(pos - NUMBER_OF_LEDS_ON_RING);
else if(pos 《 0)
return(pos + NUMBER_OF_LEDS_ON_RING);
else
return(pos);
}
int distance;
int counterClockwiseDistanceBetweenLeds(int prevPos, int nextPos){
distance = nextPos - prevPos;
if(distance 《 0)
distance += NUMBER_OF_LEDS_ON_RING;
return(distance);
}
int ledPosition, currentQueueSize;
#define NUMBER_OF_LEDS_TO_SHINE 10
int brightnessStep = 255/NUMBER_OF_LEDS_TO_SHINE;
void makeLightShow(){
for(int j = 0; j 《 NUMBER_OF_LEDS_ON_RING; j++)
neoring.setPixelColor(j, 0, 0, 0);
currentQueueSize = ledQueue.count();
for(int k = 0; k 《 currentQueueSize; k++){
ledPosition = ledQueue.pop();
neoring.setPixelColor(ledPosition, 0, (brightnessStep * k), 0);
if((k == 0 && currentQueueSize 《 NUMBER_OF_LEDS_TO_SHINE) || k 》 0)
ledQueue.push(ledPosition);
}
neoring.show();
}
///////////////////////////////////////////////////////////////////////////////////
//////////////////////////////////////////////////////////////////////////////////
/Metodos del juego de luces del arcoiris
// Fill the dots one after the other with a color
void colorWipe(uint32_t c, uint8_t wait) {
for(uint16_t i=0; i
void rainbow(uint8_t wait) {
uint16_t i, j;
for(j=0; j《256; j++) {
for(i=0; i
// Slightly different, this makes the rainbow equally distributed throughout
void rainbowCycle(uint8_t wait) {
uint16_t i, j;
for(j=0; j《256*5; j++) { // 5 cycles of all colors on wheel
for(i=0; i《 strip.numPixels(); i++) {
strip.setPixelColor(i, Wheel(((i * 256 / strip.numPixels()) + j) & 255));
}
strip.show();
delay(wait);
}
}
//Theatre-style crawling lights.
void theaterChase(uint32_t c, uint8_t wait) {
for (int j=0; j《10; j++) { //do 10 cycles of chasing
for (int q=0; q 《 3; q++) {
for (uint16_t i=0; i 《 strip.numPixels(); i=i+3) {
strip.setPixelColor(i+q, c); //turn every third pixel on
}
strip.show();
delay(wait);
for (uint16_t i=0; i 《 strip.numPixels(); i=i+3) {
strip.setPixelColor(i+q, 0); //turn every third pixel off
}
}
}
}
//Theatre-style crawling lights with rainbow effect
void theaterChaseRainbow(uint8_t wait) {
for (int j=0; j 《 256; j++) { // cycle all 256 colors in the wheel
for (int q=0; q 《 3; q++) {
for (uint16_t i=0; i 《 strip.numPixels(); i=i+3) {
strip.setPixelColor(i+q, Wheel( (i+j) % 255)); //turn every third pixel on
}
strip.show();
delay(wait);
for (uint16_t i=0; i 《 strip.numPixels(); i=i+3) {
strip.setPixelColor(i+q, 0); //turn every third pixel off
}
}
}
}
// Input a value 0 to 255 to get a color value.
// The colours are a transition r - g - b - back to r.
uint32_t Wheel(byte WheelPos) {
WheelPos = 255 - WheelPos;
if(WheelPos 《 85) {
return strip.Color(255 - WheelPos * 3, 0, WheelPos * 3);
}
if(WheelPos 《 170) {
WheelPos -= 85;
return strip.Color(0, WheelPos * 3, 255 - WheelPos * 3);
}
WheelPos -= 170;
return strip.Color(WheelPos * 3, 255 - WheelPos * 3, 0);
}
///////////////////////////////////////////////////////////////////////////////////
//////////////////////////////////////////////////////////////////////////////////
/Metodos Rueda de colores
// int elegirColor = random(0x000000,0xffffff);//Se elige aleatoriamente entre toda la gama de colores comprendida entre 0x000000 y 0xFFFFFF
//CylonEyeColor=HtmlColor(elegirColor);
//int elegirColor = random(1,7);//Podemos elegir aleatoriamente entre los 7 colores que hay debajo0xf0ffff
// if(elegirColor == 1) CylonEyeColor=HtmlColor(0xff0000);//Rojo
// if(elegirColor == 2) CylonEyeColor=HtmlColor(0x00ff00);//Verde
// if(elegirColor == 3) CylonEyeColor=HtmlColor(0x0000ff);//Azul
// if(elegirColor == 4) CylonEyeColor=HtmlColor(0xffff00);//Amarillo
// if(elegirColor == 5) CylonEyeColor=HtmlColor(0x200020);//Morado
// if(elegirColor == 6) CylonEyeColor=HtmlColor(0x00ffff);//Azul Claro
// if(elegirColor == 7) CylonEyeColor=HtmlColor(0x100010);//Rosa
//CylonEyeColor=HtmlColor(0x000000);
///////////////////////////////////////////////////////////////////////////////////
//////////////////////////////////////////////////////////////////////////////////
/Metodos luces varias
// Fill the dots one after the other with a color
void colorWipe1(uint32_t c, uint8_t wait) {
for(uint16_t i=0; i
void pulseWhite(uint8_t wait) {
for(int j = 0; j 《 256 ; j++){
for(uint16_t i=0; i
for(int j = 255; j 》= 0 ; j--){
for(uint16_t i=0; i
void rainbowFade2White(uint8_t wait, int rainbowLoops, int whiteLoops) {
float fadeMax = 100.0;
int fadeVal = 0;
uint32_t wheelVal;
int redVal, greenVal, blueVal;
for(int k = 0 ; k 《 rainbowLoops ; k ++){
for(int j=0; j《256; j++) { // 5 cycles of all colors on wheel
for(int i=0; i《 strip.numPixels(); i++) {
wheelVal = Wheel(((i * 256 / strip.numPixels()) + j) & 255);
redVal = red(wheelVal) * float(fadeVal/fadeMax);
greenVal = green(wheelVal) * float(fadeVal/fadeMax);
blueVal = blue(wheelVal) * float(fadeVal/fadeMax);
strip.setPixelColor( i, strip.Color( redVal, greenVal, blueVal ) );
}
//First loop, fade in!
if(k == 0 && fadeVal 《 fadeMax-1) {
fadeVal++;
}
//Last loop, fade out!
else if(k == rainbowLoops - 1 && j 》 255 - fadeMax ){
fadeVal--;
}
strip.show();
delay(wait);
}
}
delay(500);
for(int k = 0 ; k 《 whiteLoops ; k ++){
for(int j = 0; j 《 256 ; j++){
for(uint16_t i=0; i 《 strip.numPixels(); i++) {
strip.setPixelColor(i, strip.Color(0,0,0, neopix_gamma[j] ) );
}
strip.show();
}
delay(2000);
for(int j = 255; j 》= 0 ; j--){
for(uint16_t i=0; i 《 strip.numPixels(); i++) {
strip.setPixelColor(i, strip.Color(0,0,0, neopix_gamma[j] ) );
}
strip.show();
}
}
delay(500);
}
void whiteOverRainbow(uint8_t wait, uint8_t whiteSpeed, uint8_t whiteLength ) {
if(whiteLength 》= strip.numPixels()) whiteLength = strip.numPixels() - 1;
int head = whiteLength - 1;
int tail = 0;
int loops = 3;
int loopNum = 0;
static unsigned long lastTime = 0;
while(true){
for(int j=0; j《256; j++) {
for(uint16_t i=0; i= tail && i 《= head) || (tail 》 head && i 》= tail) || (tail 》 head && i 《= head) ){
strip.setPixelColor(i, strip.Color(0,0,0, 255 ) );
}
else{
strip.setPixelColor(i, Wheel(((i * 256 / strip.numPixels()) + j) & 255));
}
}
if(millis() - lastTime 》 whiteSpeed) {
head++;
tail++;
if(head == strip.numPixels()){
loopNum++;
}
lastTime = millis();
}
if(loopNum == loops) return;
head%=strip.numPixels();
tail%=strip.numPixels();
strip.show();
delay(wait);
}
}
}
void fullWhite() {
for(uint16_t i=0; i
// Slightly different, this makes the rainbow equally distributed throughout
void rainbowCycle1(uint8_t wait) {
uint16_t i, j;
for(j=0; j《256 * 5; j++) { // 5 cycles of all colors on wheel
for(i=0; i《 strip.numPixels(); i++) {
strip.setPixelColor(i, Wheel(((i * 256 / strip.numPixels()) + j) & 255));
}
strip.show();
delay(wait);
}
}
void rainbow1(uint8_t wait) {
uint16_t i, j;
for(j=0; j《256; j++) {
for(i=0; i
// Input a value 0 to 255 to get a color value.
// The colours are a transition r - g - b - back to r.
uint32_t Wheel1(byte WheelPos) {
WheelPos = 255 - WheelPos;
if(WheelPos 《 85) {
return strip.Color(255 - WheelPos * 3, 0, WheelPos * 3,0);
}
if(WheelPos 《 170) {
WheelPos -= 85;
return strip.Color(0, WheelPos * 3, 255 - WheelPos * 3,0);
}
WheelPos -= 170;
return strip.Color(WheelPos * 3, 255 - WheelPos * 3, 0,0);
}
uint8_t red(uint32_t c) {
return (c 》》 16);
}
uint8_t green(uint32_t c) {
return (c 》》 8);
}
uint8_t blue(uint32_t c) {
return (c);
}
步驟8:3D設(shè)計(jì)


首先,您必須調(diào)整硬件組件的大小以確保正確。如果它們與我們的相同,您可以使用我們借給您的相同文件。
兩種支持都是使用3D打印機(jī)設(shè)計(jì)的,它們也包括在內(nèi):
ukelele_support_arduino_v0.stl:https://www.tinkercad.com/things/1aAGZ1xFptA-ukel。 。. ukelele_support_WS2812_v0.stl:https://www.tinkercad.com/things/1aAGZ1xFptA-ukel.。.
最后,燈光會(huì)像最后兩張照片一樣。
步驟9:安裝頸部


首先,我們將馬鞍放在頸部。螺絲需要固定的孔不在那里,所以我們必須制作它們,用螺旋鉆小心地標(biāo)記它們應(yīng)該去的地方,制作孔。
這同樣適用于用于將頸部固定在儀器主體上的螺釘?shù)目住](méi)有必要這樣做,因?yàn)檫@種緊固沒(méi)有螺釘,但如果我們想這樣做,就沒(méi)有問(wèn)題。
重要提示:在桅桿的起點(diǎn)和音叉的起點(diǎn)之間留出5mm的空間,因?yàn)樵谀莻€(gè)孔中將放置螺母。
我們將用膠水,按照?qǐng)D中所示的方向。
最后,我們將在桅桿開(kāi)頭的孔中引入4個(gè)針腳,每個(gè)針腳用2個(gè)短螺釘固定,如圖所示。
步驟10:安裝Birdge

通過(guò)粘合固定橋接兩個(gè)長(zhǎng)螺釘位于車(chē)身中央位置。建議用鉛筆在身體上標(biāo)記正確的位置。我們將采用圖像中標(biāo)記的距離。
我們將在兩個(gè)組件的并集處應(yīng)用膠水。我們?cè)跀Q緊螺絲的幫助下仔細(xì)固定這兩個(gè)部件,直到接頭干燥。我們將用1.5mm鉆頭為木頭制作螺釘?shù)膬蓚€(gè)孔。用兩個(gè)長(zhǎng)螺釘固定橋體。最后,我們將保護(hù)帽放在螺釘?shù)念^部。
步驟11:身體和頸部組裝


為了組裝這兩個(gè)部分,我們?cè)谏眢w的頭部有個(gè)洞,脖子上有兩個(gè)突出部分。我們可以用膠水或熱熔膠膠粘它們。為了獲得更大的固定效果,您可以將音叉末端的孔連接到身體上。
步驟12:放入尤克里里琴弦


最后我們必須放置字符串,以便我們的儀器完成。
以前我們會(huì)將銷(xiāo)的固定環(huán)插入穿過(guò)桅桿的突出部分中。為了放置琴弦,我們采用了套件附帶的4個(gè)琴弦。首先,您必須區(qū)分每個(gè)字符串,因?yàn)樗鼈儾⒎峭耆嗤D惚仨毥壸∶扛业囊欢耍▋蓚€(gè)粗節(jié)用正常的結(jié),兩個(gè)薄的用一個(gè)雙節(jié))并將琴弦插入琴橋的插槽中。
然后我們將以下列方式放置字符串:
?第一個(gè)位置:G字符串(第二個(gè)最粗的字符串)。
?第二個(gè)位置:C字符串(粗字符串) )。
?第三個(gè)位置:E字符串(第二個(gè)較細(xì)的字符串)。
?第四個(gè)位置:一個(gè)字符串(較細(xì)的字符串)。
將字符串穿入孔中提供的插頭。嘗試通過(guò)在銷(xiāo)上旋轉(zhuǎn)兩到三圈來(lái)固定每根繩子。在不施加過(guò)大力量的情況下拉緊琴弦并檢查琴弦和琴鞍之間的距離。
如果你對(duì)如何制作它有任何疑問(wèn),你可以在教程中解釋你如何正確地設(shè)置琴弦。
步驟13:測(cè)試


最后,我們要看看尤克里里琴是否有已正確組裝,使第一個(gè)音品上的理想距離為0.1毫米,而第十二個(gè)音符上的理想距離約為1.2毫米。
需要調(diào)整四弦琴弦。我推薦你這個(gè)應(yīng)用程序:GuitarTuna
-
led
+關(guān)注
關(guān)注
242文章
23857瀏覽量
674717
發(fā)布評(píng)論請(qǐng)先 登錄
降壓線性恒流40V LED恒流驅(qū)動(dòng)芯片H7304B低功耗 無(wú)需電感2.5-36V降5V12V
惠洋科技24V 36V 48V降9V 12V 48V恒流芯片H5119GRGBW調(diào)光舞臺(tái)燈芯片
亮化燈光控制系統(tǒng):可編程調(diào)光控制,智能自控照明效果
如何制造一個(gè)可以自主演奏音樂(lè)的尤克里里機(jī)器人?

基于FPGA的電子琴設(shè)計(jì)
ADS1601的參考電壓是內(nèi)部給效果好,還是外接好?
躍昉科技亮相2024琴澳青年創(chuàng)新創(chuàng)業(yè)發(fā)展大會(huì)
智能化燈光控制系統(tǒng)
開(kāi)源項(xiàng)目!可以自主演奏音樂(lè)的尤克里里機(jī)器人!
舞臺(tái)燈電機(jī)驅(qū)動(dòng)芯片_步進(jìn)驅(qū)動(dòng)ic-選型指南_應(yīng)用方案
工業(yè)AI視覺(jué)檢測(cè)軟件培訓(xùn) 工業(yè)AI視覺(jué)檢測(cè)?上海尤勁恩
STM32項(xiàng)目實(shí)戰(zhàn):基于STM32F4的智能燈光控制系統(tǒng)(LVGL),附項(xiàng)目教程/源碼
MS35631N無(wú)刷直流馬達(dá)驅(qū)動(dòng)IC硬件技術(shù)助力舞臺(tái)燈光
LED燈光亮化引領(lǐng)著現(xiàn)代照明的潮流


 工商網(wǎng)監(jiān)
評(píng)論