 自動寵物喂食機的制作
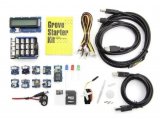
步驟1:需要硬件
- 1x Arduino Mega 2560
- 1x步進電機12V 28BYJ-48
- 1x步進電機驅動器ULN2003
- 1x超聲波傳感器HC-SR04
- 1x時鐘模塊DS1307
- 1x 0.91“IIC I2C 128x32 SSD1306 SPI OLED顯示模塊
- 20x線路M/F& 2x線M/M
- 1x面包板
- 1x電池
步驟2:設置
電源= 5V
接地= GND
OLED_MOSI = 9
OLED_CLK = 10
OLED_DC = 11
OLED_CS = 12
OLED_RESET = 13
trigPin = 2
echoPin = 3
RTC SDA = SDA 20
RTC SCL = SCL 21
motorPin1Feed = 22
motorPin2Feed = 24
motorPin3Feed = 26
motorPin4Feed = 28
第3步:3D打印。..。.. 3D打印。..。..以及更多3D打印
您可能已經注意到STL的數量相當多 - 附在這個Instructable上的文件,因此我們的構造非常需要手頭有3D打印機。
雖然我們使用了所有的設計來創建這臺機器,但是有幾個STL文件你可以在技術上沒有生活;
“mount-base-pet-feeder.stl” - 取決于你打算如何設置包含布線的機艙,Arduino,步進電機和步進驅動器
“left-mount-adjuster-pet-feeder.stl“ -
”right-mount-adjuster-pet-feeder.stl“ -
”離開-spacer-mount-adjuster-pet-feeder.stl“ -
”right-spacer-mount-adjuster-pet-feeder.stl“ -
”Bowl-v2.stl “ - 如果你不使用我們特制的碗,我們不會抱怨。
“M& M‘s.stl” - 這僅用于在Autodesk Fusion 360中渲染和說明我們的自動PetFeeder。**不能用作寵物的食物。我們對不當使用不承擔任何責任**
第4步:讓我們添加一些代碼
//Basic Embedded Programming 2. Semester Project UCL
//TinyRTC I2C module DS1307
#include ”Wire.h“
#define DS1307_I2C_ADDRESS 0x68
// Convert normal decimal numbers to binary coded decimal
byte decToBcd(byte val)
{
return( (val/10*16) + (val%10) );
}
// Convert binary coded decimal to normal decimal numbers
byte bcdToDec(byte val)
{
return( (val/16*10) + (val%16) );
}
#include
#include
#include
#include
#include
#include
RTC_DS1307 RTC;
//#include DS1307 rtc(SDA, SCL);
//declaring variables for the motor (driver) pins
int motorPin1Feed = 22;
int motorPin2Feed = 24;
int motorPin3Feed = 26;
int motorPin4Feed = 28;
//if(hour 》=
int petFeedMorning;
int petFeedAfternoon;
int petFedMorning;
int petFedAfternoon;
//Declare ultrasonic sensor pins
int trigPin = 2; // Trigger
int echoPin = 3; // Echo
long duration, cm, inches;
// Variables will change:
//Millis()
long previousMillis = 0; // will store last time LED was updated
// the follow variables is a long because the time, measured in miliseconds,
// will quickly become a bigger number than can be stored in an int.
long interval = 1000; // interval at which to blink (milliseconds)
//Disp millis()
//int period = 1000;
unsigned long time_now = 0;
#define STEPSFeed 64
#define STEPSTop 64 //Number of steps per revolution
#define STEPSBottom 64 //Number of steps per revolution
//The pin connections need to be 4 pins connected
// to Motor Driver In1, In2, In3, In4 and then the
// here in the sequence 1-3-2-4 for proper sequencing of 28BYJ48
Stepper small_stepperFeed(STEPSFeed, motorPin1Feed, motorPin3Feed, motorPin2Feed, motorPin4Feed);
Stepper small_stepperTop(STEPSTop, motorPin1Top, motorPin3Top, motorPin2Top, motorPin4Top);
int Steps2TakeFeed;
int Steps2TakeTop;
unsigned long startMillis; //some global variables available anywhere in the program
unsigned long currentMillis;
const unsigned long period = 1000; //the value is a number of milliseconds
#define SCREEN_WIDTH 128 // OLED display width, in pixels
#define SCREEN_HEIGHT 32 // OLED display height, in pixels
// Declaration for SSD1306 display connected using software SPI (default case):
#define OLED_MOSI 9
#define OLED_CLK 10
#define OLED_DC 11
#define OLED_CS 12
#define OLED_RESET 13
Adafruit_SSD1306 display(SCREEN_WIDTH, SCREEN_HEIGHT,
OLED_MOSI, OLED_CLK, OLED_DC, OLED_RESET, OLED_CS);
// ’Logo 2‘, 128x32px
static const unsigned char myBitmap [] PROGMEM = {
0xff, 0x80, 0x00, 0x00, 0x00, 0x00, 0x00, 0x00, 0x00, 0x00, 0x00, 0x00, 0x00, 0x00, 0x01, 0xff,
0xff, 0x80, 0x00, 0x00, 0x00, 0x00, 0x00, 0x00, 0x00, 0x00, 0x00, 0x00, 0x00, 0x00, 0x01, 0xff,
0xff, 0x80, 0x00, 0x00, 0x00, 0x00, 0x00, 0x00, 0x00, 0x00, 0x00, 0x00, 0x00, 0x00, 0x01, 0xff,
0xff, 0xbc, 0x3c, 0xc6, 0x1e, 0x0e, 0x07, 0xfc, 0xe0, 0x00, 0x00, 0x00, 0x00, 0x00, 0x01, 0xff,
0xff, 0xbc, 0x3c, 0xc6, 0x3c, 0x0f, 0x07, 0xfc, 0xe0, 0x00, 0x00, 0x00, 0x00, 0x00, 0x01, 0xff,
0xff, 0xb4, 0x7c, 0xc6, 0x78, 0x1f, 0x07, 0x00, 0xe0, 0x00, 0x00, 0x00, 0x00, 0x00, 0x01, 0xff,
0xff, 0xbe, 0x7c, 0xc6, 0xf0, 0x1b, 0x87, 0x00, 0xe0, 0x00, 0x00, 0x00, 0x00, 0x00, 0x01, 0xff,
0xff, 0xbe, 0x7c, 0xc7, 0xe0, 0x1b, 0x87, 0xf8, 0xe0, 0x00, 0x00, 0x00, 0x00, 0x00, 0x01, 0xff,
0xff, 0xb6, 0x7c, 0xc7, 0xe0, 0x39, 0x87, 0xf8, 0xe0, 0x00, 0x00, 0x00, 0x00, 0x00, 0x01, 0xff,
0xff, 0xba, 0x5c, 0xc7, 0xf0, 0x31, 0xc7, 0xf8, 0xe0, 0x00, 0x00, 0x00, 0x00, 0x00, 0x01, 0xff,
0xff, 0xbb, 0xdc, 0xc7, 0x70, 0x7f, 0xc7, 0x00, 0xe0, 0x00, 0x00, 0x00, 0x00, 0x00, 0x01, 0xff,
0xff, 0xbb, 0xdc, 0xc6, 0x38, 0x7f, 0xc7, 0x00, 0xe0, 0x00, 0x00, 0x00, 0x00, 0x00, 0x01, 0xff,
0xff, 0xbb, 0xdc, 0xc6, 0x1c, 0x60, 0xe7, 0x00, 0xe0, 0x00, 0x00, 0x00, 0x00, 0x00, 0x01, 0xff,
0xff, 0xbb, 0x9c, 0xc6, 0x1e, 0xe0, 0xe7, 0xfc, 0xff, 0x80, 0x00, 0x00, 0x00, 0x00, 0x01, 0xff,
0xff, 0xb9, 0x9c, 0xc6, 0x0e, 0xe0, 0x67, 0xfc, 0xff, 0x80, 0x00, 0x00, 0x00, 0x00, 0x01, 0xff,
0xff, 0x80, 0x00, 0x00, 0x00, 0x00, 0x00, 0x00, 0x00, 0x00, 0x00, 0x00, 0x00, 0x00, 0x01, 0xff,
0xff, 0x80, 0x00, 0x00, 0x00, 0x00, 0x00, 0x00, 0x00, 0x00, 0x00, 0x00, 0x00, 0x00, 0x01, 0xff,
0xff, 0x80, 0x00, 0x00, 0x00, 0x60, 0xe7, 0xfc, 0xe0, 0xc7, 0x0e, 0x73, 0x83, 0x07, 0xe1, 0xff,
0xff, 0x80, 0x00, 0x00, 0x00, 0x60, 0xc7, 0xfc, 0xf0, 0xc7, 0x0e, 0x73, 0x83, 0x0f, 0xf1, 0xff,
0xff, 0x80, 0x00, 0x00, 0x00, 0x60, 0xe7, 0x00, 0xf8, 0xc7, 0x8e, 0x73, 0xc3, 0x1c, 0x39, 0xff,
0xff, 0x80, 0x00, 0x00, 0x00, 0x60, 0xe7, 0x00, 0xf8, 0xc7, 0x8e, 0x73, 0xe3, 0x38, 0x19, 0xff,
0xff, 0x80, 0x00, 0x00, 0x00, 0x60, 0xc7, 0x00, 0xfc, 0xc6, 0xce, 0x73, 0x63, 0x38, 0x01, 0xff,
0xff, 0x80, 0x00, 0x00, 0x00, 0x7f, 0xe7, 0xfc, 0xec, 0xc6, 0xee, 0x73, 0x73, 0x38, 0x01, 0xff,
0xff, 0x80, 0x00, 0x00, 0x00, 0x7f, 0xe7, 0xfc, 0xee, 0xc6, 0x6e, 0x73, 0x33, 0x38, 0xf9, 0xff,
0xff, 0x80, 0x00, 0x00, 0x00, 0x60, 0xc7, 0x00, 0xe6, 0xc6, 0x7e, 0x73, 0x1b, 0x30, 0xf9, 0xff,
0xff, 0x80, 0x00, 0x00, 0x00, 0x60, 0xc7, 0x00, 0xe3, 0xc6, 0x3e, 0x73, 0x1b, 0x38, 0x19, 0xff,
0xff, 0x80, 0x00, 0x00, 0x00, 0x60, 0xe7, 0x00, 0xe3, 0xc6, 0x3e, 0x73, 0x0f, 0x38, 0x39, 0xff,
0xff, 0xbf, 0xff, 0xff, 0xfc, 0x60, 0xc7, 0xfc, 0xe1, 0xc6, 0x1e, 0x73, 0x0f, 0x1e, 0x79, 0xff,
0xff, 0xbf, 0xff, 0xff, 0xfc, 0x60, 0xc7, 0xfc, 0xe1, 0xc6, 0x0e, 0x73, 0x07, 0x0f, 0xf9, 0xff,
0xff, 0xbf, 0xff, 0xff, 0xfc, 0x60, 0xe7, 0xfe, 0xe0, 0xc6, 0x0e, 0x73, 0x07, 0x07, 0xc9, 0xff,
0xff, 0x80, 0x00, 0x00, 0x00, 0x00, 0x00, 0x00, 0x00, 0x00, 0x00, 0x00, 0x00, 0x00, 0x01, 0xff,
0xff, 0x80, 0x00, 0x00, 0x00, 0x00, 0x00, 0x00, 0x00, 0x00, 0x00, 0x00, 0x00, 0x00, 0x01, 0xff
};
void setup() {
Wire.begin();
//Serial Port begin
Serial.begin(9600);
// Using this to set the initial time:
// DS1307 seconds, minutes, hours, day, date, month, year
// setDS1307time(30,9,19,1,1,4,19);
// 1 = Sunday
//Define inputs and outputs (Ultrasonic sensor)
pinMode(trigPin, OUTPUT);
pinMode(echoPin, INPUT);
startMillis = millis(); //initial start time
// put your setup code here, to run once:
small_stepperFeed.setSpeed(200);
small_stepperTop.setSpeed(200);
// SSD1306_SWITCHCAPVCC = generate display voltage from 3.3V internally
if(!display.begin(SSD1306_SWITCHCAPVCC)) {
Serial.println(F(”SSD1306 allocation failed“));
for(;;); // Don’t proceed, loop forever
}
// Show initial display buffer contents on the screen --
// the library initializes this with an Adafruit splash screen.
display.display();
delay(500); // Pause for 2 seconds
// Clear the buffer
display.clearDisplay();
}
void loop() {
//Over 35 cm display length, time, day and date
if(cm 》= 45) {
ultrasonic();
displayTimeSerial();
displayTimeDisplay();
delay(750);
displayDayDateDisplay();
delay(750);
checkTime();
Serial.print(”Morning: “);
Serial.println(petFeedMorning);
Serial.print(”Afternoon: “);
Serial.println(petFeedAfternoon);
}
//Between 35 cm (under) and 5 cm (over) feed pet, turn motor CW
//else if(cm 《= 20 && hour 》= 7 && hour 《= 13) {
if(cm 《= 45 && cm 》8) {
ultrasonic();
stepMotorFeed();
}
//Under 5 cm display length, time, day and date
else if(cm 《= 8) {
ultrasonic();
displayTimeSerial();
displayTimeDisplay();
if(petFedMorning 《1) {
petFedMorning +1;
Serial.print(petFedMorning);
}
}
}
void setDS1307time(byte second, byte minute, byte hour, byte dayOfWeek, byte
dayOfMonth, byte month, byte year)
{
// sets time and date data to DS1307
Wire.beginTransmission(DS1307_I2C_ADDRESS);
Wire.write(0); // set next input to start at the seconds register
Wire.write(decToBcd(second)); // set seconds
Wire.write(decToBcd(minute)); // set minutes
Wire.write(decToBcd(hour)); // set hours
Wire.write(decToBcd(dayOfWeek)); // set day of week (1=Sunday, 7=Saturday)
Wire.write(decToBcd(dayOfMonth)); // set date (1 to 31)
Wire.write(decToBcd(month)); // set month
Wire.write(decToBcd(year)); // set year (0 to 99)
Wire.endTransmission();
}
void readDS1307time(byte *second,
byte *minute,
byte *hour,
byte *dayOfWeek,
byte *dayOfMonth,
byte *month,
byte *year)
{
Wire.beginTransmission(DS1307_I2C_ADDRESS);
Wire.write(0); // set DS1307 register pointer to 00h
Wire.endTransmission();
Wire.requestFrom(DS1307_I2C_ADDRESS, 7);
// request seven bytes of data from DS1307 starting from register 00h
*second = bcdToDec(Wire.read() & 0x7f);
*minute = bcdToDec(Wire.read());
*hour = bcdToDec(Wire.read() & 0x3f);
*dayOfWeek = bcdToDec(Wire.read());
*dayOfMonth = bcdToDec(Wire.read());
*month = bcdToDec(Wire.read());
*year = bcdToDec(Wire.read());
}
void checkTime() {
byte second, minute, hour, dayOfWeek, dayOfMonth, month, year;
// retrieve data from DS1307
readDS1307time(&second, &minute, &hour, &dayOfWeek, &dayOfMonth, &month,
&year);
if(hour 》= 6 && hour 《= 11) {
petFeedMorning = 1;
}
else if (hour 》= 5 && hour 《= 13) {
petFeedMorning = 0;
}
if(hour 》= 17 && hour 《= 21) {
petFeedAfternoon = 1;
}
else if(hour 《= 16 && hour 》= 18) {
petFeedAfternoon = 0;
}
}
void displayTimeSerial()
{
byte second, minute, hour, dayOfWeek, dayOfMonth, month, year;
// retrieve data from DS1307
readDS1307time(&second, &minute, &hour, &dayOfWeek, &dayOfMonth, &month,
&year);
//Current function prints this on the serial monitor
Serial.print(hour, DEC);
// convert the byte variable to a decimal number when displayed
Serial.print(”:“);
if (minute《10)
{
Serial.print(”0“);
}
Serial.print(minute, DEC);
Serial.print(”:“);
if (second《10)
{
Serial.print(”0“);
}
//Print seconds on serial monitor
Serial.print(second, DEC);
Serial.print(” “);
//Print numerical day of the month on serial monitor
Serial.print(dayOfMonth, DEC);
Serial.print(”/“);
//Print month on serial monitor
Serial.print(month, DEC);
Serial.print(”/“);
//Print year on serial monitor
Serial.print(year, DEC);
Serial.print(” Day of week: “);
//Determine specific day of the week
switch(dayOfWeek){
case 1:
Serial.println(”Sunday“);
break;
case 2:
Serial.println(”Monday“);
break;
case 3:
Serial.println(”Tuesday“);
break;
case 4:
Serial.println(”Wednesday“);
break;
case 5:
Serial.println(”Thursday“);
break;
case 6:
Serial.println(”Friday“);
break;
case 7:
Serial.println(”Saturday“);
break;
}
}
void displayTimeDisplay()
{
byte second, minute, hour, dayOfWeek, dayOfMonth, month, year;
// retrieve data from DS1307
readDS1307time(&second, &minute, &hour, &dayOfWeek, &dayOfMonth, &month,
&year);
//Current function shows this on the OLED display
//Display
//TODO Millis
/*
currentMillis = millis(); //get the current ”time“ (actually the number of milliseconds since the program started)
if (currentMillis - startMillis 》= period) //test whether the period has elapsed
{
display.clearDisplay();
display.display();
display.setCursor(0,0);
display.setTextSize(2); // Draw 2X-scale text
display.setTextColor(WHITE);
display.print(cm);
display.println(” Millis“);
display.display();
digitalWrite(trigPin, LOW);
delayMicroseconds(5);
digitalWrite(trigPin, HIGH);
delayMicroseconds(10);
digitalWrite(trigPin, LOW);
startMillis = currentMillis; //IMPORTANT to save the start time of the current LED state.
}
*/
//Display distance measured from Ultrasonic sensor on OLED
display.clearDisplay();
display.display();
display.setCursor(0,0);
display.setTextSize(2); // Draw 2X-scale text
display.setTextColor(WHITE);
display.print(cm);
display.println(” cm“);
display.setTextSize(1); // Draw 2X-scale text
display.setTextColor(WHITE);
display.println();
//Display hours on OLED
display.print(hour, DEC);
//Converting the byte variable to a decimal number when displayed
display.print(”:“);
if (minute《10)
{
display.print(”0“);
}
//Display minutes on OLED
display.print(minute, DEC);
display.print(”:“);
if (second《10)
{
display.print(”0“);
}
//Display seconds on OLED
display.print(second, DEC);
display.print(” “);
//Between 35 cm (under) and 5 cm (over) feed pet, turn motor CW
//else if(cm 《= 20 && hour 》= 7 && hour 《= 13) {
if(cm 《= 35 && cm 》5) {
display.setCursor(85,25);
display.setTextSize(1); // Draw 2X-scale text
display.setTextColor(WHITE);
display.print(”FEEDING“);
}
//Under 5 cm display length, time, day and date
else if(cm 《= 5) {
display.setCursor(85,25);
display.setTextSize(1); // Draw 2X-scale text
display.setTextColor(WHITE);
display.print(”DONE“);
}
display.display();
//TODO Millis
//delay(1000);
}
void displayDayDateDisplay()
{
byte second, minute, hour, dayOfWeek, dayOfMonth, month, year;
//Retrieving data from DS1307
readDS1307time(&second, &minute, &hour, &dayOfWeek, &dayOfMonth, &month,
&year);
//Sending it to the OLED display
//Display
//TODO Millis
//Day
display.clearDisplay();
display.setCursor(0,0);
display.setTextSize(1); // Draw 2X-scale text
display.setTextColor(WHITE);
display.println();
//Determine specific day of the week
switch(dayOfWeek){
case 1:
display.println(”Sunday“);
//display.println();
break;
case 2:
display.println(”Monday“);
break;
case 3:
display.println(”Tuesday“);
break;
case 4:
display.println(”Wednesday“);
break;
case 5:
display.println(”Thursday“);
break;
case 6:
display.println(”Friday“);
break;
case 7:
display.println(”Saturday“);
break;
}
//Date
display.setTextSize(2); // Draw 2X-scale text
display.setTextColor(WHITE);
display.print(dayOfMonth, DEC);
display.print(”/“);
display.print(month, DEC);
display.print(”/“);
display.print(year, DEC);
display.println(” “);
display.display();
//TODO Millis
//delay(500);
}
void ultrasonicTimeout() {
// The sensor is triggered by a HIGH pulse of 10 or more microseconds.
// Give a short LOW pulse beforehand to ensure a clean HIGH pulse:
/*
//Without Millis
digitalWrite(trigPin, LOW);
delayMicroseconds(5);
digitalWrite(trigPin, HIGH);
delayMicroseconds(10);
digitalWrite(trigPin, LOW);
*/
currentMillis = millis(); //get the current ”time“ (actually the number of milliseconds since the program started)
if (currentMillis - startMillis 》= period) //test whether the period has elapsed
{
digitalWrite(trigPin, LOW);
delayMicroseconds(5);
digitalWrite(trigPin, HIGH);
delayMicroseconds(10);
digitalWrite(trigPin, LOW);
startMillis = currentMillis; //IMPORTANT to save the start time of the current LED state.
}
// Read the signal from the sensor: a HIGH pulse whose
// duration is the time (in microseconds) from the sending
// of the ping to the reception of its echo off of an object.
pinMode(echoPin, INPUT);
duration = pulseIn(echoPin, HIGH);
// Convert the time into a distance
cm = (duration/2) / 29.1; // Divide by 29.1 or multiply by 0.0343
inches = (duration/2) / 74; // Divide by 74 or multiply by 0.0135
Serial.print(inches);
Serial.print(”in, “);
Serial.print(cm);
Serial.print(”cm“);
Serial.println();
//delay(200);
}
void ultrasonic() {
// The sensor is triggered by a HIGH pulse of 10 or more microseconds.
// Give a short LOW pulse beforehand to ensure a clean HIGH pulse:
/*
//Without Millis
digitalWrite(trigPin, LOW);
delayMicroseconds(5);
digitalWrite(trigPin, HIGH);
delayMicroseconds(10);
digitalWrite(trigPin, LOW);
*/
currentMillis = millis(); //get the current ”time“ (actually the number of milliseconds since the program started)
if (currentMillis - startMillis 》= period) //test whether the period has elapsed
{
digitalWrite(trigPin, LOW);
delayMicroseconds(5);
digitalWrite(trigPin, HIGH);
delayMicroseconds(10);
digitalWrite(trigPin, LOW);
startMillis = currentMillis; //IMPORTANT to save the start time of the current LED state.
}
// Read the signal from the sensor: a HIGH pulse whose
// duration is the time (in microseconds) from the sending
// of the ping to the reception of its echo off of an object.
pinMode(echoPin, INPUT);
duration = pulseIn(echoPin, HIGH);
// Convert the time into a distance
cm = (duration/2) / 29.1; // Divide by 29.1 or multiply by 0.0343
inches = (duration/2) / 74; // Divide by 74 or multiply by 0.0135
Serial.print(inches);
Serial.print(”in, “);
Serial.print(cm);
Serial.print(”cm“);
Serial.println();
}
void stepMotorFeed() {
/*
currentMillis = millis(); //get the current ”time“ (actually the number of milliseconds since the program started)
if (currentMillis - startMillis 》= period) //test whether the period has elapsed
{
//function to turn stepper motor 32 steps left
small_stepperFeed.setSpeed(300); // 200 as max speed?
//ultrasonic();
Steps2TakeFeed = -3200; // Rotate CW
//ultrasonic();
small_stepperFeed.step(Steps2TakeFeed);
startMillis = currentMillis; //IMPORTANT to save the start time of the current LED state.
}
*/
//function to turn stepper motor 32 steps left
small_stepperFeed.setSpeed(300); // 200 as max speed?
//ultrasonic();
Steps2TakeFeed = -520; // Rotate CW
//ultrasonic();
small_stepperFeed.step(Steps2TakeFeed);
}
void testdrawlogo() {
display.clearDisplay();
display.drawBitmap(
(display.width() - SCREEN_WIDTH ),
(display.height() - SCREEN_HEIGHT),
myBitmap, SCREEN_WIDTH, SCREEN_HEIGHT, 1);
display.display();
// Invert and restore display, pausing in-between
display.invertDisplay(true);
delay(1000);
display.invertDisplay(false);
delay(8000);
}
-
喂食器
+關注
關注
1文章
27瀏覽量
3394
發布評論請先 登錄
芯資訊|寵物喂食器錄音語音芯片應用解析:廣州唯創電子WTR096系列技術優勢與場景實踐
涂鴉AI多寵識別方案落地量產!寵物檔案+進食記錄全面革新科學養寵體驗

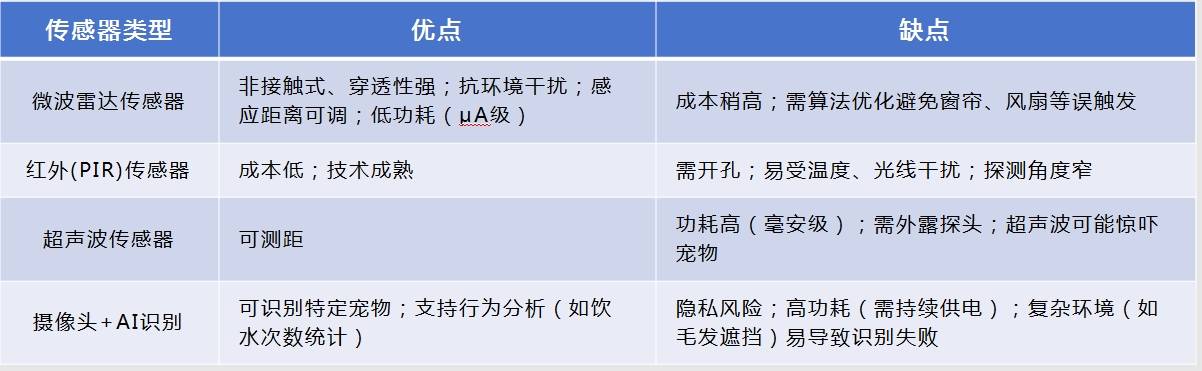
智能寵物飲水機WTL580微波雷達感應模塊應用方案;便捷管理寵物飲水

直播預告|如何在10分鐘內開發爆款寵物AI硬件?涂鴉手把手直播教學來了
智能寵物飲水機WTL580微波雷達感應模塊方案;便捷管理寵物飲水
基于WT2000P4錄音IC的寵物喂食器應用方案-支持手機APP功能拓展,遠程下載更新
霍爾開關在智能寵物飲水機中的作用
Wio LTE的寵物物流安全衛士設計案例
寵物自動喂食器主控芯片DSH3186
裝配液位傳感器的智能寵物飲水機:流水不腐、喝水不累!

NVF04M錄音芯片在寵物喂食器的應用:錄音播放功能,內置SPI閃存

寵物烘干機需不需要做CCC認證?需要準備哪些材料?


物聯網智能寵物管理系統


 工商網監
工商網監
評論