資料介紹
描述
在上一篇文章中,您了解了使用 Arduino 的基于 RFID 和鍵盤的門鎖和警報系統(tǒng),其中用戶必須掃描正確的標(biāo)簽并輸入正確的密碼才能打開門鎖,系統(tǒng)還會向我們發(fā)送確認(rèn)消息。
在這篇文章中,您將了解如何使用 Arduino 構(gòu)建基于 RFID 的訪問控制系統(tǒng)。系統(tǒng)只允許掃描正確的標(biāo)簽和掃描錯誤的標(biāo)簽,系統(tǒng)將拒絕訪問,并且蜂鳴器會發(fā)出嗶嗶聲。將有一個主標(biāo)簽用于添加/刪除其他標(biāo)簽。
模塊斷電后保存的標(biāo)簽仍會保留。重置系統(tǒng)的唯一方法是使用擦除按鈕,該按鈕將擦除 EEPROM 中的所有數(shù)據(jù)。EEPROM 大約有 100, 000 個有限的寫入周期。
這是 RFID Arduino 系列的第四篇文章。RFID Arduino系列所有文章如下
- RFID 基礎(chǔ)知識和與 Arduino 連接的 RFID 模塊
- 使用 Arduino 的基于 RFID 和鍵盤的門鎖
- 使用 Arduino 的基于 RFID 和鍵盤的門鎖和警報系統(tǒng)
- 使用 Arduino 的基于 RFID 的訪問控制系統(tǒng)
- 使用 Arduino 的基于 RFID 的訪問控制和警報系統(tǒng)
- 使用 Arduino 的基于 RFID 和鍵盤的訪問控制
- 使用 Arduino 的基于 RFID 和鍵盤的訪問控制和警報系統(tǒng)
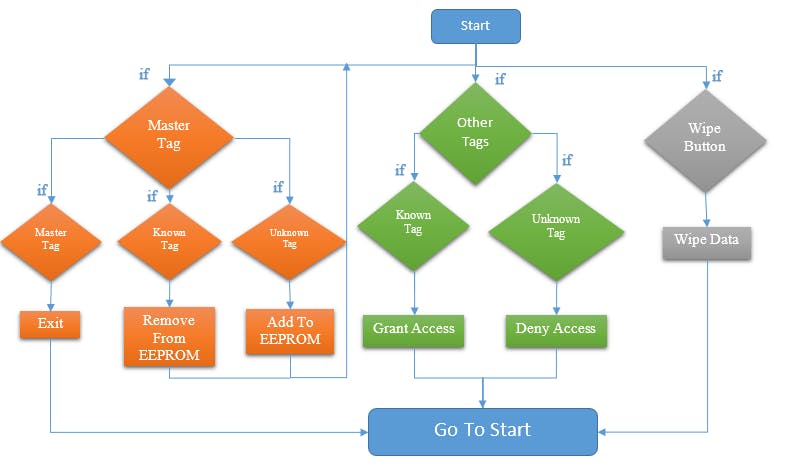
使用Arduino的基于RFID的訪問控制系統(tǒng)的工作
第一次啟動項目時,它會要求您定義一個主標(biāo)簽,您將掃描的任何標(biāo)簽都將是您的主標(biāo)簽。主標(biāo)簽將充當(dāng)程序員,您可以使用它來添加或刪除其他標(biāo)簽。
定義主標(biāo)簽后,您必須添加可用于開門的其他標(biāo)簽。為此,請掃描主標(biāo)簽,它將使系統(tǒng)進(jìn)入程序模式。
在程序模式下,掃描標(biāo)簽將從系統(tǒng)中添加/刪除這些標(biāo)簽。掃描您想用來開門的標(biāo)簽,系統(tǒng)會將這些標(biāo)簽的 UID 存儲在 EEPROM 中。再次掃描標(biāo)簽以將其從 EEPROM 中移除。要退出編程模式,請掃描主標(biāo)簽。
現(xiàn)在掃描您在系統(tǒng)中添加的標(biāo)簽以打開門,掃描錯誤的標(biāo)簽時,門將保持關(guān)閉狀態(tài)。
要重置系統(tǒng),請按 Arduino 的重置按鈕,然后長按擦除按鈕 10 秒。這將從 EEPROM 中刪除所有數(shù)據(jù),包括主標(biāo)簽。
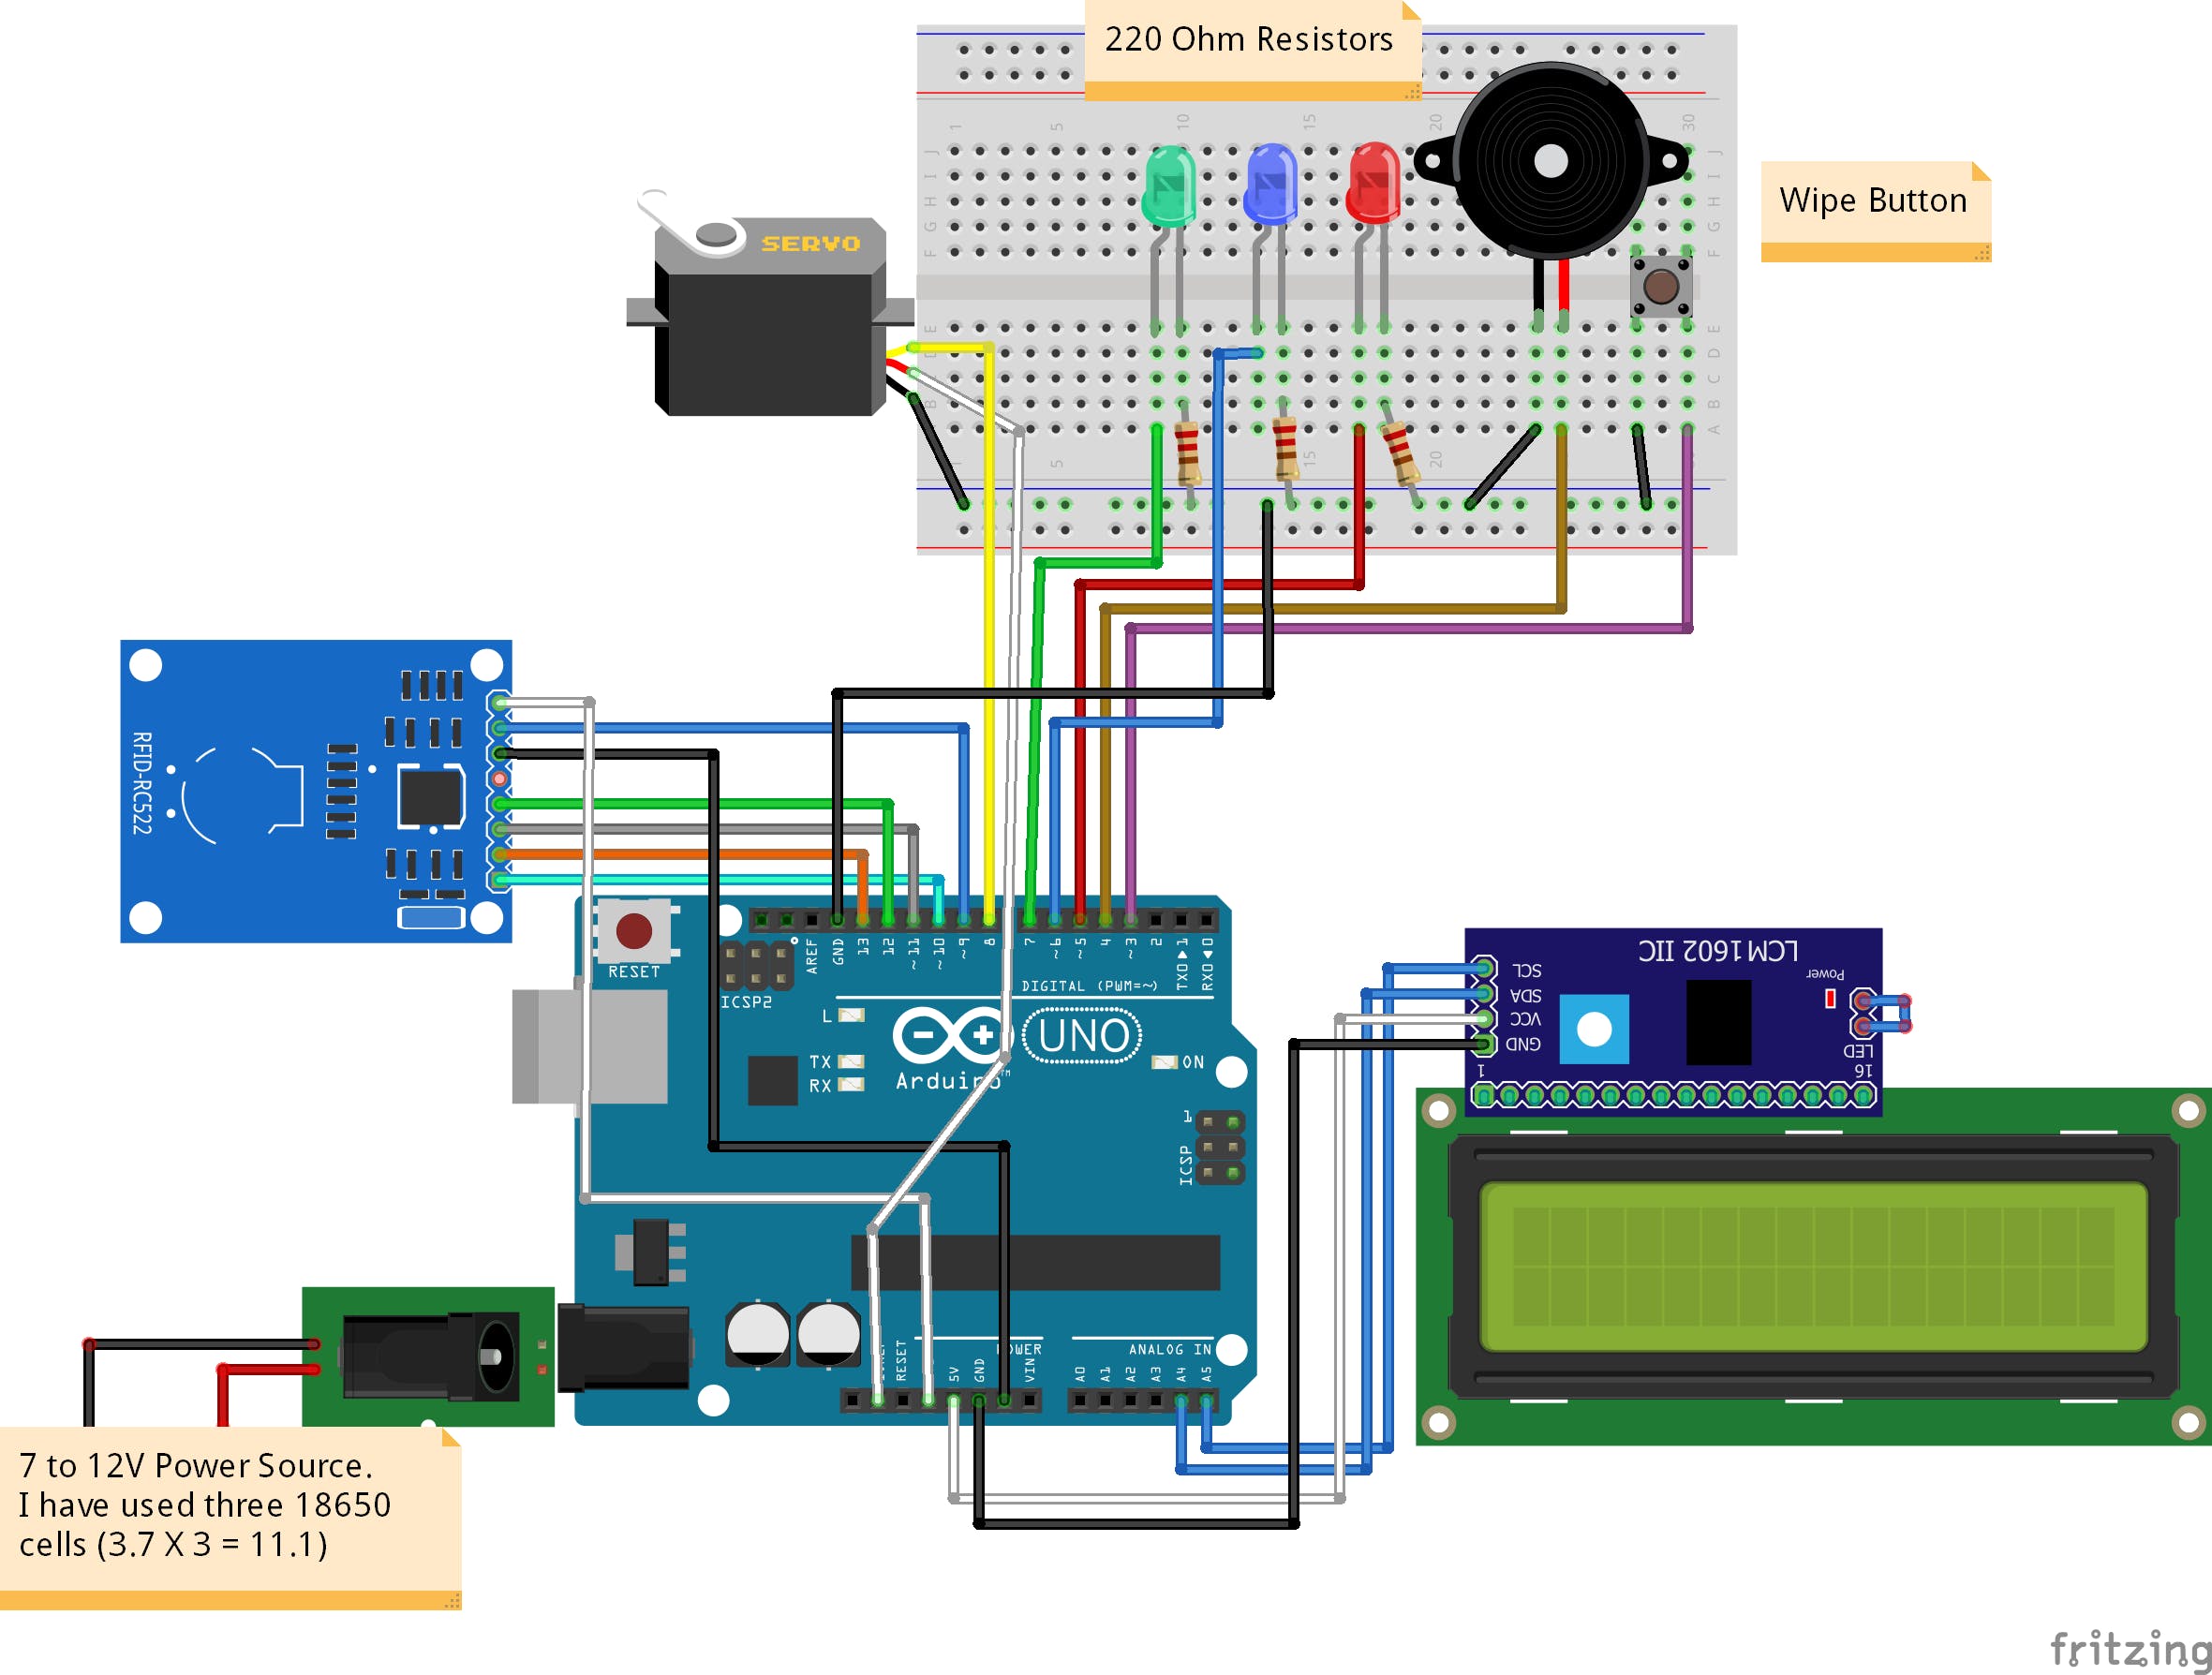
電路圖及說明
RFID 閱讀器通過 SPI 協(xié)議與 Arduino 通信,不同的 Arduino 板具有不同的 SPI 引腳。
要測試 RFID 閱讀器是否正常工作,請上傳 Arduino 中示例中的“dumpinfo”,看看它是否在串行監(jiān)視器上顯示標(biāo)簽的信息。如果您是 RFID 新手,請遵循本教程 | RFID 基礎(chǔ)知識和與 Arduino 連接的 RFID 模塊
I2C LCD 通過 I2C 協(xié)議與 Arduino 通信。不同的 Arduino 板具有不同的 I2C 引腳。Arduino Uno 和 Arduino Nano 上的 I2C 引腳是 A4、A5。
之后,將 Arduino 與伺服、LED、蜂鳴器和按鈕連接起來。
最后,將電源連接到 Arduino。我用了三個 18650 電池。我們可以通過筒形千斤頂給 Arduino 提供 6 到 12V 的電壓。
使用Arduino的基于RFID的訪問控制系統(tǒng)的完整電路圖如下
?

?
代碼
下面的代碼是 Miguel Balboa 編寫的庫中示例草圖的修改版本。圖書館的鏈接如下
https://github.com/miguelbalboa/rfid
使用Arduino的基于RFID的訪問控制系統(tǒng)的完整代碼如下
#include // We are going to read and write Tag's UIDs from/to EEPROM
#include
#include
#include
#include
#include
// Create instances
MFRC522 mfrc522(10, 9); // MFRC522 mfrc522(SS_PIN, RST_PIN)
LiquidCrystal_I2C lcd(0x27, 16, 2);
Servo myServo; // create servo object to control a servo
// Set Pins for led's, servo, buzzer and wipe button
constexpr uint8_t greenLed = 7;
constexpr uint8_t blueLed = 6;
constexpr uint8_t redLed = 5;
constexpr uint8_t ServoPin = 8;
constexpr uint8_t BuzzerPin = 4;
constexpr uint8_t wipeB = 3; // Button pin for WipeMode
boolean match = false; // initialize card match to false
boolean programMode = false; // initialize programming mode to false
boolean replaceMaster = false;
uint8_t successRead; // Variable integer to keep if we have Successful Read from Reader
byte storedCard[4]; // Stores an ID read from EEPROM
byte readCard[4]; // Stores scanned ID read from RFID Module
byte masterCard[4]; // Stores master card's ID read from EEPROM
///////////////////////////////////////// Setup ///////////////////////////////////
void setup() {
//Arduino Pin Configuration
pinMode(redLed, OUTPUT);
pinMode(greenLed, OUTPUT);
pinMode(blueLed, OUTPUT);
pinMode(BuzzerPin, OUTPUT);
pinMode(wipeB, INPUT_PULLUP); // Enable pin's pull up resistor
// Make sure led's are off
digitalWrite(redLed, LOW);
digitalWrite(greenLed, LOW);
digitalWrite(blueLed, LOW);
//Protocol Configuration
lcd.begin(); // initialize the LCD
lcd.backlight();
SPI.begin(); // MFRC522 Hardware uses SPI protocol
mfrc522.PCD_Init(); // Initialize MFRC522 Hardware
myServo.attach(ServoPin); // attaches the servo on pin 8 to the servo object
myServo.write(10); // Initial Position
//If you set Antenna Gain to Max it will increase reading distance
//mfrc522.PCD_SetAntennaGain(mfrc522.RxGain_max);
ShowReaderDetails(); // Show details of PCD - MFRC522 Card Reader details
//Wipe Code - If the Button (wipeB) Pressed while setup run (powered on) it wipes EEPROM
if (digitalRead(wipeB) == LOW) { // when button pressed pin should get low, button connected to ground
digitalWrite(redLed, HIGH); // Red Led stays on to inform user we are going to wipe
lcd.setCursor(0, 0);
lcd.print("Button Pressed");
digitalWrite(BuzzerPin, HIGH);
delay(1000);
digitalWrite(BuzzerPin, LOW);
lcd.clear();
lcd.setCursor(0, 0);
lcd.print("This will remove");
lcd.setCursor(0, 1);
lcd.print("all records");
delay(2000);
lcd.clear();
lcd.setCursor(0, 0);
lcd.print("You have 10 ");
lcd.setCursor(0, 1);
lcd.print("secs to Cancel");
delay(2000);
lcd.clear();
lcd.setCursor(0, 0);
lcd.print("Unpres to cancel");
lcd.setCursor(0, 1);
lcd.print("Counting: ");
bool buttonState = monitorWipeButton(10000); // Give user enough time to cancel operation
if (buttonState == true && digitalRead(wipeB) == LOW) { // If button still be pressed, wipe EEPROM
lcd.print("Wiping EEPROM...");
for (uint16_t x = 0; x < EEPROM.length(); x = x + 1) { //Loop end of EEPROM address
if (EEPROM.read(x) == 0) { //If EEPROM address 0
// do nothing, already clear, go to the next address in order to save time and reduce writes to EEPROM
}
else {
EEPROM.write(x, 0); // if not write 0 to clear, it takes 3.3mS
}
}
lcd.clear();
lcd.setCursor(0, 0);
lcd.print("Wiping Done");
// visualize a successful wipe
digitalWrite(redLed, LOW);
digitalWrite(BuzzerPin, HIGH);
delay(200);
digitalWrite(redLed, HIGH);
digitalWrite(BuzzerPin, LOW);
delay(200);
digitalWrite(redLed, LOW);
digitalWrite(BuzzerPin, HIGH);
delay(200);
digitalWrite(redLed, HIGH);
digitalWrite(BuzzerPin, LOW);
delay(200);
digitalWrite(redLed, LOW);
}
else {
lcd.clear();
lcd.setCursor(0, 0);
lcd.print("Wiping Cancelled"); // Show some feedback that the wipe button did not pressed for 10 seconds
digitalWrite(redLed, LOW);
}
}
// Check if master card defined, if not let user choose a master card
// This also useful to just redefine the Master Card
// You can keep other EEPROM records just write other than 143 to EEPROM address 1
// EEPROM address 1 should hold magical number which is '143'
if (EEPROM.read(1) != 143) {
lcd.clear();
lcd.setCursor(0, 0);
lcd.print("No Master Card ");
lcd.setCursor(0, 1);
lcd.print("Defined");
delay(2000);
lcd.setCursor(0, 0);
lcd.print("Scan A Tag to ");
lcd.setCursor(0, 1);
lcd.print("Define as Master");
do {
successRead = getID(); // sets successRead to 1 when we get read from reader otherwise 0
// Visualize Master Card need to be defined
digitalWrite(blueLed, HIGH);
digitalWrite(BuzzerPin, HIGH);
delay(200);
digitalWrite(BuzzerPin, LOW);
digitalWrite(blueLed, LOW);
delay(200);
}
while (!successRead); // Program will not go further while you not get a successful read
for ( uint8_t j = 0; j < 4; j++ ) { // Loop 4 times
EEPROM.write( 2 + j, readCard[j] ); // Write scanned Tag's UID to EEPROM, start from address 3
}
EEPROM.write(1, 143); // Write to EEPROM we defined Master Card.
lcd.clear();
lcd.setCursor(0, 0);
lcd.print("Master Defined");
delay(2000);
}
for ( uint8_t i = 0; i < 4; i++ ) { // Read Master Card's UID from EEPROM
masterCard[i] = EEPROM.read(2 + i); // Write it to masterCard
}
ShowOnLCD(); // Print data on LCD
cycleLeds(); // Everything ready lets give user some feedback by cycling leds
}
///////////////////////////////////////// Main Loop ///////////////////////////////////
void loop () {
do {
successRead = getID(); // sets successRead to 1 when we get read from reader otherwise 0
if (programMode) {
cycleLeds(); // Program Mode cycles through Red Green Blue waiting to read a new card
}
else {
normalModeOn(); // Normal mode, blue Power LED is on, all others are off
}
}
while (!successRead); //the program will not go further while you are not getting a successful read
if (programMode) {
if ( isMaster(readCard) ) { //When in program mode check First If master card scanned again to exit program mode
lcd.clear();
lcd.setCursor(0, 0);
lcd.print("Exiting Program Mode");
digitalWrite(BuzzerPin, HIGH);
delay(1000);
digitalWrite(BuzzerPin, LOW);
ShowOnLCD();
programMode = false;
return;
}
else {
if ( findID(readCard) ) { // If scanned card is known delete it
lcd.clear();
lcd.setCursor(0, 0);
lcd.print("Already there");
deleteID(readCard);
lcd.clear();
lcd.setCursor(0, 0);
lcd.print("Tag to ADD/REM");
lcd.setCursor(0, 1);
lcd.print("Master to Exit");
}
else { // If scanned card is not known add it
lcd.clear();
lcd.setCursor(0, 0);
lcd.print("New Tag,adding...");
writeID(readCard);
lcd.clear();
lcd.setCursor(0, 0);
lcd.print("Scan to ADD/REM");
lcd.setCursor(0, 1);
lcd.print("Master to Exit");
}
}
}
else {
if ( isMaster(readCard)) { // If scanned card's ID matches Master Card's ID - enter program mode
programMode = true;
lcd.clear();
lcd.setCursor(0, 0);
lcd.print("Program Mode");
uint8_t count = EEPROM.read(0); // Read the first Byte of EEPROM that stores the number of ID's in EEPROM
lcd.setCursor(0, 1);
lcd.print("I have ");
lcd.print(count);
lcd.print(" records");
digitalWrite(BuzzerPin, HIGH);
delay(2000);
digitalWrite(BuzzerPin, LOW);
lcd.clear();
lcd.setCursor(0, 0);
lcd.print("Scan a Tag to ");
lcd.setCursor(0, 1);
lcd.print("ADD/REMOVE");
}
else {
if ( findID(readCard) ) { // If not, see if the card is in the EEPROM
lcd.clear();
lcd.setCursor(0, 0);
lcd.print("Access Granted");
granted(); // Open the door lock
myServo.write(10);
ShowOnLCD();
}
else { // If not, show that the Access is denied
lcd.clear();
lcd.setCursor(0, 0);
lcd.print("Access Denied");
denied();
ShowOnLCD();
}
}
}
}
///////////////////////////////////////// Access Granted ///////////////////////////////////
void granted () {
digitalWrite(blueLed, LOW); // Turn off blue LED
digitalWrite(redLed, LOW); // Turn off red LED
digitalWrite(greenLed, HIGH); // Turn on green LED
myServo.write(90);
delay(1000);
}
///////////////////////////////////////// Access Denied ///////////////////////////////////
void denied() {
digitalWrite(greenLed, LOW); // Make sure green LED is off
digitalWrite(blueLed, LOW); // Make sure blue LED is off
digitalWrite(redLed, HIGH); // Turn on red LED
digitalWrite(BuzzerPin, HIGH);
delay(1000);
digitalWrite(BuzzerPin, LOW);
}
///////////////////////////////////////// Get Tag's UID ///////////////////////////////////
uint8_t getID() {
// Getting ready for Reading Tags
if ( ! mfrc522.PICC_IsNewCardPresent()) { //If a new Tag placed to RFID reader continue
return 0;
}
if ( ! mfrc522.PICC_ReadCardSerial()) { //Since a Tag placed get Serial and continue
return 0;
}
// There are Mifare Tags which have 4 byte or 7 byte UID care if you use 7 byte Tag
// I think we should assume every Tag as they have 4 byte UID
// Until we support 7 byte Tags
for ( uint8_t i = 0; i < 4; i++) { //
readCard[i] = mfrc522.uid.uidByte[i];
}
mfrc522.PICC_HaltA(); // Stop reading
return 1;
}
/////////////////////// Check if RFID Reader is correctly initialized or not /////////////////////
void ShowReaderDetails() {
// Get the MFRC522 software version
byte v = mfrc522.PCD_ReadRegister(mfrc522.VersionReg);
// When 0x00 or 0xFF is returned, communication probably failed
if ((v == 0x00) || (v == 0xFF)) {
lcd.setCursor(0, 0);
lcd.print("Communication Failure");
lcd.setCursor(0, 1);
lcd.print("Check Connections");
digitalWrite(BuzzerPin, HIGH);
delay(2000);
// Visualize system is halted
digitalWrite(greenLed, LOW); // Make sure green LED is off
digitalWrite(blueLed, LOW); // Make sure blue LED is off
digitalWrite(redLed, HIGH); // Turn on red LED
digitalWrite(BuzzerPin, LOW);
while (true); // do not go further
}
}
///////////////////////////////////////// Cycle Leds (Program Mode) ///////////////////////////////////
void cycleLeds() {
digitalWrite(redLed, LOW); // Make sure red LED is off
digitalWrite(greenLed, HIGH); // Make sure green LED is on
digitalWrite(blueLed, LOW); // Make sure blue LED is off
delay(200);
digitalWrite(redLed, LOW); // Make sure red LED is off
digitalWrite(greenLed, LOW); // Make sure green LED is off
digitalWrite(blueLed, HIGH); // Make sure blue LED is on
delay(200);
digitalWrite(redLed, HIGH); // Make sure red LED is on
digitalWrite(greenLed, LOW); // Make sure green LED is off
digitalWrite(blueLed, LOW); // Make sure blue LED is off
delay(200);
}
//////////////////////////////////////// Normal Mode Led ///////////////////////////////////
void normalModeOn () {
digitalWrite(blueLed, HIGH); // Blue LED ON and ready to read card
digitalWrite(redLed, LOW); // Make sure Red LED is off
digitalWrite(greenLed, LOW); // Make sure Green LED is off
}
//////////////////////////////////////// Read an ID from EEPROM //////////////////////////////
void readID( uint8_t number ) {
uint8_t start = (number * 4 ) + 2; // Figure out starting position
for ( uint8_t i = 0; i < 4; i++ ) { // Loop 4 times to get the 4 Bytes
storedCard[i] = EEPROM.read(start + i); // Assign values read from EEPROM to array
}
}
///////////////////////////////////////// Add ID to EEPROM ///////////////////////////////////
void writeID( byte a[] ) {
if ( !findID( a ) ) { // Before we write to the EEPROM, check to see if we have seen this card before!
uint8_t num = EEPROM.read(0); // Get the numer of used spaces, position 0 stores the number of ID cards
uint8_t start = ( num * 4 ) + 6; // Figure out where the next slot starts
num++; // Increment the counter by one
EEPROM.write( 0, num ); // Write the new count to the counter
for ( uint8_t j = 0; j < 4; j++ ) { // Loop 4 times
EEPROM.write( start + j, a[j] ); // Write the array values to EEPROM in the right position
}
BlinkLEDS(greenLed);
lcd.setCursor(0, 1);
lcd.print("Added");
delay(1000);
}
else {
BlinkLEDS(redLed);
lcd.setCursor(0, 0);
lcd.print("Failed!");
lcd.setCursor(0, 1);
lcd.print("wrong ID or bad EEPROM");
delay(2000);
}
}
///////////////////////////////////////// Remove ID from EEPROM ///////////////////////////////////
void deleteID( byte a[] ) {
if ( !findID( a ) ) { // Before we delete from the EEPROM, check to see if we have this card!
BlinkLEDS(redLed); // If not
lcd.setCursor(0, 0);
lcd.print("Failed!");
lcd.setCursor(0, 1);
lcd.print("wrong ID or bad EEPROM");
delay(2000);
}
else {
uint8_t num = EEPROM.read(0); // Get the numer of used spaces, position 0 stores the number of ID cards
uint8_t slot; // Figure out the slot number of the card
uint8_t start; // = ( num * 4 ) + 6; // Figure out where the next slot starts
uint8_t looping; // The number of times the loop repeats
uint8_t j;
uint8_t count = EEPROM.read(0); // Read the first Byte of EEPROM that stores number of cards
slot = findIDSLOT( a ); // Figure out the slot number of the card to delete
start = (slot * 4) + 2;
looping = ((num - slot) * 4);
num--; // Decrement the counter by one
EEPROM.write( 0, num ); // Write the new count to the counter
for ( j = 0; j < looping; j++ ) { // Loop the card shift times
EEPROM.write( start + j, EEPROM.read(start + 4 + j)); // Shift the array values to 4 places earlier in the EEPROM
}
for ( uint8_t k = 0; k < 4; k++ ) { // Shifting loop
EEPROM.write( start + j + k, 0);
}
BlinkLEDS(blueLed);
lcd.setCursor(0, 1);
lcd.print("Removed");
delay(1000);
}
}
///////////////////////////////////////// Check Bytes ///////////////////////////////////
boolean checkTwo ( byte a[], byte b[] ) {
if ( a[0] != 0 ) // Make sure there is something in the array first
match = true; // Assume they match at first
for ( uint8_t k = 0; k < 4; k++ ) { // Loop 4 times
if ( a[k] != b[k] ) // IF a != b then set match = false, one fails, all fail
match = false;
}
if ( match ) { // Check to see if if match is still true
return true; // Return true
}
else {
return false; // Return false
}
}
///////////////////////////////////////// Find Slot ///////////////////////////////////
uint8_t findIDSLOT( byte find[] ) {
uint8_t count = EEPROM.read(0); // Read the first Byte of EEPROM that
for ( uint8_t i = 1; i <= count; i++ ) { // Loop once for each EEPROM entry
readID(i); // Read an ID from EEPROM, it is stored in storedCard[4]
if ( checkTwo( find, storedCard ) ) { // Check to see if the storedCard read from EEPROM
// is the same as the find[] ID card passed
return i; // The slot number of the card
break; // Stop looking we found it
}
}
}
///////////////////////////////////////// Find ID From EEPROM ///////////////////////////////////
boolean findID( byte find[] ) {
uint8_t count = EEPROM.read(0); // Read the first Byte of EEPROM that
for ( uint8_t i = 1; i <= count; i++ ) { // Loop once for each EEPROM entry
readID(i); // Read an ID from EEPROM, it is stored in storedCard[4]
if ( checkTwo( find, storedCard ) ) { // Check to see if the storedCard read from EEPROM
return true;
break; // Stop looking we found it
}
else { // If not, return false
}
}
return false;
}
///////////////////////////////////////// Blink LED's For Indication ///////////////////////////////////
void BlinkLEDS(int led) {
digitalWrite(blueLed, LOW); // Make sure blue LED is off
digitalWrite(redLed, LOW); // Make sure red LED is off
digitalWrite(greenLed, LOW); // Make sure green LED is off
digitalWrite(BuzzerPin, HIGH);
delay(200);
digitalWrite(led, HIGH); // Make sure blue LED is on
digitalWrite(BuzzerPin, LOW);
delay(200);
digitalWrite(led, LOW); // Make sure blue LED is off
digitalWrite(BuzzerPin, HIGH);
delay(200);
digitalWrite(led, HIGH); // Make sure blue LED is on
digitalWrite(BuzzerPin, LOW);
delay(200);
digitalWrite(led, LOW); // Make sure blue LED is off
digitalWrite(BuzzerPin, HIGH);
delay(200);
digitalWrite(led, HIGH); // Make sure blue LED is on
digitalWrite(BuzzerPin, LOW);
delay(200);
}
////////////////////// Check readCard IF is masterCard ///////////////////////////////////
// Check to see if the ID passed is the master programing card
boolean isMaster( byte test[] ) {
if ( checkTwo( test, masterCard ) )
return true;
else
return false;
}
/////////////////// Counter to check in reset/wipe button is pressed or not /////////////////////
bool monitorWipeButton(uint32_t interval) {
unsigned long currentMillis = millis(); // grab current time
while (millis() - currentMillis < interval) {
int timeSpent = (millis() - currentMillis) / 1000;
Serial.println(timeSpent);
lcd.setCursor(10, 1);
lcd.print(timeSpent);
// check on every half a second
if (((uint32_t)millis() % 10) == 0) {
if (digitalRead(wipeB) != LOW) {
return false;
}
}
}
return true;
}
////////////////////// Print Info on LCD ///////////////////////////////////
void ShowOnLCD() {
lcd.clear();
lcd.setCursor(0, 0);
lcd.print(" Access Control");
lcd.setCursor(0, 1);
lcd.print(" Scan a Tag");
}
?
?
- Arduino球和光束控制系統(tǒng)
- 如何制作RFID Arduino門禁系統(tǒng)
- 使用Arduino基于RFID的考勤系統(tǒng)
- 使用Arduino的基于RFID的考勤系統(tǒng)
- 基于RFID的訪問控制和監(jiān)控系統(tǒng)
- 基于RFID的創(chuàng)客空間訪問控制系統(tǒng)
- 會說話的RFID自行車控制系統(tǒng)
- 電力拖動自動控制系統(tǒng)之運(yùn)動控制系統(tǒng)電子版 0次下載
- 基于DSP的攤鋪機(jī)行駛控制系統(tǒng) 9次下載
- 基于區(qū)塊鏈的物聯(lián)網(wǎng)訪問控制系統(tǒng) 45次下載
- DDC控制系統(tǒng)和PLC控制系統(tǒng)對比和應(yīng)用 12次下載
- 基于XACML訪問控制系統(tǒng)設(shè)計 4次下載
- 基于Arduino的移動機(jī)器人控制系統(tǒng)設(shè)計_彭攀來 5次下載
- 基于組件的訪問控制系統(tǒng)快速開發(fā)方法
- 安全訪問控制系統(tǒng)的設(shè)計和實現(xiàn)
- 現(xiàn)場總線控制系統(tǒng)與集散控制系統(tǒng)的對比 2263次閱讀
- 前饋控制系統(tǒng)與反饋控制系統(tǒng)的區(qū)別 4214次閱讀
- 開環(huán)控制系統(tǒng)與閉環(huán)控制系統(tǒng)的區(qū)別 1w次閱讀
- PLC控制系統(tǒng)與繼電器控制系統(tǒng)的比較 3155次閱讀
- 伺服控制系統(tǒng)與變頻控制系統(tǒng)的比較 1256次閱讀
- plc控制系統(tǒng)與傳統(tǒng)繼電器控制區(qū)別 plc控制系統(tǒng)的優(yōu)點 3737次閱讀
- 智能控制系統(tǒng)的主要類型有哪些? 3300次閱讀
- DCS控制系統(tǒng)是什么?DCS控制系統(tǒng)的特點 4127次閱讀
- 如何使用Arduino創(chuàng)建停車門禁控制系統(tǒng)? 5302次閱讀
- 基于 RFID 和 ARM 架構(gòu)的醫(yī)療器械智能控制系統(tǒng) 1198次閱讀
- 機(jī)器人控制系統(tǒng)分類_機(jī)器人控制系統(tǒng)有哪些 2.6w次閱讀
- 微機(jī)控制系統(tǒng)的分類 4767次閱讀
- PID是控制系統(tǒng)嗎?控制系統(tǒng)由什么組成? 1w次閱讀
- 機(jī)器人控制系統(tǒng)概念!機(jī)器人控制系統(tǒng)的基本要求 9898次閱讀
- DCS系統(tǒng)基礎(chǔ)知識,DCS控制系統(tǒng)和PLC控制系統(tǒng),你會怎么選擇? 1.8w次閱讀
下載排行
本周
- 1山景DSP芯片AP8248A2數(shù)據(jù)手冊
- 1.06 MB | 532次下載 | 免費(fèi)
- 2RK3399完整板原理圖(支持平板,盒子VR)
- 3.28 MB | 339次下載 | 免費(fèi)
- 3TC358743XBG評估板參考手冊
- 1.36 MB | 330次下載 | 免費(fèi)
- 4DFM軟件使用教程
- 0.84 MB | 295次下載 | 免費(fèi)
- 5元宇宙深度解析—未來的未來-風(fēng)口還是泡沫
- 6.40 MB | 227次下載 | 免費(fèi)
- 6迪文DGUS開發(fā)指南
- 31.67 MB | 194次下載 | 免費(fèi)
- 7元宇宙底層硬件系列報告
- 13.42 MB | 182次下載 | 免費(fèi)
- 8FP5207XR-G1中文應(yīng)用手冊
- 1.09 MB | 178次下載 | 免費(fèi)
本月
- 1OrCAD10.5下載OrCAD10.5中文版軟件
- 0.00 MB | 234315次下載 | 免費(fèi)
- 2555集成電路應(yīng)用800例(新編版)
- 0.00 MB | 33566次下載 | 免費(fèi)
- 3接口電路圖大全
- 未知 | 30323次下載 | 免費(fèi)
- 4開關(guān)電源設(shè)計實例指南
- 未知 | 21549次下載 | 免費(fèi)
- 5電氣工程師手冊免費(fèi)下載(新編第二版pdf電子書)
- 0.00 MB | 15349次下載 | 免費(fèi)
- 6數(shù)字電路基礎(chǔ)pdf(下載)
- 未知 | 13750次下載 | 免費(fèi)
- 7電子制作實例集錦 下載
- 未知 | 8113次下載 | 免費(fèi)
- 8《LED驅(qū)動電路設(shè)計》 溫德爾著
- 0.00 MB | 6656次下載 | 免費(fèi)
總榜
- 1matlab軟件下載入口
- 未知 | 935054次下載 | 免費(fèi)
- 2protel99se軟件下載(可英文版轉(zhuǎn)中文版)
- 78.1 MB | 537798次下載 | 免費(fèi)
- 3MATLAB 7.1 下載 (含軟件介紹)
- 未知 | 420027次下載 | 免費(fèi)
- 4OrCAD10.5下載OrCAD10.5中文版軟件
- 0.00 MB | 234315次下載 | 免費(fèi)
- 5Altium DXP2002下載入口
- 未知 | 233046次下載 | 免費(fèi)
- 6電路仿真軟件multisim 10.0免費(fèi)下載
- 340992 | 191187次下載 | 免費(fèi)
- 7十天學(xué)會AVR單片機(jī)與C語言視頻教程 下載
- 158M | 183279次下載 | 免費(fèi)
- 8proe5.0野火版下載(中文版免費(fèi)下載)
- 未知 | 138040次下載 | 免費(fèi)
評論