 樹莓派項目實戰:車牌識別系統開發全記錄!
介紹
本項目的目標是設計一個基于樹莓派微電腦的自動車牌識別系統,用于控制停車場的道閘。
為什么?
我有一臺閑置的樹莓派,沒有參與任何項目,還有一臺攝像頭,以及一個潛在的問題點——辦公室停車場沒有自動化的道閘控制系統。那么,為什么不利用這些設備來做一個有趣的項目呢?
本項目的目的并不是要創建一個生產就緒、穩定且具有競爭力的解決方案,而是要在使用有限設備解決實際問題的過程中享受樂趣,并創建一個可工作的產品。之后,還可以進一步優化這個解決方案,使其在輕量級邊緣設備上運行得更快。
總體思路是使用樹莓派攝像頭以一定頻率拍照,處理圖像,檢測車牌,識別字符,并與數據庫中的允許車牌列表進行比較。如果匹配,道閘將打開。
在基礎階段,我們將使用以下工具:
圖像源:樹莓派攝像頭模塊v2
車牌檢測器:使用PyTorch的YOLO v7
光學字符識別(OCR):EasyOCR
“數據庫”:Google表格中的表格
所有處理任務和計算都應在樹莓派4B上本地執行,解決方案必須能夠自主運行。
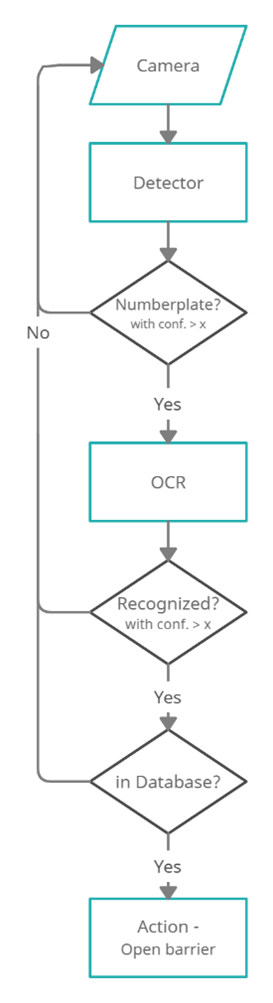
基礎版本的簡化流程圖
樹莓派將“近乎實時”地從攝像頭連續讀取幀。然后,使用在自定義數據集上微調的YOLOv7模型檢測車牌區域。之后,如果需要,對圖像進行預處理,然后EasyOCR模型將從裁剪后的幀中檢測車牌號碼。然后檢查車牌字符串是否與“數據庫”中存儲的任何車牌匹配,并執行相應的操作。使用樹莓派的GPIO(通用輸入輸出)控制的繼電器開關,我們可以連接停車道閘和任何附加負載,如燈光等。
GPIO引腳還允許連接輸入傳感器(如紅外、被動紅外傳感器),并在檢測到車輛時觸發攝像頭。
再次強調,這個問題可以通過多種方式解決,也許其中一些方式在某些要求和使用場景下會更高效、更簡單。例如,所有繁重的處理都可以在云端進行;我們可以使用基于GPU的邊緣設備;可以使用其他模型;使用ONNX、TFLite等進行部署。但這個項目是作為一個實驗來完成的,使用的是我目前擁有的設備,而且我并沒有尋找簡單的方法。
環境設置
硬件設計
必要的硬件:
攝像頭:樹莓派攝像頭模塊v2
邊緣設備:樹莓派4 Model B 4GB
SD卡(>8GB)
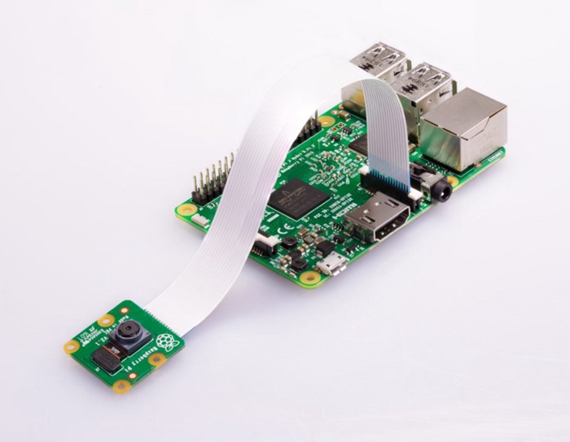
開始時的設備:帶攝像頭模塊的樹莓派
附加設備:
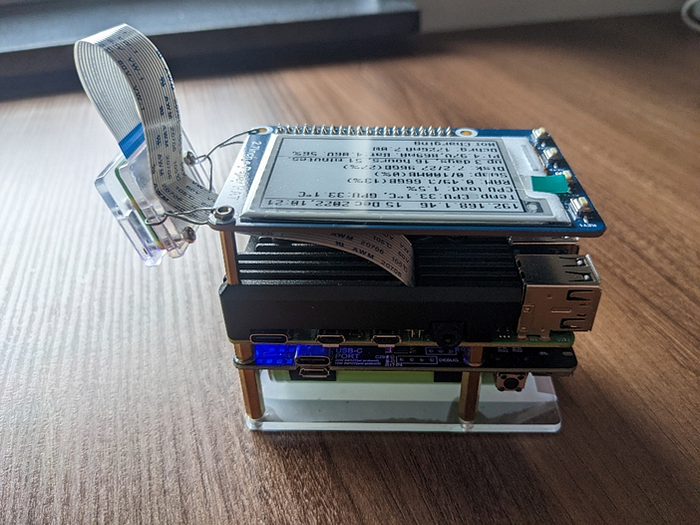
散熱片、散熱風扇
UPS
顯示器
繼電器/樹莓派HAT:用于控制外部設備(道閘)
攝像頭支架(“獨特的金屬線支架” )
*最好使用具有合適刷新時間的TFT或OLED屏幕,但當時我只有這個。
進行中的設備:帶散熱外殼的樹莓派 + 攝像頭模塊V2 + UPS + 電子墨水屏
設置步驟
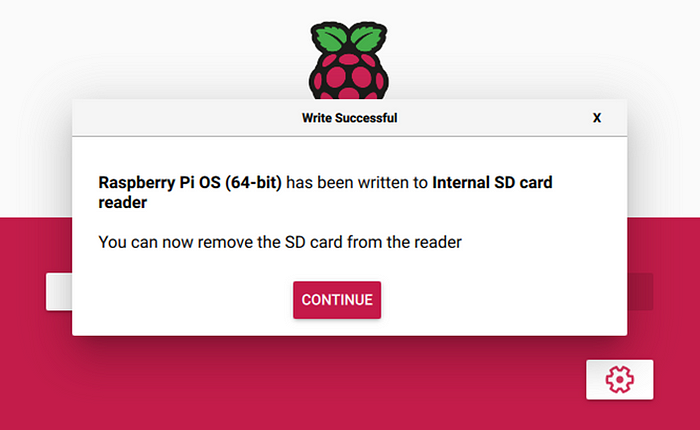
由于我決定使用PyTorch構建解決方案,而PyTorch只提供Arm 64位(aarch64)的pip包,因此我們需要安裝64位的操作系統(Debian版本:11——“Bullseye”)。最新的arm64樹莓派操作系統可以從官方網站下載,并通過rpi-imager安裝。
完成安裝后,應該如下所示:
將SD卡插入樹莓派并啟動后,應進行以下調整:
編輯/boot/config.txt文件以啟用攝像頭。
# This enables the extended features such as the camera.start_x=1# This needs to be at least 128M for the camera processing, if it's bigger you can just leave it as is.gpu_mem=128# You need to commment/remove the existing camera_auto_detect line since this causes issues with OpenCV/V4L2 capture.#camera_auto_detect=1
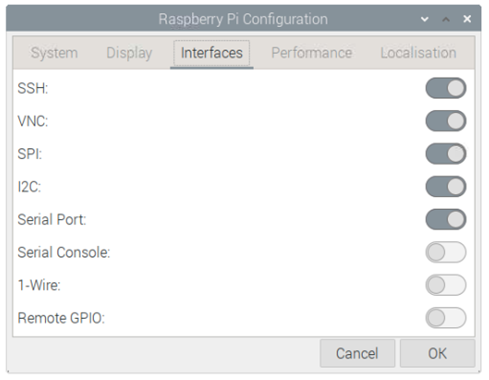
此外,你可能還需要通過raspi-config或GUI啟用I2C、SSH和VNC。
樹莓派配置設置如下:
安裝依賴
我使用了Python 3.9和3.10版本,據報道,在某些情況下3.11版本的速度明顯更快,但目前還沒有穩定的PyTorch 3.11版本。
通過pip包管理器使用requirements.txt文件安裝所有必要的庫和模塊:
matplotlib>=3.2.2numpy>=1.18.5opencv-python==4.5.4.60opencv-contrib-python==4.5.4.60Pillow>=7.1.2PyYAML>=5.3.1requests>=2.23.0scipy>=1.4.1torch>=1.7.0,!=1.12.0torchvision>=0.8.1,!=0.13.0tqdm>=4.41.0protobuf<4.21.3tensorboard>=2.4.1pandas>=1.1.4seaborn>=0.11.0easyocr>=1.6.2
如果你是手動安裝或在現有環境中實現(請不要這樣做 :) ),請注意當前OpenCV版本存在一些問題,為了正常工作,我們需要安裝精確版本4.5.4.60。
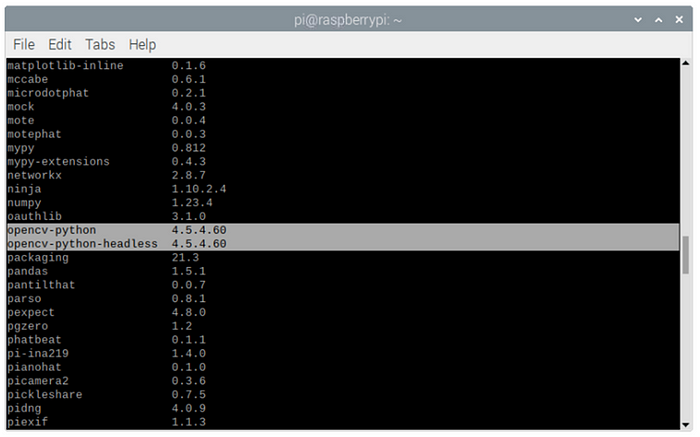
你可以使用pip list檢查是否已正確安裝所有包:
好了,我們已經設置了硬件和環境,現在可以開始編碼了。
軟件設計
圖像捕獲
對于圖像捕獲,我們將使用OpenCV來流式傳輸視頻幀,而不是使用標準的picamera庫,因為它在64位操作系統上不可用,而且速度較慢。OpenCV直接訪問/dev/video0設備來捕獲幀。
自定義的OpenCV攝像頭讀取簡單包裝器:
classPiCamera(): def__init__(self, src=0, img_size=(640,480), fps=36, rotate_180=False): self.img_size = img_size self.fps = fps self.cap = cv2.VideoCapture(src) #self.cap.set(cv2.CAP_PROP_BUFFERSIZE, 1) #self.cap.set(cv2.CAP_PROP_FPS, self.fps) self.cap.set(cv2.CAP_PROP_FRAME_WIDTH, self.img_size[0]) self.cap.set(cv2.CAP_PROP_FRAME_HEIGHT, self.img_size[1]) self.rotate_180 = rotate_180 defrun(self): # read the frame ret, image = self.cap.read() ifself.rotate_180: image = cv2.rotate(image, cv2.ROTATE_180) ifnotret: raiseRuntimeError("failed to read frame") returnimage
這里我使用image = cv2.rotate(image, cv2.ROTATE_180)是因為攝像頭是倒置安裝的。
緩沖區大小和FPS設置可以用于修復延遲并正確對齊幀流。但在我的情況下,它們不起作用,因為這取決于攝像頭制造商和用于讀取幀的后端。
一旦攝像頭捕獲到圖像,我們就需要處理它,從車牌檢測開始。
車牌檢測模塊
對于這個任務,我將使用YOLOv7的預訓練模型,并在自定義車牌數據集上進行微調。
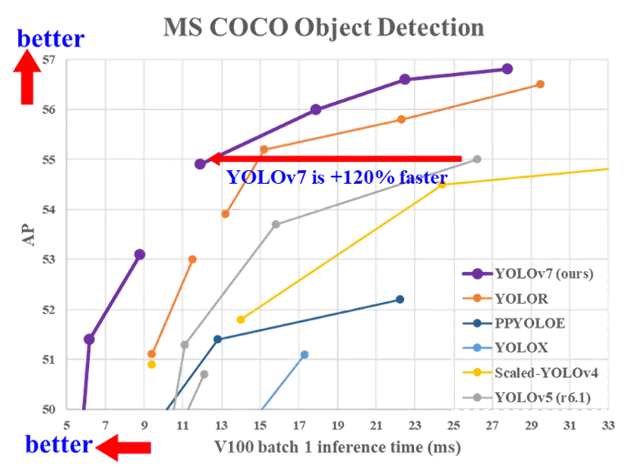
YOLOv7是目前在準確性和速度方面最先進的實時物體檢測算法。它在COCO數據集上進行了預訓練。
你可以在論文中閱讀有關該算法的詳細信息:YOLOv7:可訓練的自由目標集為實時目標檢測器樹立了新的行業標準。https://arxiv.org/abs/2207.02696
YOLOv7基準測試如下:
從官方倉庫克隆YOLOv7倉庫。
gitclonehttps://github.com/WongKinYiu/yolov7.gitcdyolov7
YOLO的要求已經包含在我們之前安裝的項目要求中。
對于微調,我將使用預訓練的YOLOv7 tiny版本,圖像大小為640。
#Download pre-trained weights!wget https://github.com/WongKinYiu/yolov7/releases/download/v0.1/yolov7-tiny.pt
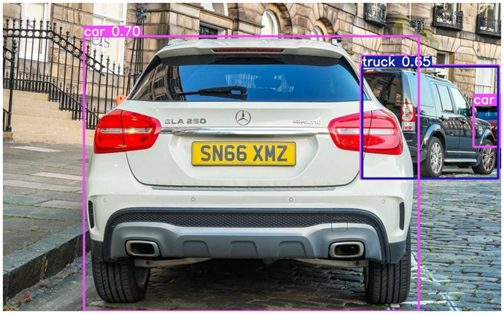
默認預訓練物體檢測:默認yolov7-tiny檢測到的物體,標準COCO數據集類別
車牌檢測模型訓練
在自定義數據集上訓練模型非常簡單直接。
我將在Google Colab上使用一些不錯的GPU進行模型微調。
在開始之前,我們需要創建并標注一個只包含一個車牌類別的適當數據集。
我的數據集部分基于我自己的照片,部分來自AUTO.RIA車牌數據集(向這些了不起的家伙致敬!),總共約2000張圖像。https://nomeroff.net.ua/datasets/
使用roboflow服務以Yolo格式進行標注。
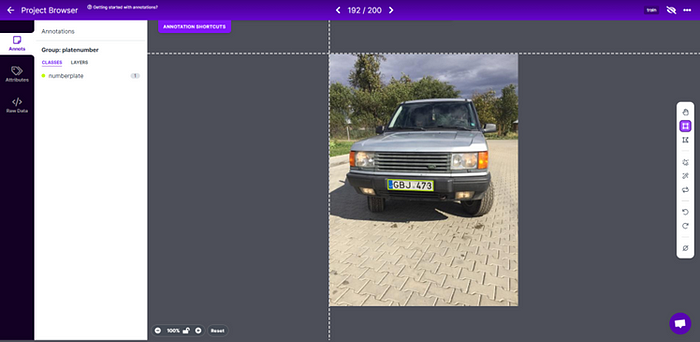
創建數據集.yaml文件:
train: dataset/trainval: dataset/valid# Classesnc: 1 # number of classesnames: ['numberplate'] # class names
訓練模型
pythontrain.py --epochs25--workers8--device0--batch-size32--data data/numberplates.yaml --img640640--cfg cfg/training/yolov7.yaml --weights 'yolov7-tiny.pt' --name yolov7_tiny_numberplates --hyp data/hyp.scratch.tiny.yaml
對于基礎版本,我決定25個epoch應該足夠了。25個epoch的模型訓練結果:

推理:微調后的yolov7-tiny檢測到的物體,單一類別
對于項目的第一版來說似乎足夠了,以后可以根據實際應用中發現的邊緣情況進行更新。
為YOLOv7檢測器創建一個抽象的簡單包裝器類:
classDetector(): def__init__(self, model_weights, img_size=640, device='cpu', half=False, trace=True, log_level='INFO', log_dir ='./logs/'): # Initialize self.model_weights = model_weights self.img_size = img_size self.device = torch.device(device) self.half = half # half = device.type != 'cpu' # half precision only supported on CUDA self.trace = trace # Convert model to Traced-model self.log_level = log_level ifself.log_level: self.num_log_level =getattr(logging, self.log_level.upper(),20)##Translate the log_level input string to one of the accepted values of the logging module, if no 20 - INFO self.log_dir = log_dir log_formatter = logging.Formatter("%(asctime)s %(message)s") logFile = self.log_dir +'detection.log' my_handler = RotatingFileHandler(logFile, mode='a', maxBytes=25*1024*1024, backupCount=10, encoding='utf-8', delay=False) my_handler.setFormatter(log_formatter) my_handler.setLevel(self.num_log_level) self.logger = logging.getLogger(__name__) self.logger.setLevel(self.num_log_level) self.logger.addHandler(my_handler) # Add path to yolo model as whenever load('weights.pt') is called, pytorch looks for model config in path enviornment variable (models/yolo) yolo_folder_dir =str(Path(__file__).parent.absolute()) +"\yolov7"# models folder path sys.path.insert(0, yolo_folder_dir) # Load model self.model = attempt_load(self.model_weights, map_location=self.device) # load FP32 model # Convert model to Traced-model ifself.trace: self.model = TracedModel(self.model, self.device, self.img_size) # if half: # model.half() # to FP16 # Get names and colors self.names = self.model.module.namesifhasattr(self.model,'module')elseself.model.names iflen(self.names) >1: self.colors = [[0,255,127]] + [[random.randint(0,255)for_inrange(3)]for_inself.names[1:]] else: self.colors = [[0,255,127]] sys.path.remove(yolo_folder_dir) defrun(self, inp_image, conf_thres=0.25): # Run Inference # Load data dataset = LoadImage(inp_image, device=self.device, half=self.half) t0 = time.time() self.file_name, self.img, self.im0 = dataset.preprocess() # Inference t1 = time.time() withtorch.no_grad(): # Calculating gradients would cause a GPU memory leak self.pred = self.model(self.img)[0] t2 = time.time() # Apply NMS self.pred = non_max_suppression(self.pred, conf_thres=conf_thres) t3 = time.time() # Process detections bbox =None # bounding boxe of detected object with max conf cropped_img =None # cropped detected object with max conf det_conf =None # confidence level for detected object with max conf self.det = self.pred[0] # pred[0] - NMX suppr returns list with 1 tensor per image; iflen(self.det): # Rescale boxes from img_size to im0 size self.det[:, :4] = scale_coords(self.img.shape[2:], self.det[:, :4], self.im0.shape).round() # Print results print_strng ="" forcinself.det[:, -1].unique(): n = (self.det[:, -1] == c).sum() # detections per class print_strng +=f"{n}{self.names[int(c)]}{'s'* (n >1)}" # add to string # Print time (inference + NMS) print( f'{print_strng}detected. ({(1E3* (t1 - t0)):.1f}ms)-Load data, ({(1E3* (t2 - t1)):.1f}ms)-Inference, ({(1E3* (t3 - t2)):.1f}ms)-NMS') # Write results to file if debug mode ifself.log_level: self.logger.debug( f'{self.file_name}{print_strng}detected. ({(1E3* (t1 - t0)):.1f}ms)-Load data, ({(1E3* (t2 - t1)):.1f}ms)-Inference, ({(1E3* (t3 - t2)):.1f}ms)-NMS') ifself.logger.getEffectiveLevel() ==10: # level 10 = debug gn = torch.tensor(self.im0.shape)[[1,0,1,0]] # normalization gain whwh for*xyxy, conf, clsinreversed(self.det): # save detections with bbox in xywh format xywh = (xyxy2xywh(torch.tensor(xyxy).view(1,4)) / gn).view(-1).tolist() # normalized xywh line = (int(cls), np.round(conf,3), *xywh) # label format self.logger.debug(f"{self.file_name}{('%g '*len(line)).rstrip() % line}") # Find detection with max confidence: indx = self.pred[0].argmax(0)[ 4] # pred[0] - NMX suppr returns list with 1 tensor per image; argmax(0)[4] - conf has indx 4 in [x1,y1,x2,y2,conf,cls] max_det = self.pred[0][indx] # Collect detected bounding boxe and corresponding cropped img bbox = max_det[:4] cropped_img = save_crop(max_det[:4], self.im0) cropped_img = cropped_img[:, :, ::-1]# # BGR to RGB det_conf = max_det[4:5] print(f'Detection total time:{time.time() - t0:.3f}s') return{'file_name': self.file_name,'orig_img': self.im0,'cropped_img': cropped_img,'bbox': bbox, 'det_conf': det_conf}
這里為了調試目的,我添加了將檢測數據記錄到文件的可能性,最多10個文件,每個文件25Mb,然后重寫。
對于當前任務,我需要檢測器只返回一個置信度最高的檢測結果。此外,檢測器輸出原始圖像、裁剪后的檢測區域及其對應的邊界框、置信度分數,以及為每個圖像生成一個唯一名稱以便于調試。
車牌區域圖像預處理
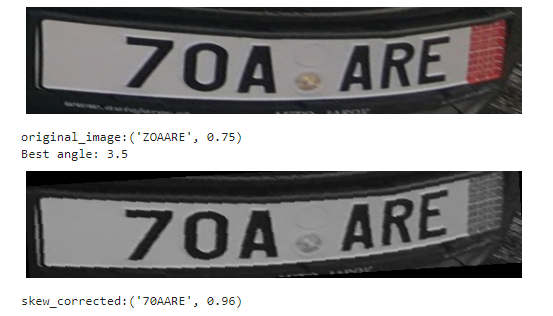
一般來說,下一步是對圖像進行特定的預處理(如RGB轉灰度、去噪、腐蝕+膨脹、閾值處理、直方圖均衡化等),以便進行下一步的OCR。預處理在很大程度上取決于并針對具體的OCR解決方案和拍攝條件進行調整。但由于我正在使用EasyOCR構建基礎版本(之后應該替換為自定義解決方案),我決定不深入進行預處理,只進行兩個通用的步驟——灰度轉換和使用投影輪廓法進行傾斜校正。
這里我使用的是平面角度校正,但之后應該更新為使用真實車牌角點檢測器進行單應性計算和透視變換的校正。
# Skew Correction (projection profile)def_find_score(arr, angle): data = rotate(arr, angle, reshape=False, order=0) hist = np.sum(data, axis=1) score = np.sum((hist[1:] - hist[:-1]) **2) returnhist, scoredef_find_angle(img, delta =0.5, limit =10): angles = np.arange(-limit, limit+delta, delta) scores = [] forangleinangles: hist, score = _find_score(img, angle) scores.append(score) best_score =max(scores) best_angle = angles[scores.index(best_score)] print(f'Best angle:{best_angle}') returnbest_angledefcorrect_skew(img): # correctskew best_angle =_find_angle(img) data = rotate(img, best_angle, reshape=False, order=0) returndata
即使對于這樣扭曲的圖像,僅進行傾斜校正就足以讓EasyOCR以高置信度正確讀取車牌號碼。
經過上述圖像處理步驟后,我們可以認為圖像已經足夠好,可以進行識別了。
車牌識別(OCR)
對于基礎版本,我決定使用EasyOCR解決方案,因為它易于使用、識別準確,而且可能是我所知道的唯一比無聊的tesseract更好的替代方案。
使用EasyOCR進行車牌識別的簡單包裝器類:
classEasyOcr(): def__init__(self, lang = ['en'], allow_list ='0123456789ABCDEFGHIJKLMNOPQRSTUVWXYZ', min_size=50, log_level='INFO', log_dir ='./logs/'): self.reader = easyocr.Reader(lang, gpu=False) self.allow_list = allow_list self.min_size = min_size self.log_level = log_level ifself.log_level: self.num_log_level =getattr(logging, log_level.upper(), 20) ##Translate the log_level input string to one of the accepted values of the logging module, if no 20 - INFO self.log_dir = log_dir # Set logger log_formatter = logging.Formatter("%(asctime)s %(message)s") logFile = self.log_dir +'ocr.log' my_handler = RotatingFileHandler(logFile, mode='a', maxBytes=25*1024*1024, backupCount=10, encoding='utf-8', delay=False) my_handler.setFormatter(log_formatter) my_handler.setLevel(self.num_log_level) self.logger = logging.getLogger(__name__) self.logger.setLevel(self.num_log_level) self.logger.addHandler(my_handler) defrun(self, detect_result_dict): ifdetect_result_dict['cropped_img']isnotNone: t0 = time.time() img = detect_result_dict['cropped_img'] img = ocr_img_preprocess(img) file_name = detect_result_dict.get('file_name') ocr_result = self.reader.readtext(img, allowlist = self.allow_list, min_size=self.min_size) text = [x[1]forxinocr_result] confid = [x[2]forxinocr_result] text ="".join(text)iflen(text) >0elseNone confid = np.round(np.mean(confid),2)iflen(confid) >0elseNone t1 = time.time() print(f'Recognized number:{text}, conf.:{confid}.\nOCR total time:{(t1 - t0):.3f}s') ifself.log_level: # Write results to file if debug mode self.logger.debug(f'{file_name}Recognized number:{text}, conf.:{confid}, OCR total time:{(t1 - t0):.3f}s.') return{'text': text,'confid': confid} else: return{'text':None,'confid':None}
與檢測器類似,這里為了調試目的,也添加了將OCR數據記錄到文件的可能性。
識別模塊返回檢測到的字符串和置信度分數。
驗證與操作
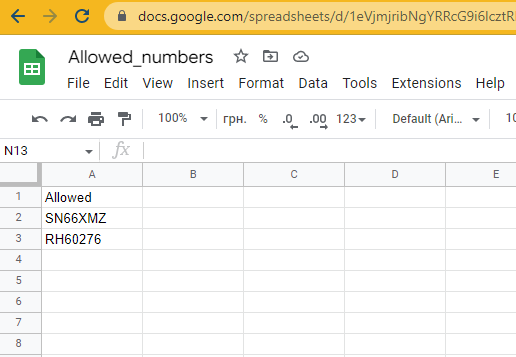
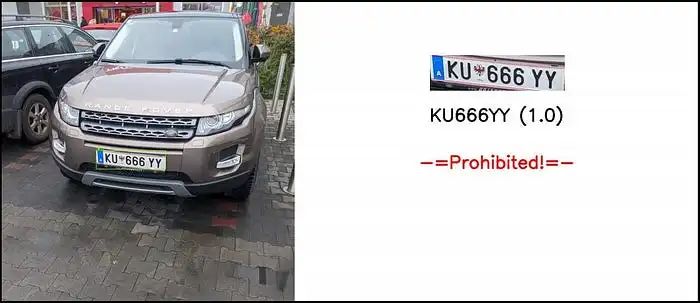
在我們成功從檢測到的車牌中獲取到識別文本后,是時候進行驗證并采取一些行動了。對于車牌驗證步驟,最合乎邏輯的做法是使用一個由客戶更新的數據庫,我們每次或每天讀取一次,并將列表本地存儲。對于當前的基礎版本,我決定不設置數據庫,以節省時間和金錢,因為這不是重點。我將使用Google表格作為示例。
“數據庫”
截至目前,還沒有配置操作步驟,只是顯示在允許列表中的車牌號碼檢查結果。但對于樹莓派來說,通過GPIO控制的繼電器開關操作任何負載都非常容易。
可視化
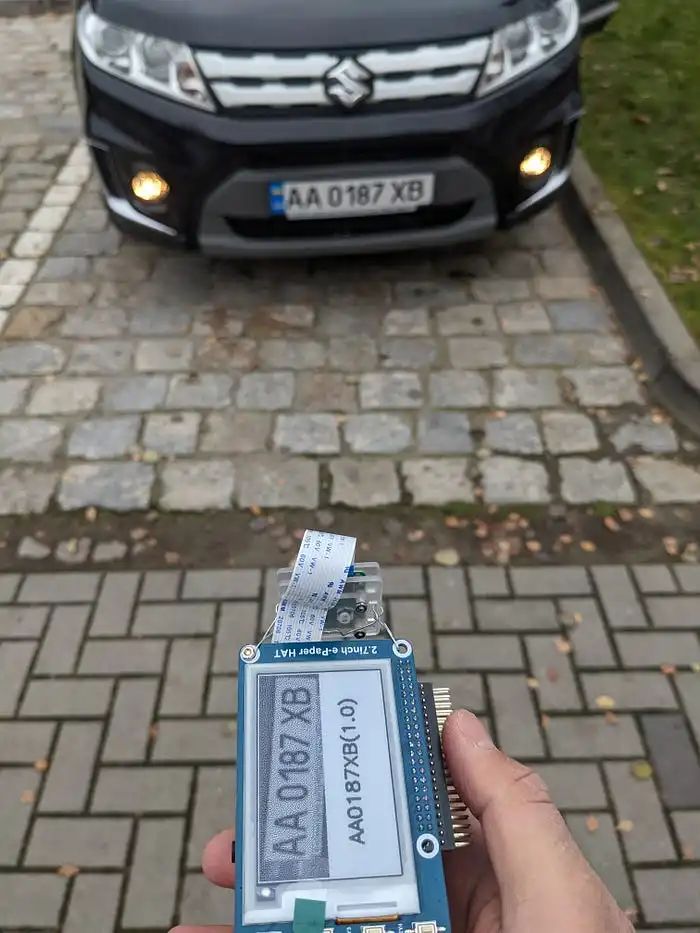
為了能夠舒適地監控和調試解決方案,我添加了一個可視化模塊,用于處理車牌識別過程的顯示、保存輸入圖像、裁剪后的車牌區域和輸出結果圖像。此外,我還添加了一個函數,用于在電子墨水屏上顯示車牌區域和識別文本。
目前,為了方便起見,圖像以壓縮的JPG格式存儲在日志文件夾中,數量限制為10800張,隨后進行覆蓋(文件夾最大大小約為500Mb)。在生產解決方案中,可視化并不是必需的,用于調試的圖像最好存儲在NumPy ndarrays或二進制字符串中。
classVisualize(): def__init__(self, im0, file_name, cropped_img=None, bbox=None, det_conf=None, ocr_num=None, ocr_conf=None, num_check_response=None, out_img_size=(720,1280), outp_orig_img_size =640, log_dir ='./logs/', save_jpg_qual =65, log_img_qnt_limit =10800): self.im0 = im0 self.input_img = im0.copy() self.file_name = file_name self.cropped_img = cropped_img self.bbox = bbox self.det_conf = det_conf self.ocr_num = ocr_num self.ocr_conf = ocr_conf self.num_check_response = num_check_response self.out_img_size = out_img_size self.save_jpg_qual = save_jpg_qual self.log_dir = log_dir self.imgs_log_dir = self.log_dir +'imgs/' os.makedirs(os.path.dirname(self.imgs_log_dir), exist_ok=True) self.crop_imgs_log_dir = self.log_dir +'imgs/crop/' os.makedirs(os.path.dirname(self.crop_imgs_log_dir), exist_ok=True) self.orig_imgs_log_dir = self.log_dir +'imgs/inp/' os.makedirs(os.path.dirname(self.orig_imgs_log_dir), exist_ok=True) self.log_img_qnt_limit = log_img_qnt_limit # Create blank image h, w = self.out_img_size self.img = np.zeros((h, w,3), np.uint8) self.img[:, :] = (255,255,255) # Draw bounding box on top the image if(self.bboxisnotNone)and(self.det_confisnotNone): label =f'{self.det_conf.item():.2f}' color = [0,255,127] plot_one_box(self.bbox, self.im0, label=label, color=color, line_thickness=3) # Resize img width to fit the plot, keep origin aspect ratio h0, w0 = im0.shape[:2] aspect = w0 / h0 ifaspect >1: # horizontal image new_w = outp_orig_img_size new_h = np.round(new_w / aspect).astype(int) elifaspect self.log_img_qnt_limit: oldest_file =sorted([self.imgs_log_dir+fforfinos.listdir(self.imgs_log_dir)])[ 0] # , key=os.path.getctime os.remove(oldest_file) # Write compressed jpeg with results cv2.imwrite(f"{self.imgs_log_dir}{self.file_name}", self.img, [int(cv2.IMWRITE_JPEG_QUALITY), self.save_jpg_qual]) # TBD Write in byte string format defsave_input(self): ifself.input_imgisnotNone: # Remove oldest file if reach quantity limit ifself.get_dir_file_quantity(self.orig_imgs_log_dir) > self.log_img_qnt_limit: oldest_file =sorted([self.orig_imgs_log_dir+fforfinos.listdir(self.orig_imgs_log_dir)])[ 0] # , key=os.path.getctime os.remove(oldest_file) # Write compressed jpeg with results cv2.imwrite(f"{self.orig_imgs_log_dir}orig_inp_{self.file_name}", self.input_img) # TBD Write in byte string format defsave_crop(self): ifself.cropped_imgisnotNone: # Remove oldest file if reach quantity limit ifself.get_dir_file_quantity(self.crop_imgs_log_dir) > self.log_img_qnt_limit: oldest_file =sorted([self.crop_imgs_log_dir+fforfinos.listdir(self.crop_imgs_log_dir)])[ 0] # , key=os.path.getctime os.remove(oldest_file) # Write compressed jpeg with results cv2.imwrite(f"{self.crop_imgs_log_dir}crop_{self.file_name}", self.cropped_img) # TBD Write in byte string format # Display img on e-ink display 176*264. defdisplay(self): # Create blank image disp_img = np.zeros((epd2in7.EPD_WIDTH, epd2in7.EPD_HEIGHT,3), np.uint8) disp_img[:, :] = (255,255,255) ifself.cropped_imgisnotNone: # Add cropped number crop_resized = cv2.resize(self.cropped_img, (epd2in7.EPD_HEIGHT-4,85), interpolation=cv2.INTER_AREA) crop_resized_h, crop_resized_w = crop_resized.shape[:2] crop_w_x1 =int(epd2in7.EPD_HEIGHT/2- crop_resized_w/2) disp_img[2:crop_resized_h+2, crop_w_x1:crop_resized_w+crop_w_x1] = crop_resized ifself.ocr_numisnotNone: # Add recognized label label =f"{self.ocr_num}({self.ocr_conf})" t_thickn =2 # text font thickness in px font = cv2.FONT_HERSHEY_SIMPLEX # font fontScale =0.8 text_size = cv2.getTextSize(label, font, fontScale=fontScale, thickness=t_thickn)[0] ocr_w_x1 =int(epd2in7.EPD_HEIGHT /2- text_size[0] /2) ocr_h_y1 =int(crop_resized_h/2+2+ epd2in7.EPD_WIDTH/2) # Plot text on img cv2.putText(disp_img, label, (ocr_w_x1, ocr_h_y1), font, fontScale, color=(0,0,0), thickness=t_thickn, lineType=cv2.LINE_AA) Himage = cv2.resize(disp_img, (epd2in7.EPD_HEIGHT, epd2in7.EPD_WIDTH), interpolation=cv2.INTER_AREA) print(f"###Himage:{Himage.shape}") # convert to PIL format Himage = Image.fromarray(Himage) tic = time.perf_counter() epd = epd2in7.EPD()# get the display epd.init() # initialize the display epd.Clear(0xFF) # clear the display toc = time.perf_counter() print(f"Init, clean display -{toc - tic:0.4f}seconds") tic = time.perf_counter() epd.display(epd.getbuffer(Himage)) toc = time.perf_counter() print(f"Display image -{toc - tic:0.4f}seconds") epd.sleep()# Power off display @staticmethod defget_dir_file_quantity(dir_path): list_of_files = os.listdir(dir_path) returnlen(list_of_files)
演示
測試解決方案
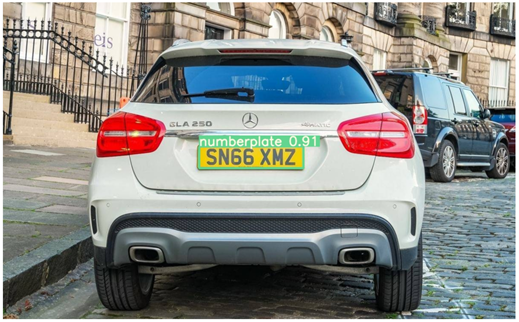
讓我們測試一下我們現在已經完成的內容。在靜態圖像上的檢測和識別流程:
從手機上傳的圖像結果。
使用設備攝像頭在街道上進行端到端解決方案測試:
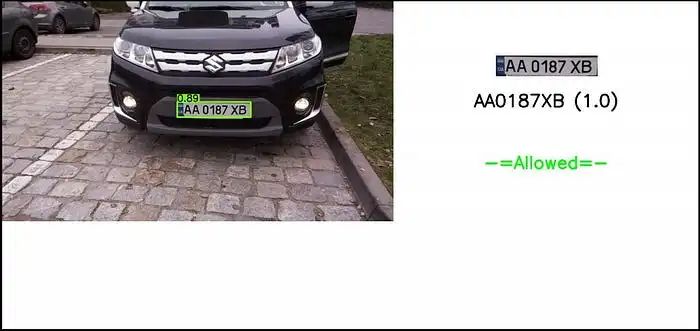
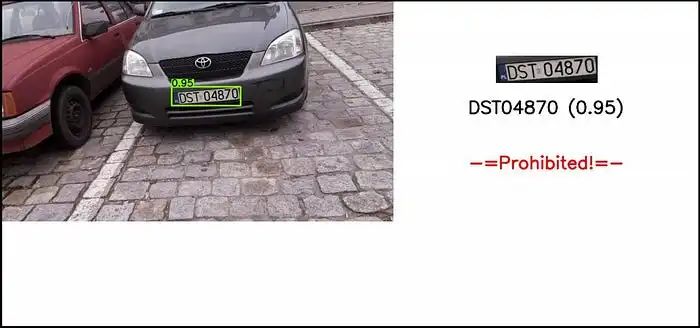
如我們所見,這里傾斜校正派上了用場。
性能
在當前配置下,檢測大約需要700..800ms,OCR步驟大約需要900..1200ms,平均FPS約為0.4..0.5
雖然這樣的幀率值對于當前的停車道閘自動化項目來說并不關鍵,但顯然還有很大的改進空間。
從htop我們可以看到,CPU利用率接近滿負荷:
所有測試都是在樹莓派操作系統的默認設置下進行的。如果你禁用UI和所有其他默認啟用的后臺服務,性能將更加穩定和高效。
額外收獲
事實證明,我們的檢測器模塊即使沒有任何額外的調整,也能完美地檢測樂高汽車的車牌。
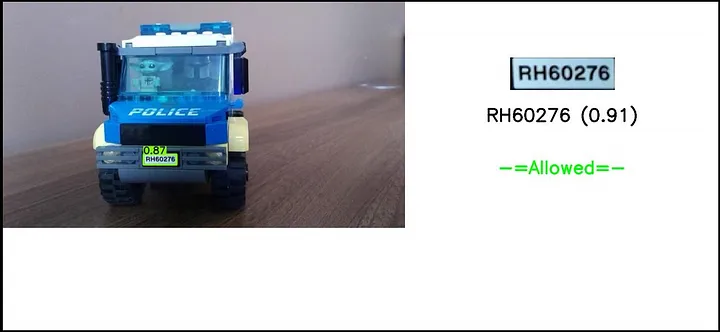
因此,有了樹莓派Build Hat和我從兒子那里借來的樂高積木,我決定搭建自己的停車道閘,并在“真實”條件下進行完整的端到端測試。
基于樂高Build Hat專有庫的簡單操作模塊包裝器:
classAction(): def__init__(self): self.motor = Motor('A') self.motor.set_default_speed(25) self.matrix = Matrix('B') self.ok_color = [[(6,10)forxinrange(3)]foryinrange(3)] self.nok_color = [[(9,10)forxinrange(3)]foryinrange(3)] self.matrix.set_transition(2)#fade-in/out self.matrix.set_pixel((1,1), ("blue",10)) def_handle_motor(self, speed, pos, apos): print("Motor:", speed, pos, apos) defrun(self, action_status): whileTrue: ifaction_status[0] =='Allowed': self.matrix.set_pixels(self.ok_color) time.sleep(1) self.motor.run_for_degrees(-90, blocking=False) time.sleep(5) self.motor.run_for_degrees(90, blocking=False) time.sleep(1) elifaction_status[0] =='Prohibited': self.matrix.set_pixels(self.nok_color) time.sleep(3) else: self.matrix.clear() self.matrix.set_pixel((1,1), ("blue",10)) time.sleep(1) self.matrix.set_pixel((1,1), (0,10)) time.sleep(1)
我在一個并行線程中運行這個模塊,當檢測到車牌且action_status發生變化時,從主程序中觸發操作。
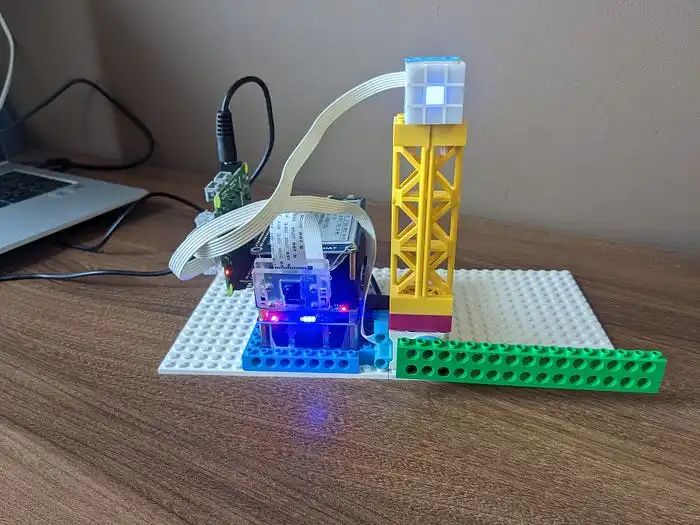
“弗蘭肯斯坦的怪物”——樹莓派 + UPS + 攝像頭v2 + 電子墨水屏 + 帶有連接的樂高電機和LED矩陣的Build HAT。
我將其中一個樂高車牌號碼添加到了Google表格“數據庫”中,現在我們可以將所有部分組合在一起并運行它:
“真實”自動化停車道閘控制系統的端到端演示

最終思考
總的來說,我們已經成功實現了使用樹莓派進行自動車牌識別以控制停車道閘的完全功能系統。
需要強調的問題之一是——由于處理速度較慢,我們可能會遇到圖像延遲,因為攝像頭有自己的緩沖區,而我們以較慢的速度抓取圖像,即使場景已經改變,一段時間內我們仍然從緩沖區中讀取“舊”幀。對于當前的使用案例來說,這并不是非常關鍵,但為了改進它,我添加了幀跳過功能,間隔大約等于我們的總處理時間。這樣可以更快地讀取幀并清理緩沖區,同時也減輕了CPU的負載,因為我們不會處理每一幀。但是,如果我們需要近乎實時的流暢圖像流而不出現延遲,最好的選擇是將攝像頭讀取設置為一個單獨的并行線程,該線程將以最大速度從緩沖區中讀取幀,而我們的主程序只在需要時從該進程中抓取幀。然而,需要注意的是,在Python中,多線程并不是真正的多進程,而是一種模擬,它有助于從架構的角度更清晰地組織和運行你的代碼。
后續步驟
OCR:加速OCR,因為它是當前的瓶頸。我傾向于開發一個自定義的小型基于RNN的模型。如果時間不是問題,而你只需要準確性——你可以嘗試在EasyOCR中使用不同的模型并進行微調。或者你可以嘗試其他解決方案,如WPOD-NET。此外,提高識別質量的一個重要點是——針對具體的使用案例(攝像頭位置、光照條件等)調整圖像預處理。
檢測器:為了加速,我們可以使用更小的幀大小——如果攝像頭應該只對近處的車輛工作,就不需要高分辨率的圖像。另一個選項是,如果攝像頭和車輛的可能位置大致固定,我們可以只抓取車牌預期出現的區域,而不是整個幀。
對于這兩個模型,我們之后可以使用遷移學習、量化、剪枝和其他方法,使其在邊緣設備上更輕量、更快。
但無論如何,如果實時處理是關鍵(顯然對于自動化停車道閘案例來說不是),沒有配備張量核心的設備是無法實現的。在僅配備CPU的設備上,速度和質量之間總是需要權衡。
另一個改進選項是——對于當前案例來說,沒有必要24/7讓CPU全速運行,攝像頭可以在車輛接近時通過PIR或紅外傳感器觸發。
我將在下一次迭代中嘗試實現的最后一點是——將解決方案切換到微服務,并實現生產者-消費者數據流模式。
好了,感謝你閱讀這篇關于項目實施經驗的冗長而枯燥的描述。
原文地址:
https://medium.com/@alexey.yeryomenko/automatic-number-plate-recognition-with-raspberry-pi-e1ac8a804c79
-
車牌識別系統
+關注
關注
0文章
16瀏覽量
9614 -
樹莓派
+關注
關注
121文章
1954瀏覽量
107033
發布評論請先 登錄
【TL6748 DSP申請】基于DSP的車牌識別系統
【Rico Board申請】基于SoC的車牌識別系統
【MediaTek X20開發板申請】小區車牌自動識別系統
【HarmonyOS HiSpark AI Camera】車牌識別系統
基于MATLAB的車牌識別系統的研究

項目分享|基于ELF 1開發板的車牌識別系統

車牌識別新花樣:樹莓派打造智能車牌監控系統!


 工商網監
工商網監
評論