 怎樣通過CircuitPython使用Adafruit eInk / ePaper顯示屏

概述
本指南旨在幫助您通過CircuitPython快速使用Adafruit 2.13“三色電子墨水FeatherWing和2.7”三色電子墨水屏蔽。
這些顯示器已經帶有標題焊接-屏蔽型的公頭和羽毛型的母頭。這使它們無需焊接即可插入各自的微控制器。放在微控制器上,上傳代碼和圖形文件,然后顯示!
刷新時間
大多數LCD,OLED和LED顯示屏都可以很快地寫入,這有助于輕松地移動圖形和顏色。
對于eInk顯示屏, 不是這種情況。擦除圖像涉及向顯示器發送特殊信號,以“消除”彩色像素的顯示。 Adafruit建議不要每隔180秒(3分鐘)刷新一次這些顯示器。
如果將它們更快地寫入,則可能會損壞顯示器。損壞的顯示器可能會永久打開或關閉像素或出現其他異常情況,從而使保修無效。
電子墨水顯示器即使在關閉電源的情況下仍會繼續顯示圖像。如果您想要一個相當靜態的圖像(例如圖片或名片),則eInk很棒。
如果您想要清晰,很少變化的顯示,則eInk很棒。有關快速變化的信息,請考慮使用其他類型的顯示器,例如TFT或OLED。
零件 羽毛形狀因數
Adafruit Feather M4 Express-配備ATSAMD51
產品編號:3857
這就是您一直期待的配備ATSAMD51的Feather M4 Express。這羽羽毛像迅捷一樣迅捷,像貓頭鷹一樣聰明,像牛鳥一樣強壯(它是半牛,……
$ 22.95
庫存
添加到購物車
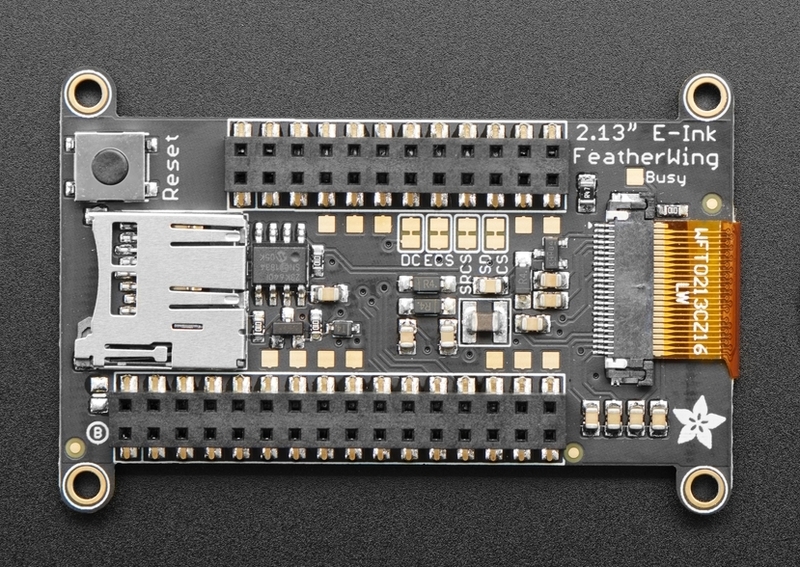
Adafruit 2.13英寸三色電子墨水/電子紙顯示屏FeatherWing
產品ID:4128
簡單的電子紙終于出現在您的Feather上,旨在輕松添加三色eInk顯示器的突破口,您可能已經看到其中一種。..
$ 24.95
入庫存
添加到購物車
Metro Form Factor
/div》
Adafruit Metro M4特性Microchip ATSAMD51
產品ID:3382
您準備好了嗎?真的準備好了嗎?這是有史以來最快,功能最強大的Metro。AdafruitMetro M4具有Microchip ATSAMD51。這。..
$ 27.50
入庫價
添加到購物車
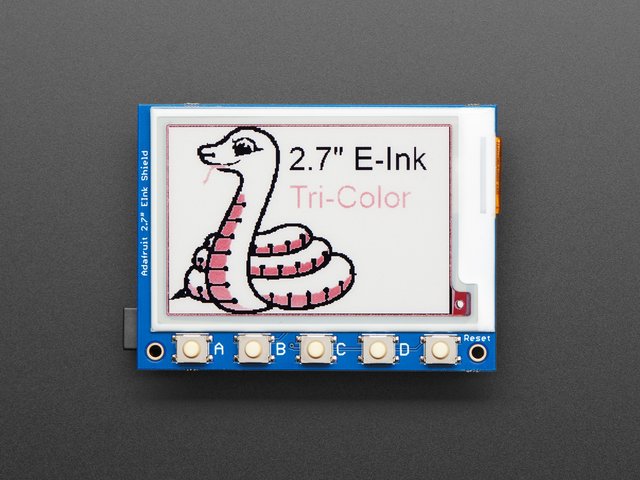
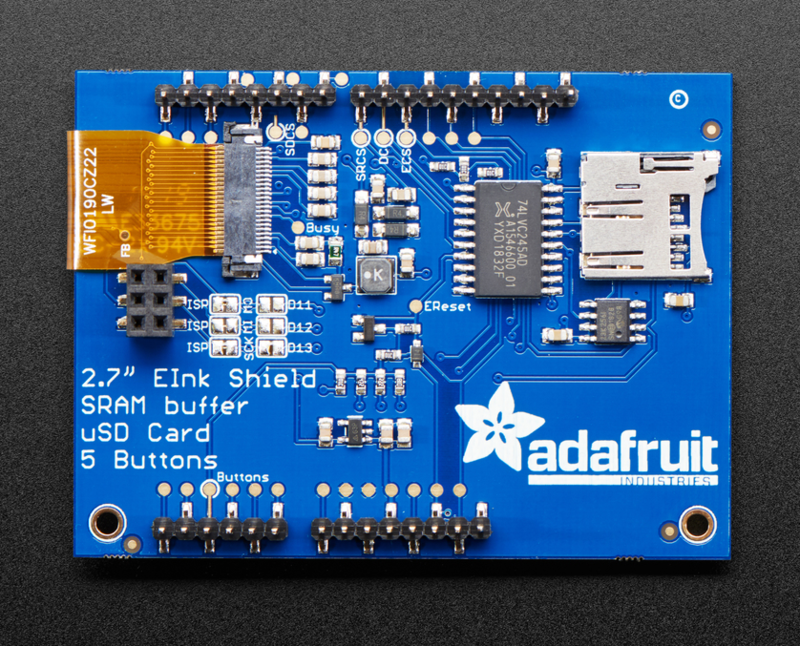
Adafruit帶有SRAM的2.7英寸三色eInk/ePaper防護罩
產品ID:4229
易于使用的電子紙終于出現在微控制器上,這一突破旨在使其輕而易舉地添加三色電子墨水顯示屏。您可能已經看過其中之一。..
$ 39.95
入庫存
添加到購物車
如果USB數據加電源線的一端適合您的計算機,而另一端具有micro B連接器,則可以使用。下面的一個是最喜歡的,但可以根據需要選擇自己的一個。
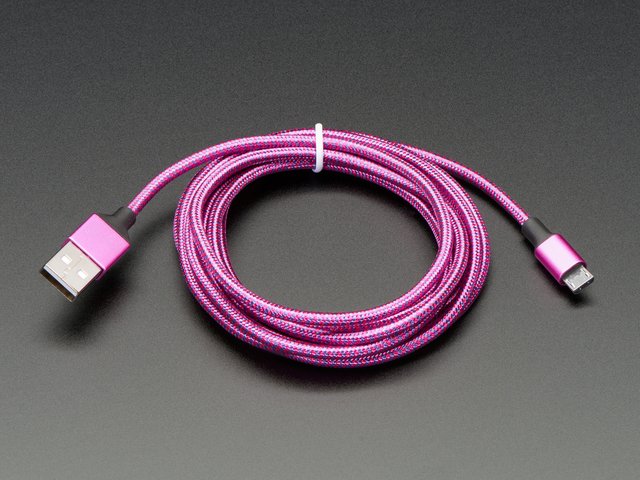
粉紅色和紫色編織的USB A到Micro B電纜-2米長
產品ID:4148
該電纜非常流行,具有編織的粉紅色和紫色Blinka圖案。封面和包覆成型。我們將這些顏色制成自定義顏色,。..
$ 3.95
入庫存
添加到購物車
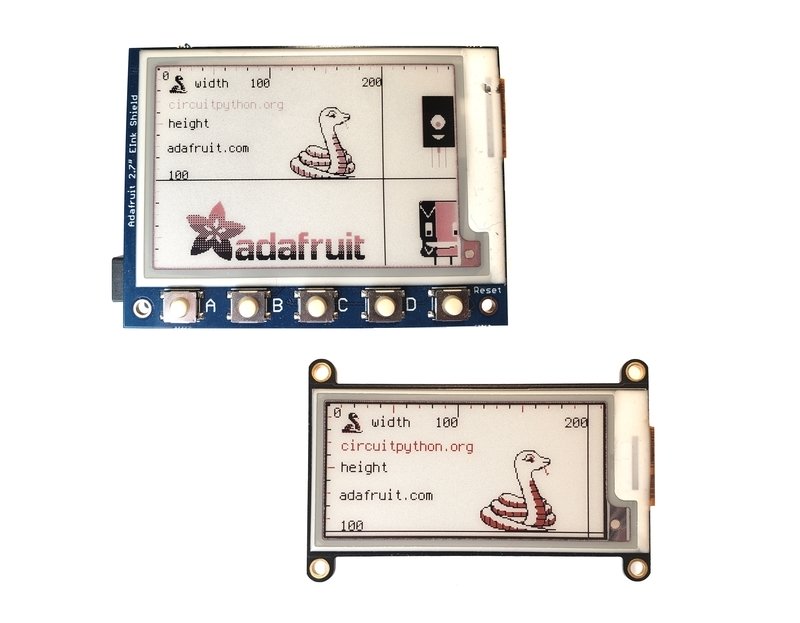
2.13英寸三色電子墨水羽翼
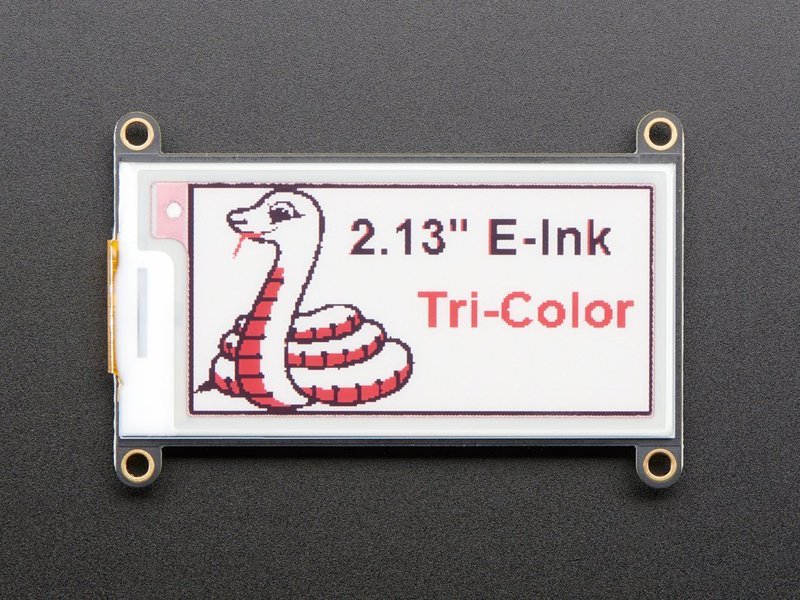
eInk FeatherWIng非常易于使用。它的背面有SD卡分線,母頭連接到Feather微控制器。
與羽毛微控制器的連接 《對于具有大量內存的快速芯片,示例將其與Adafruit Feather M4 Express微控制器一起使用。目前,該板帶有未焊接的接頭。
2.7英寸三色電子墨水盾
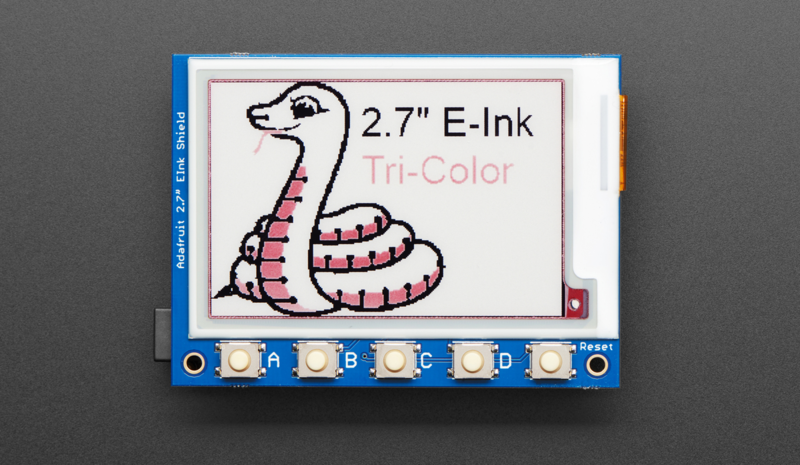
此顯示器采用Arduino屏蔽形式,非常易于使用,背面具有SD卡分線,公頭可插入Metro尺寸微控制器。
與Metro微控制器的連接
對于具有大量內存的快速芯片,本示例將此顯示器與Adafruit Metro M4 Express微控制器一起使用,屏蔽層應插入帶有插頭的Metro M4中。如果您的Metro沒有母頭,請焊接它們。
CircuitPython和庫設置
編程
該CircuitPython指南中的所有快速入門示例均使用CircuitPython 5.0及更高版本中的新displayio驅動程序。該代碼提供了強大的屏幕合成功能,并且已經過優化。雖然有使用舊版adafruit_epd方法的CircuitPython代碼示例,但將來會使用displayio。
在Feather上更新CircuitPython
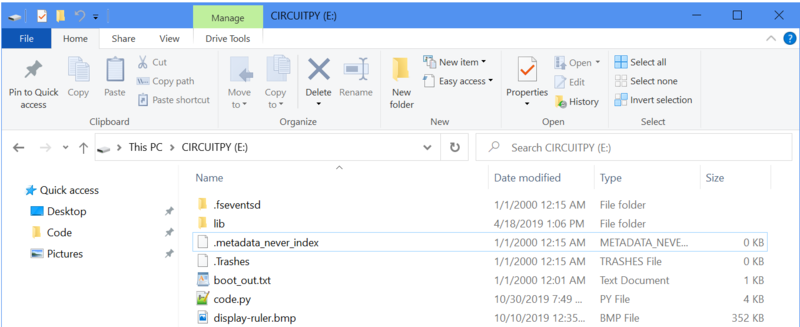
您應該檢查Feather上運行的CircuitPython的版本。使用已知的優質數據+電源USB電纜將開發板插入計算機。該板應該顯示為名為 CIRCUITPY 的計算機上的磁盤驅動器。
打開 boot_out.txt 。這將向您顯示電路板已加載的CircuitPython的版本。
下載:文件
復制代碼
Adafruit CircuitPython 5.0.0-alpha.4 on 2019-09-15; Adafruit Feather M4 Express with samd51j19 Adafruit CircuitPython 5.0.0-alpha.4 on 2019-09-15; Adafruit Feather M4 Express with samd51j19
displayio需要CircuitPython 5或更高版本。如果您的電路板運行的是CircuitPython的較低版本,則需要對其進行更新。為您的電路板升級到最新版本的Adafruit CircuitPython。
必需的CircuitPython庫
要顯示帶有displayio的位圖,只有一個必需的庫,但這取決于您使用的顯示。
首先,確保為您的電路板運行最新版本的Adafruit CircuitPython。
接下來,您需要安裝必要的庫才能使用硬件。仔細按照以下步驟從Adafruit的CircuitPython庫捆綁包中查找并安裝該庫。我們的簡介指南上有一個很棒的頁面,介紹如何為Express和非Express板安裝庫捆綁包。
由于捆綁包中的庫數量眾多,建議您從以下位置手動安裝必要的庫捆綁包。第一個庫取決于您使用的eInk顯示器:
羽毛和2.13“三色eInk顯示器
adafruit_IL0373
Metro和2.7英寸三色電子墨水顯示屏
adafruit_il91874
接下來,獲得以下信息用于在displayio顯示器上顯示文本的庫。它用于第二個和第三個示例。
adafruit_display_text
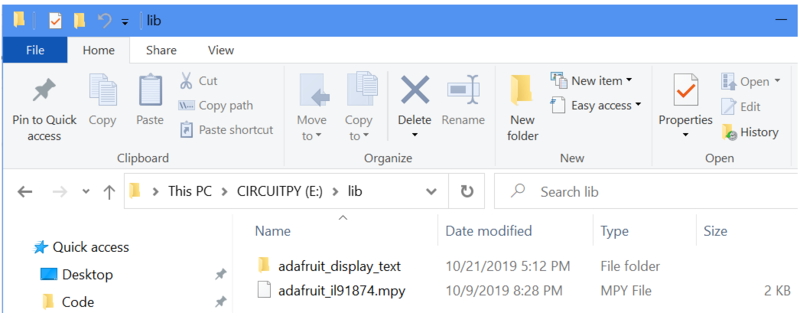
在繼續之前,請確保您董事會的 lib 文件夾具有正確的驅動程序文件和 adafruit_display_text 庫已復制。
示例:單個位圖

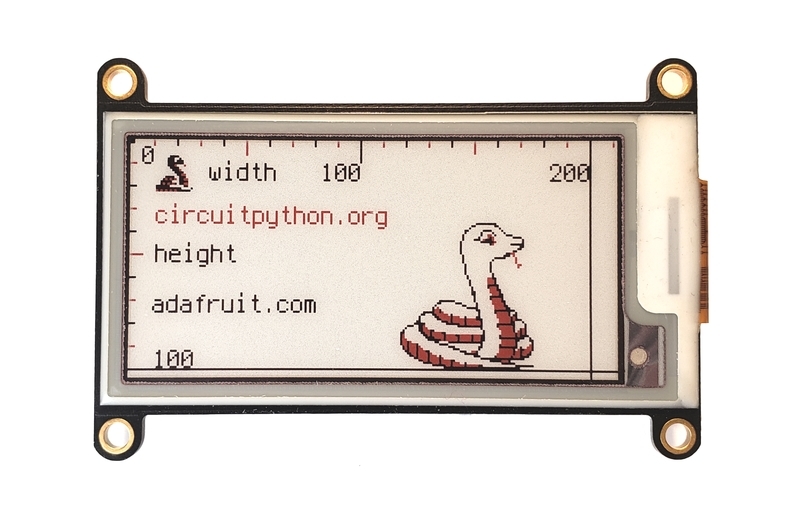
第一個示例讀取放置在電路板 CIRCUITPY 驅動器上的位圖圖像,并將其顯示在eInk顯示屏上。
圖像
本示例中使用的圖像是CircuitPython文本圖像,顯示了各種元素。您可以通過單擊下面的綠色按鈕下載它。
display-ruler.bmp
用于制作自己的圖形,使其可以在三種顏色上顯示得體在這些顯示器上可用,請參閱指南為電子墨水顯示器準備圖形。
如果圖片大于顯示器的寬度和高度,則其余部分將被截斷而不顯示。建議您在使用圖像編輯器之前先縮放圖像,因為代碼不會縮放位圖。
將要使用的位圖縮放到圖像編輯器和抖動中的顯示寬度和高度,否則僅使用黑色/白色/紅色。該代碼無法對位圖文件執行圖像縮放。
代碼
下面的代碼將在主板的閃存驅動器(在 CIRCUITPY 根目錄中)上放置一個位圖,并將其顯示在eInk顯示屏上。請參閱代碼中的注釋,以了解每個步驟如何有助于該過程。
請選擇特定于顯示器和微控制器的代碼,因為以下兩個代碼塊對兩組硬件均不可互換。這些示例幾乎完全相同。
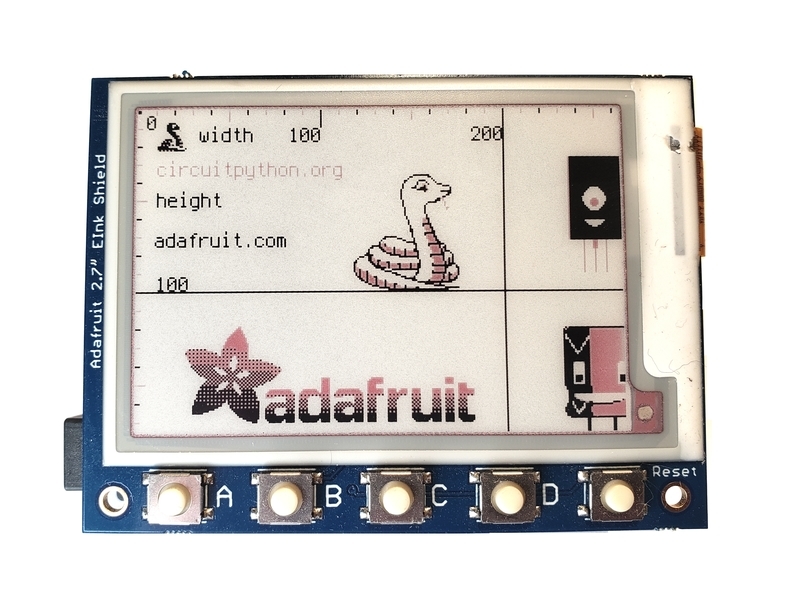
2.13“ eink FeatherWing示例
圖釘反映了FeatherWing eInk顯示器和Feather M4的組合。它還具有2.13英寸顯示器的像素尺寸。
下載:Zip 或 il91874_simpletest.py | 在Github上查看
復制代碼
“”“
Simple test script for 2.7” 264x176 Tri-Color display shield
Supported products:
* Adafruit 2.7“ Tri-Color ePaper Display Shield
https://www.adafruit.com/product/4229
This program only requires the adafruit_il91874 library in /lib
for CircuitPython 5.0 and above which has displayio support.
”“”
import time
import board
import displayio
import adafruit_il91874
# Used to ensure the display is free in CircuitPython
displayio.release_displays()
# Define the pins needed for display use on the Metro
spi = board.SPI()
epd_cs = board.D10
epd_dc = board.D9
# Create the displayio connection to the display pins
display_bus = displayio.FourWire(spi, command=epd_dc, chip_select=epd_cs,
baudrate=1000000)
time.sleep(1) # Wait a bit
# Create the display object - the third color is red (0xff0000)
display = adafruit_il91874.IL91874(display_bus, width=264, height=176,
highlight_color=0xff0000, rotation=90)
# Create a display group for our screen objects
g = displayio.Group()
# Display a ruler graphic from the root directory of the CIRCUITPY drive
f = open(“/display-ruler.bmp”, “rb”)
pic = displayio.OnDiskBitmap(f)
# Create a Tilegrid with the bitmap and put in the displayio group
t = displayio.TileGrid(pic, pixel_shader=displayio.ColorConverter())
g.append(t)
# Place the display group on the screen (does not refresh)
display.show(g)
# Show the image on the display
display.refresh()
print(“refreshed”)
# Do Not refresh the screen more often than every 180 seconds
# for eInk displays! Rapid refreshes will damage the panel.
time.sleep(180)
2.7“ eInk Shield示例
這些引腳反映了屏蔽eInk顯示屏和Metro M4的組合。它還具有2.7英寸顯示屏的像素尺寸。
下載:Project Zip 或 il0373_2.13_color.py | 在Github上查看
復制代碼
“”“Simple test script for Adafruit 2.13” 212x104 tri-color display
Supported products:
* Adafruit 2.13“ Tri-Color Display Breakout
* https://www.adafruit.com/product/4086 (breakout) or
* https://www.adafruit.com/product/4128 (FeatherWing)
”“”
import time
import board
import displayio
import adafruit_il0373
# Used to ensure the display is free in CircuitPython
displayio.release_displays()
# Define the pins needed for display use
# This pinout is for a Feather M4 and may be different for other boards
spi = board.SPI() # Uses SCK and MOSI
epd_cs = board.D9
epd_dc = board.D10
epd_reset = board.D5
epd_busy = board.D6
# Create the displayio connection to the display pins
display_bus = displayio.FourWire(spi, command=epd_dc, chip_select=epd_cs,
reset=epd_reset, baudrate=1000000)
time.sleep(1) # Wait a bit
# Create the display object - the third color is red (0xff0000)
display = adafruit_il0373.IL0373(display_bus, width=212, height=104,
rotation=90, busy_pin=epd_busy,
highlight_color=0xff0000)
# Create a display group for our screen objects
g = displayio.Group()
# Display a ruler graphic from the root directory of the CIRCUITPY drive
f = open(“/display-ruler.bmp”, “rb”)
pic = displayio.OnDiskBitmap(f)
# Create a Tilegrid with the bitmap and put in the displayio group
t = displayio.TileGrid(pic, pixel_shader=displayio.ColorConverter())
g.append(t)
# Place the display group on the screen
display.show(g)
# Refresh the display to have it actually show the image
# NOTE: Do not refresh eInk displays sooner than 180 seconds
display.refresh()
print(“refreshed”)
time.sleep(180)
代碼查看
有關使用對于使用CircuitPython進行顯示,出色的指南CircuitPython顯示支持使用displayio是您的第一站。如果您想更深入地了解用于顯示器的模型,請參閱本指南。
Adafruit建議在嘗試執行其他代碼以確保將顯示器連接至顯示器之前,使用 displayio函數。硬件是由CircuitPython發行的。
下一步是讓微控制器知道顯示器上使用了哪些引腳。所使用的銷釘非常依賴于顯示器,建議在尋求更換之前,先參考顯示器上的指南以了解已知的有效工作配置。 displayio.release_displays設置與顯示總線的displayio.FourWire連接。
通過總線,程序將建立與顯示驅動程序的連接。給出了顯示的大小(displayio和width),方向(height),忙碌引腳和突出顯示顏色。對于此三色顯示,指定了紅色(rotation)。
其余代碼遵循標準的0xff0000顯示設置和使用:
創建顯示組
打開要在顯示器上放置的位圖
創建位圖對象
創建一個TileGrid以使用位圖放置對象,并將圖塊組附加到顯示組
在屏幕上顯示顯示
刷新屏幕
最后,程序等待至少3分鐘。然后,程序將完成并轉到REPL。如果位圖應保留在屏幕上,請在程序末尾添加displayio和while True:語句。
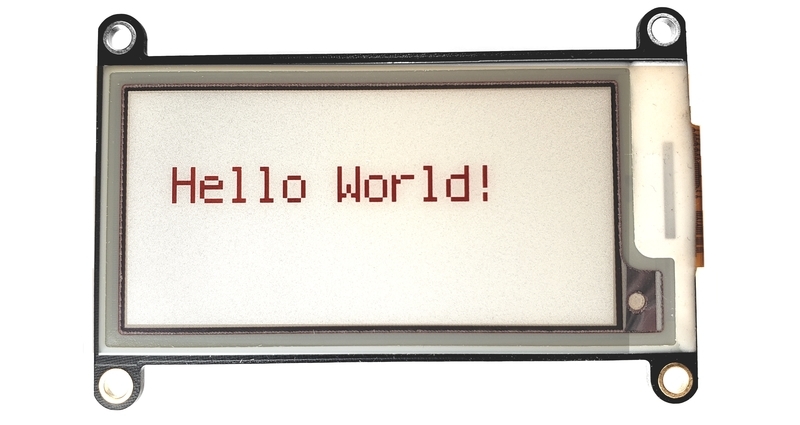
示例:簡單文本
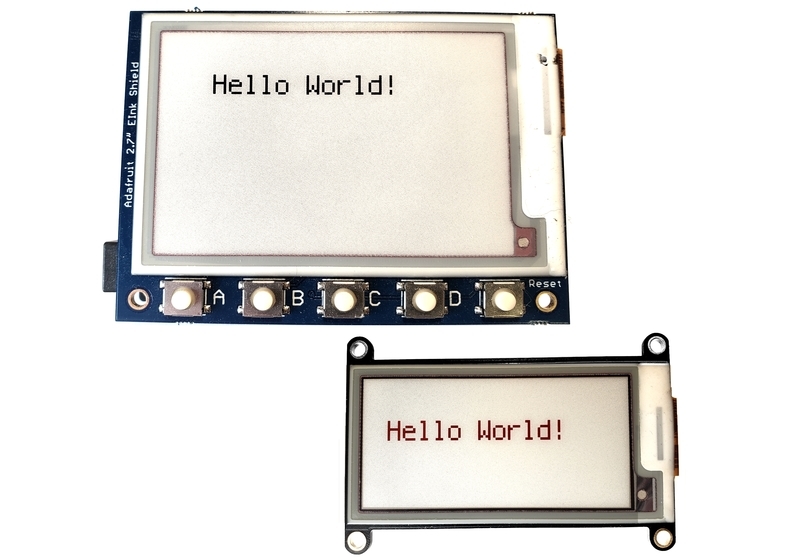
此示例在eInk顯示屏上顯示文本,可以說是eInk的“ Hello World”。文本可以放在任何地方并縮放更大。
代碼
下面的代碼將使用內部terminalio字體在eInk顯示屏上顯示一行文本。您可以設置前景色和背景色。請參閱注釋以了解每個步驟如何對過程作出貢獻。
請選擇特定于顯示器和微控制器的代碼,因為以下兩個代碼塊對于兩組硬件均不可互換。這些示例幾乎完全相同。
2.13“ eink FeatherWing示例
圖釘反映了FeatherWing eInk顯示器和Feather M4的組合。它還具有2.13英寸顯示器的像素尺寸。
下載:Project Zip 或 213_tricolor_eink_fw_text.py | 在Github上查看
復制代碼
“”“
Simple text script for Adafruit 2.13” 212x104 tri-color display
Supported products:
* Adafruit 2.13“ Tri-Color Display Breakout
* Adafruit 2.13” Tri-Color Display FeatherWing
https://www.adafruit.com/product/4086 (breakout) or
https://www.adafruit.com/product/4128 (FeatherWing)
This program requires the adafruit_il0373 library and the
adafruit_display_text library in the CIRCUITPY /lib folder
for CircuitPython 5.0 and above which has displayio support.
“”“
import time
import board
import displayio
import adafruit_il0373
import terminalio
from adafruit_display_text import label
BLACK = 0x000000
WHITE = 0xFFFFFF
RED = 0xFF0000
# Change text colors, choose from the following values:
# BLACK, RED, WHITE
FOREGROUND_COLOR = RED
BACKGROUND_COLOR = WHITE
# Used to ensure the display is free in CircuitPython
displayio.release_displays()
# Define the pins needed for display use
# This pinout is for a Feather M4 and may be different for other boards
spi = board.SPI() # Uses SCK and MOSI
epd_cs = board.D9
epd_dc = board.D10
epd_reset = board.D5
epd_busy = board.D6
# Create the displayio connection to the display pins
display_bus = displayio.FourWire(spi, command=epd_dc, chip_select=epd_cs,
reset=epd_reset, baudrate=1000000)
time.sleep(1) # Wait a bit
# Create the display object - the third color is red (0xff0000)
DISPLAY_WIDTH = 212
DISPLAY_HEIGHT = 104
display = adafruit_il0373.IL0373(display_bus, width=DISPLAY_WIDTH,
height=DISPLAY_HEIGHT,
rotation=90, busy_pin=epd_busy,
highlight_color=0xff0000)
# Create a display group for our screen objects
g = displayio.Group(max_size=10)
# Set a background
background_bitmap = displayio.Bitmap(DISPLAY_WIDTH, DISPLAY_HEIGHT, 1)
# Map colors in a palette
palette = displayio.Palette(1)
palette[0] = BACKGROUND_COLOR
# Create a Tilegrid with the background and put in the displayio group
t = displayio.TileGrid(background_bitmap, pixel_shader=palette)
g.append(t)
# Draw simple text using the built-in font into a displayio group
text_group = displayio.Group(max_size=10, scale=2, x=20, y=40)
text = ”Hello World!“
text_area = label.Label(terminalio.FONT, text=text, color=FOREGROUND_COLOR)
text_group.append(text_area) # Add this text to the text group
g.append(text_group)
# Place the display group on the screen
display.show(g)
# Refresh the display to have everything show on the display
# NOTE: Do not refresh eInk displays more often than 180 seconds!
display.refresh()
time.sleep(120)
while True:
pass
”“”
Simple text script for Adafruit 2.13“ 212x104 tri-color display
Supported products:
* Adafruit 2.13” Tri-Color Display Breakout
* Adafruit 2.13“ Tri-Color Display FeatherWing
https://www.adafruit.com/product/4086 (breakout) or
https://www.adafruit.com/product/4128 (FeatherWing)
This program requires the adafruit_il0373 library and the
adafruit_display_text library in the CIRCUITPY /lib folder
for CircuitPython 5.0 and above which has displayio support.
”“”
import time
import board
import displayio
import adafruit_il0373
import terminalio
from adafruit_display_text import label
BLACK = 0x000000
WHITE = 0xFFFFFF
RED = 0xFF0000
# Change text colors, choose from the following values:
# BLACK, RED, WHITE
FOREGROUND_COLOR = RED
BACKGROUND_COLOR = WHITE
# Used to ensure the display is free in CircuitPython
displayio.release_displays()
# Define the pins needed for display use
# This pinout is for a Feather M4 and may be different for other boards
spi = board.SPI() # Uses SCK and MOSI
epd_cs = board.D9
epd_dc = board.D10
epd_reset = board.D5
epd_busy = board.D6
# Create the displayio connection to the display pins
display_bus = displayio.FourWire(spi, command=epd_dc, chip_select=epd_cs,
reset=epd_reset, baudrate=1000000)
time.sleep(1) # Wait a bit
# Create the display object - the third color is red (0xff0000)
DISPLAY_WIDTH = 212
DISPLAY_HEIGHT = 104
display = adafruit_il0373.IL0373(display_bus, width=DISPLAY_WIDTH,
height=DISPLAY_HEIGHT,
rotation=90, busy_pin=epd_busy,
highlight_color=0xff0000)
# Create a display group for our screen objects
g = displayio.Group(max_size=10)
# Set a background
background_bitmap = displayio.Bitmap(DISPLAY_WIDTH, DISPLAY_HEIGHT, 1)
# Map colors in a palette
palette = displayio.Palette(1)
palette[0] = BACKGROUND_COLOR
# Create a Tilegrid with the background and put in the displayio group
t = displayio.TileGrid(background_bitmap, pixel_shader=palette)
g.append(t)
# Draw simple text using the built-in font into a displayio group
text_group = displayio.Group(max_size=10, scale=2, x=20, y=40)
text = “Hello World!”
text_area = label.Label(terminalio.FONT, text=text, color=FOREGROUND_COLOR)
text_group.append(text_area) # Add this text to the text group
g.append(text_group)
# Place the display group on the screen
display.show(g)
# Refresh the display to have everything show on the display
# NOTE: Do not refresh eInk displays more often than 180 seconds!
display.refresh()
time.sleep(120)
while True:
pass

2.7“ eInk Shield示例
這些引腳反映了屏蔽eInk顯示屏和Metro M4的組合。它還具有2.7英寸顯示屏的像素尺寸。
下載:Project Zip 或 27_tricolor_eink_shiel d_text.py | 在Github上查看
復制代碼
“”“
Simple text script for 2.7” 264x176 Tri-Color display shield
Supported products:
* Adafruit 2.7“ Tri-Color ePaper Display Shield
https://www.adafruit.com/product/4229
This program requires the adafruit_il91874 and the
adafruit_display_text library in /lib on the CIRCUITPY drive
for CircuitPython 5.0 and above which has displayio support.
”“”
import time
import board
import displayio
import adafruit_il91874
import terminalio
from adafruit_display_text import label
BLACK = 0x000000
WHITE = 0xFFFFFF
RED = 0xFF0000
# Change text colors, choose from the following values:
# BLACK, WHITE, RED (note red on this display is not vivid)
FOREGROUND_COLOR = BLACK
BACKGROUND_COLOR = WHITE
# Used to ensure the display is free in CircuitPython
displayio.release_displays()
# Define the pins needed for display use on the Metro
spi = board.SPI()
epd_cs = board.D10
epd_dc = board.D9
# Create the displayio connection to the display pins
display_bus = displayio.FourWire(spi, command=epd_dc, chip_select=epd_cs,
baudrate=1000000)
time.sleep(1) # Wait a bit
# Create the display object - the third color is red (0xff0000)
DISPLAY_WIDTH = 264
DISPLAY_HEIGHT = 176
# Create the display object - the third color is red (0xff0000)
display = adafruit_il91874.IL91874(display_bus, width=DISPLAY_WIDTH,
height=DISPLAY_HEIGHT,
highlight_color=0xff0000, rotation=90)
# Create a display group for our screen objects
g = displayio.Group(max_size=10)
# Set a white background
background_bitmap = displayio.Bitmap(DISPLAY_WIDTH, DISPLAY_HEIGHT, 1)
# Map colors in a palette
palette = displayio.Palette(1)
palette[0] = BACKGROUND_COLOR
# Create a Tilegrid with the background and put in the displayio group
t = displayio.TileGrid(background_bitmap, pixel_shader=palette)
g.append(t)
# Draw simple text using the built-in font into a displayio group
text_group = displayio.Group(max_size=10, scale=2, x=40, y=40)
text = “Hello World!”
text_area = label.Label(terminalio.FONT, text=text, color=FOREGROUND_COLOR)
text_group.append(text_area) # Add this text to the text group
g.append(text_group)
# Place the display group on the screen
display.show(g)
# Refresh the display to have everything show on the display
# NOTE: Do not refresh eInk displays more often than 180 seconds!
display.refresh()
time.sleep(180)
while True:
pass
代碼查看
對于概述將displayio用于CircuitPython的顯示,這是出色的指南,使用displayio的CircuitPython顯示支持是您的第一站。如果您想更深入地了解用于顯示器的模型,請參閱本指南。
Adafruit建議在嘗試執行其他代碼以確保顯示器連接到顯示器之前,使用 displayio.release_displays()函數。
下一步是讓displayio知道顯示器上使用了哪些引腳。所使用的特定引腳在很大程度上取決于顯示器,建議您在尋求更改之前,先參考顯示器上的指南以了解已知的工作配置。 displayio.FourWire設置與顯示總線的displayio連接。
使用總線,程序建立與顯示驅動器。給出了顯示的大小(adafruit_il0373和width),方向(height),忙碌引腳和突出顯示顏色。對于此三色顯示,指定了紅色(rotation)。
其余代碼遵循標準的0xff0000顯示設置和使用:
創建顯示組
將所需的背景色設置為位圖
創建TileGrid以將對象與位圖一起放入并將圖塊組附加到顯示組中
為文本添加顯示組項目并使用“ Hello World!”作為示例文本。文本將按比例縮放兩個大小,并位于displayio,x=40處,以將其從左上方向下移動到右側。
在屏幕上顯示顯示內容
刷新屏幕
最后,程序等待3分鐘(最小刷新時間。然后,程序使用y=40和while True:語句來保持當前狀態直到處理器復位為止。
示例:姓名徽章

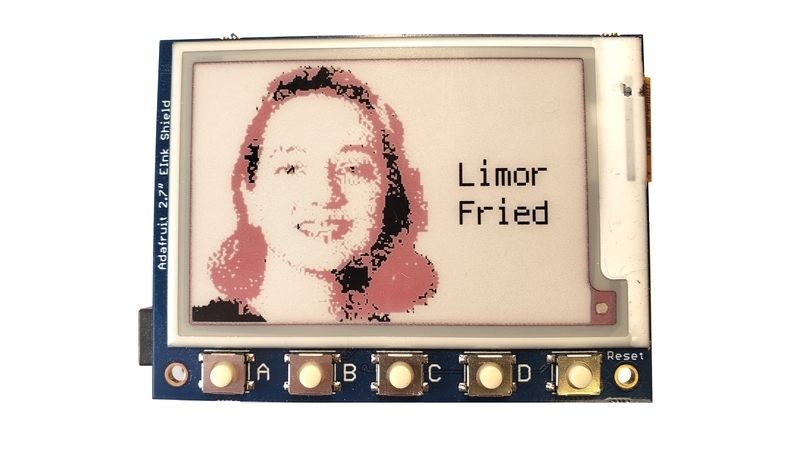
最后一個示例在eInk顯示器上的位圖上顯示文本,從而使名稱徽章對于聚會或會議非常有用。
圖像
此示例使用BMP格式的方形圖片文件顯示在顯示屏的左側。可能是某人的圖片,徽標或其他藝術品。
要使用高度為104像素的2.13“顯示器,請將圖像設為104x104。
要使用2.7”顯示屏的高度為176像素,使圖像的尺寸為176x176。
由于eInk顯示屏只能使用3種顏色,因此請參閱隨附的指南“為E-Ink顯示屏準備圖形”。查看它們可能如何在您選擇的顯示器上最佳顯示。
以下是示例中使用的示例圖片。對于2.13英寸顯示屏,請使用較小的圖片;對于2.7英寸屏蔽板,請使用較大的圖片。將圖像作為 picture.bmp 復制到開發板的 CIRCUITPY 驅動器。


代碼
下面的代碼將在左側顯示一個正方形圖片,使用internal terminalio字體在eInk顯示屏的右側放置兩行文本。您可以設置前景色和背景色。請參閱注釋以了解每個步驟如何對過程作出貢獻。
請選擇特定于顯示器和微控制器的代碼,因為以下兩個代碼塊對于兩組硬件均不可互換。這些示例幾乎是相同的。
“ 2.13”顯示效果更真實紅色,而2.7英寸顯示屏則使用更多的粉紅色。這完全取決于顯示器的制造方式,而不取決于顯示器本身的顏色問題。請將此因素納入您的顏色選擇計劃中。

2.13“ eInk FeatherWing示例
引腳反映了FeatherWing eInk顯示器和Feather M4的組合。它還具有2.13英寸顯示器的像素尺寸。
下載:Project Zip 或 213_tricolor_eink_fw_badge.py | 在Github上查看
復制代碼
“”“
Simple badge script for Adafruit 2.13” 212x104 tri-color display
Supported products:
* Adafruit 2.13“ Tri-Color Display Breakout
* https://www.adafruit.com/product/4086 (breakout) or
* https://www.adafruit.com/product/4128 (FeatherWing)
This program requires the adafruit_il0373 library and the
adafruit_display_text library in the CIRCUITPY /lib folder
for CircuitPython 5.0 and above which has displayio support.
”“”
import time
import board
import displayio
import adafruit_il0373
import terminalio
from adafruit_display_text import label
BLACK = 0x000000
WHITE = 0xFFFFFF
RED = 0xFF0000
# Change text colors, choose from the following values:
# BLACK, RED, WHITE
TEXT_COLOR = BLACK
BACKGROUND_COLOR = WHITE
# Used to ensure the display is free in CircuitPython
displayio.release_displays()
# Define the pins needed for display use
# This pinout is for a Feather M4 and may be different for other boards
spi = board.SPI() # Uses SCK and MOSI
epd_cs = board.D9
epd_dc = board.D10
epd_reset = board.D5
epd_busy = board.D6
# Create the displayio connection to the display pins
display_bus = displayio.FourWire(spi, command=epd_dc, chip_select=epd_cs,
reset=epd_reset, baudrate=1000000)
time.sleep(1) # Wait a bit
DISPLAY_WIDTH = 212
DISPLAY_HEIGHT = 104
# Create the display object - the third color is red (0xff0000)
display = adafruit_il0373.IL0373(display_bus, width=DISPLAY_WIDTH,
height=DISPLAY_HEIGHT,
rotation=90, busy_pin=epd_busy,
highlight_color=0xff0000)
# Create a display group for our screen objects
g = displayio.Group()
# Set a background
background_bitmap = displayio.Bitmap(DISPLAY_WIDTH, DISPLAY_HEIGHT, 1)
# Map colors in a palette
palette = displayio.Palette(1)
palette[0] = BACKGROUND_COLOR
# Put the background into the display group
bg_sprite = displayio.TileGrid(background_bitmap,
pixel_shader=palette,
x=0, y=0)
g.append(bg_sprite)
# Display a picture from the root directory of the CIRCUITPY drive
# Picture should be HEIGHTxHEIGHT square idealy for a portrait
# But could be the entire WIDTHxHEIGHT for a non-portrait
f = open(“/picture.bmp”, “rb”)
pic = displayio.OnDiskBitmap(f)
# Create a Tilegrid with the bitmap and put in the displayio group
t = displayio.TileGrid(pic, pixel_shader=displayio.ColorConverter())
g.append(t)
# Draw simple text using the built-in font into a displayio group
# For smaller text, change scale=2 to scale=1
text_group = displayio.Group(max_size=10, scale=2,
x=DISPLAY_HEIGHT + 10,
y=int(DISPLAY_HEIGHT/2) - 13)
first_name = “Limor”
text_area = label.Label(terminalio.FONT, text=first_name,
color=TEXT_COLOR)
text_group.append(text_area) # Add this text to the text group
g.append(text_group)
# Draw simple text using the built-in font into a displayio group
text_group = displayio.Group(max_size=10, scale=2,
x=DISPLAY_HEIGHT + 10,
y=int(DISPLAY_HEIGHT/2) + 13)
last_name = “Ladyada”
text_area = label.Label(terminalio.FONT, text=last_name,
color=TEXT_COLOR)
text_group.append(text_area) # Add this text to the text group
g.append(text_group)
# Place the display group on the screen
display.show(g)
# Refresh the display to have it actually show
# NOTE: Do not refresh eInk displays more often than 180 seconds!
display.refresh()
# Wait the minimum 3 minutes between refreshes. Then loop to freeze.
time.sleep(180)
while True:
pass
div》 2.7“ eInk Shield示例
引腳反映了屏蔽eInk顯示屏和Metro M4的組合。它具有2.7”顯示屏的像素尺寸。
下載:Project Zip 或 27 _tricolor_eink_shield_badge.py | 在Github上查看
復制代碼
“”“
Simple Badge script for a 2.7” 264x176 Tri-Color eInk display shield
Supported products:
* Adafruit 2.7“ Tri-Color ePaper Display Shield
https://www.adafruit.com/product/4229
This program requires the adafruit_il91874 and the
adafruit_display_text library in /lib on the CIRCUITPY drive
for CircuitPython 5.0 and above which has displayio support.
”“”
import time
import board
import displayio
import adafruit_il91874
import terminalio
from adafruit_display_text import label
BLACK = 0x000000
WHITE = 0xFFFFFF
RED = 0xFF0000
# Change text colors, choose from the following values:
# BLACK, RED, WHITE
TEXT_COLOR = BLACK
BACKGROUND_COLOR = WHITE
# Used to ensure the display is free in CircuitPython
displayio.release_displays()
# Define the pins needed for display use on the Metro
spi = board.SPI()
epd_cs = board.D10
epd_dc = board.D9
# Create the displayio connection to the display pins
display_bus = displayio.FourWire(spi, command=epd_dc, chip_select=epd_cs,
baudrate=1000000)
time.sleep(1) # Wait a bit
DISPLAY_WIDTH = 264
DISPLAY_HEIGHT = 176
# Create the display object - the third color is red (0xff0000)
display = adafruit_il91874.IL91874(display_bus, width=DISPLAY_WIDTH,
height=DISPLAY_HEIGHT,
highlight_color=0xff0000, rotation=90)
# Create a display group for our screen objects
g = displayio.Group(max_size=10)
# Set a background
background_bitmap = displayio.Bitmap(DISPLAY_WIDTH, DISPLAY_HEIGHT, 1)
# Map colors in a palette
palette = displayio.Palette(1)
palette[0] = BACKGROUND_COLOR
# Put the background into the display group
bg_sprite = displayio.TileGrid(background_bitmap,
pixel_shader=palette,
x=0, y=0)
g.append(bg_sprite)
# Display a picture from the root directory of the CIRCUITPY drive
# Picture should be HEIGHTxHEIGHT square idealy for a portrait
# But could be the entire WIDTHxHEIGHT for a non-portrait
f = open(“/picture.bmp”, “rb”)
pic = displayio.OnDiskBitmap(f)
# Create a Tilegrid with the bitmap and put in the displayio group
t = displayio.TileGrid(pic, pixel_shader=displayio.ColorConverter())
g.append(t)
# Draw simple text using the built-in font into a displayio group
# For smaller text, change scale=2 to scale=1 as scale 2 doesn‘t
# allow for much text but the text is bigger.
text_group = displayio.Group(max_size=10, scale=2,
x=DISPLAY_HEIGHT + 5,
y=int(DISPLAY_HEIGHT/2) - 13)
first_name = “Limor”
text_area = label.Label(terminalio.FONT, text=first_name,
color=TEXT_COLOR)
text_group.append(text_area) # Add this text to the text group
g.append(text_group)
# Draw simple text using the built-in font into a displayio group
# For smaller text, change scale=2 to scale=1 as scale 2 doesn’t
# allow for much text but the text is bigger.
text_group = displayio.Group(max_size=10, scale=2,
x=DISPLAY_HEIGHT + 5,
y=int(DISPLAY_HEIGHT/2) + 13)
last_name = “Fried”
text_area = label.Label(terminalio.FONT, text=last_name,
color=TEXT_COLOR)
text_group.append(text_area) # Add this text to the text group
g.append(text_group)
# Place the display group on the screen
display.show(g)
# Refresh the display to have it actually show
# NOTE: Do not refresh eInk displays more often than 180 seconds!
display.refresh()
# Wait the minimum 3 minutes between refreshes. Then loop to freeze.
time.sleep(180)
while True:
pass
代碼查看
對于概述將displayio用于CircuitPython的顯示,這是出色的指南,使用displayio的CircuitPython顯示支持是您的第一站。如果您想更深入地了解用于顯示器的模型,請參閱本指南。
Adafruit建議在嘗試執行其他代碼以確保顯示器連接到顯示器之前,使用 displayio.release_displays()函數。
下一步是讓displayio知道顯示器上使用了哪些引腳。所使用的特定引腳在很大程度上取決于顯示器,建議您在尋求更改之前,先參考顯示器上的指南以了解已知的工作配置。 displayio.FourWire設置與顯示總線的displayio連接。
定義了顯示尺寸(特定于顯示器)。然后在總線上,程序建立與顯示驅動程序的連接。給出了顯示的大小(width和height),方向(rotation),忙碌引腳和突出顯示顏色。對于此三色顯示,指定了紅色(0xff0000)。
其余代碼與后兩個示例非常相似。首先,從 CIRCUITPY 驅動器的根目錄中讀取一個名為 picture.bmp 的位圖圖形。通過displayio.TileGrid在顯示組中設置圖形。然后定義兩行文本。它們被放置在位圖的右邊幾個像素處,并與顯示高度的中間等距。
此莊園中容納的文字很少。您可以通過兩種方法來獲得更大的文本寬度:
將scale=2更改為scale=1將使每行字符更多,但文本將更小。
如果需要最終的靈活性,建議您將所有設計元素創建到一個位圖圖片中,并使用第一個示例僅顯示位圖。
該程序將所有組放置屏幕上具有display.show的元素將刷新display.refresh的顯示,以實際顯示圖形。 eInk顯示器需要2-3秒鐘才能刪除上一張圖像并顯示新圖像。
最后,程序將等待3分鐘。 while True:和pass 循環位于程序的末尾,因此REPL不會擦除標志圖像。按下重置按鈕將再次啟動程序。
深入
本指南是對在使用CircuitPython和displayio庫的三色eInk顯示器上使用位圖圖形和文本的介紹。
其他《 Adafruit學習系統指南》提供了制作不同屏幕元素的更多示例。有關更多信息,請參考以下指南:
Adafruit eInk顯示器突破點
為電子墨水顯示器準備圖形 p》
使用displayio
支持CircuitPython顯示對于更多高級名稱標簽,您可以考慮將Adafruit PyBadge與TFT LCD顯示器一起使用
帶有Unicode字體的PyBadge會議徽章
責任編輯:wv
-
顯示屏
+關注
關注
28文章
4601瀏覽量
76327
發布評論請先 登錄

液晶顯示屏是什么材料做的
液晶顯示屏與led顯示屏的區別
LED顯示屏如何通過FMEA進行風險分析:打造無憂顯示新境界
物聯網系統中顯示屏的主要成員_LED顯示屏詳解


 工商網監
工商網監
評論