 怎樣用語音命令控制直流電機

電路圖
建立連接如下:
ENA L298N到Arduino 11的引腳
L298N的ENB到Arduino的10號引腳
L298N的IN1到Arduino的9號引腳
L298N的IN2到Arduino的第8針
L298N的IN3到Arduino的第7針
L298N的IN4到Arduino的第6針
將正在使用的電池電源正極連接到L298N的12V連接器,電池到L298N的GND,以及L298N的GND到GND of Arduino
最后,連接L298N兩端的兩個電機

如何運行程序
首先,在Arduino IDE的帖子末尾復制并粘貼Arduino代碼并上傳代碼。
然后從Wekinator的示例頁面下載草圖。
下載MFCC的可執行文件(mel-frequency cepstral coefficient)。我有一個64位操作系統,所以我下載了“win64”。
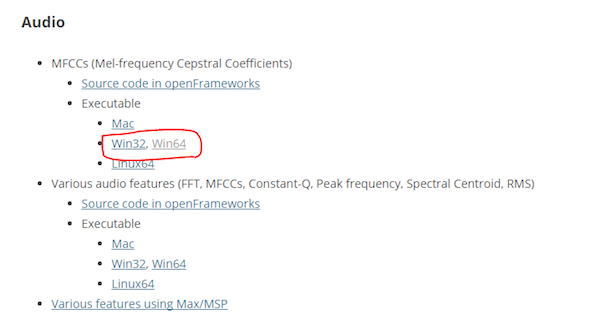
下載后,將其解壓縮并運行“.exe”文件。它將如下所示。現在您需要一個麥克風來為Wekinator提供輸入。如果已連接外接麥克風,請確保在聲音設置中選擇了該麥克風。
您需要另一個草圖來獲取Wekinator的輸出。該草圖在本文末尾給出。將其粘貼到新的處理窗口并運行草圖。
打開Wekinator并進行如下圖所示的設置。將輸入設置為13,將輸出設置為1.將類型設置為“所有動態時間扭曲”,使用5種手勢類型,然后單擊“下一步”。
現在按住output_1前面的“+”按鈕并說“前進”。
然后按住output_2前面的“+”按鈕并說出“向后”。
然后按住output_3前面的“+”按鈕并說出“right”。
然后按住output_4前面的“+”按鈕并說“左”。
然后按住“ outpu前面的+“按鈕t_5并說“停止”。
然后,單擊“Train”,然后單擊“Run”。確保已上載Arduino代碼并且處理草圖正在后臺運行。現在電機應根據您的聲控命令移動。嘗試用你的聲音進行測試,并在需要時重復上述步驟進行重新訓練。
它是如何工作的?
總之,這個項目有三個部分:Wekinator,Processing和Arduino。使用機器學習,Wekinator正在告訴處理它正在收聽的語音是否是預先訓練好的語音命令。然后處理讀取該消息并將其傳遞給Arduino,然后Arduino決定是否順時針/逆時針轉動電機。 Wekinator和處理之間發生的所有通信都是通過OSC(開放式聲音控制)協議。處理和Arduino之間的通信是通過串口完成的。
Arduino代碼
#include //Including the library that will help us in receiving and sending the values from processing
ValueReceiver《1》 receiver; /*Creating the receiver that will receive only one value.
Put the number of values to synchronize in the brackets */
/* The below variable will be synchronized in the processing
and it should be same on both sides. */
int output;
//Motor Pins
int EN_A = 11;
int IN1 = 9;
int IN2 = 8;
int IN3 = 7;
int IN4 = 6;
int EN_B = 10;
void setup()
{
/* Starting the serial communication because we are communicating with the
Processing through serial. The baudrate should be same as on the processing side. */
Serial.begin(19200);
//Initializing the motor pins as output
pinMode(EN_A, OUTPUT);
pinMode(IN1, OUTPUT);
pinMode(IN2, OUTPUT);
pinMode(IN3, OUTPUT);
pinMode(IN4, OUTPUT);
pinMode(EN_B, OUTPUT);
digitalWrite(EN_A, HIGH);
digitalWrite(EN_B, HIGH);
// Synchronizing the variable with the processing. The variable must be int type.
receiver.observe(output);
}
void loop()
{
// Receiving the output from the processing.
receiver.sync();
// Matching the received output to light up led‘s
if (output == 1)
{
//Forward
digitalWrite(IN1, LOW);
digitalWrite(IN2, HIGH);
digitalWrite(IN3, LOW);
digitalWrite(IN4, HIGH);
}
else if (output == 2)
{
//Backward
digitalWrite(IN1, HIGH);
digitalWrite(IN2, LOW);
digitalWrite(IN3, HIGH);
digitalWrite(IN4, HIGH);
}
else if (output == 3)
{
//Right
digitalWrite(IN1, LOW);
digitalWrite(IN2, HIGH);
digitalWrite(IN3, LOW);
digitalWrite(IN4, LOW);
}
else if (output == 4)
{
//Left
digitalWrite(IN1, LOW);
digitalWrite(IN2, LOW);
digitalWrite(IN3, HIGH);
digitalWrite(IN4, LOW);
}
else if (output == 5)
{
//Stop
digitalWrite(IN1, LOW);
digitalWrite(IN2, LOW);
digitalWrite(IN3, LOW);
digitalWrite(IN4, LOW);
}
}
處理代碼
import vsync.*; // Importing the library that will help us in sending and receiving the values from the Arduino
import processing.serial.*; // Importing the serial library
// Below libraries will connect and send, receive the values from wekinator
import oscP5.*;
import netP5.*;
// Creating the instances
OscP5 oscP5;
NetAddress dest;
ValueSender sender;
// This variable will be syncronized with the Arduino and it should be same on the Arduino side.
public int output;
void setup()
{
// Starting the serial communication, the baudrate and the com port should be same as on the Arduino side.
Serial serial = new Serial(this, “COM10”, 19200);
sender = new ValueSender(this, serial);
// Synchronizing the variable as on the Arduino side.
sender.observe(“output”);
// Starting the communication with wekinator. listen on port 12000, return messages on port 6448
oscP5 = new OscP5(this, 12000);
dest = new NetAddress(“127.0.0.1”, 6448);
}
//This is called automatically when OSC message is received
void oscEvent(OscMessage theOscMessage) {
if (theOscMessage.checkAddrPattern(“/output_1”)==true)
{
output = 1;
}
else if (theOscMessage.checkAddrPattern(“/output_2”)==true)
{
output = 2;
}
else if (theOscMessage.checkAddrPattern(“/output_3”) == true)
{
output = 3;
}
else if (theOscMessage.checkAddrPattern(“/output_4”) == true)
{
output = 4;
}
else if (theOscMessage.checkAddrPattern(“/output_5”) == true)
{
output = 5;
}
else
{
}
}
void draw()
{
// Nothing to be drawn for this example
}
-
直流電機
+關注
關注
36文章
1733瀏覽量
71768 -
語音控制
+關注
關注
5文章
497瀏覽量
28786
發布評論請先 登錄
電機:無刷直流電機的原理


 工商網監
工商網監
評論