 電子發(fā)燒友App


 創(chuàng)作
 發(fā)文章
 發(fā)帖
  提問
提問  發(fā)資料
 發(fā)視頻
資料介紹
描述
自動駕駛汽車現(xiàn)在是最熱門的話題。愛好者嘗試使用樹莓派和計算機視覺技術(shù)制作它們。這是一種方法。制造自動駕駛汽車的另一種更簡單的方法是線路跟隨器、路徑跟隨器、迷宮求解機器人。這種機器人遵循在特定環(huán)境的地板上繪制的特定顏色線。我們可以使用相機或紅外傳感器制作它們。如果我說我不想在地板上畫任何線,我希望它在隱形線上運行。這實際上是我在這里所做的。這個虛擬迷宮解算器/路徑跟隨機器人遵循來自遠程 PC 的路徑。所以機器人沒有任何傳感器,它只是從 PC 獲取坐標——另一個軟件機器人試圖解決難題——硬件機器人/汽車的移動方式與軟件機器人汽車的移動方式相同。現(xiàn)在讓我分享一下我是如何做到這一點的。
部分:
硬件 -
- 電機 - 4x
- 車輪(與電機兼容) - 4x
- HC05 藍牙模塊(發(fā)送/接收數(shù)據(jù)) - 1x
- 我制作的多功能機器人PCB(點此查看)- 1x
- 一些公母頭針
- 焊線(在PCB上焊接東西)
使身體 -
- PVC 板(您可以使用任何板甚至紙張,我喜歡使用它們)
- 熱膠和膠槍
軟件 -
- Arduino.ide
- Python3(別擔心,我會指導如何安裝)
而已。現(xiàn)在讓我們看看一切將如何運作。
原則(一切如何運作)
很簡單,機器人將是一輛藍牙控制的機器人汽車。python代碼將在計算機上加載地圖/迷宮并嘗試解決它。硬件機器人將使用藍牙從 Python 程序中獲取數(shù)據(jù)并相應地移動。
python程序?qū)⑼ㄟ^比較顏色值來查找路徑。我們的地圖將包含白色路徑。只要有一個白色像素,軟件汽車就會前進,硬件機器人也會前進。現(xiàn)在讓我們來吧。
制作機器人底盤
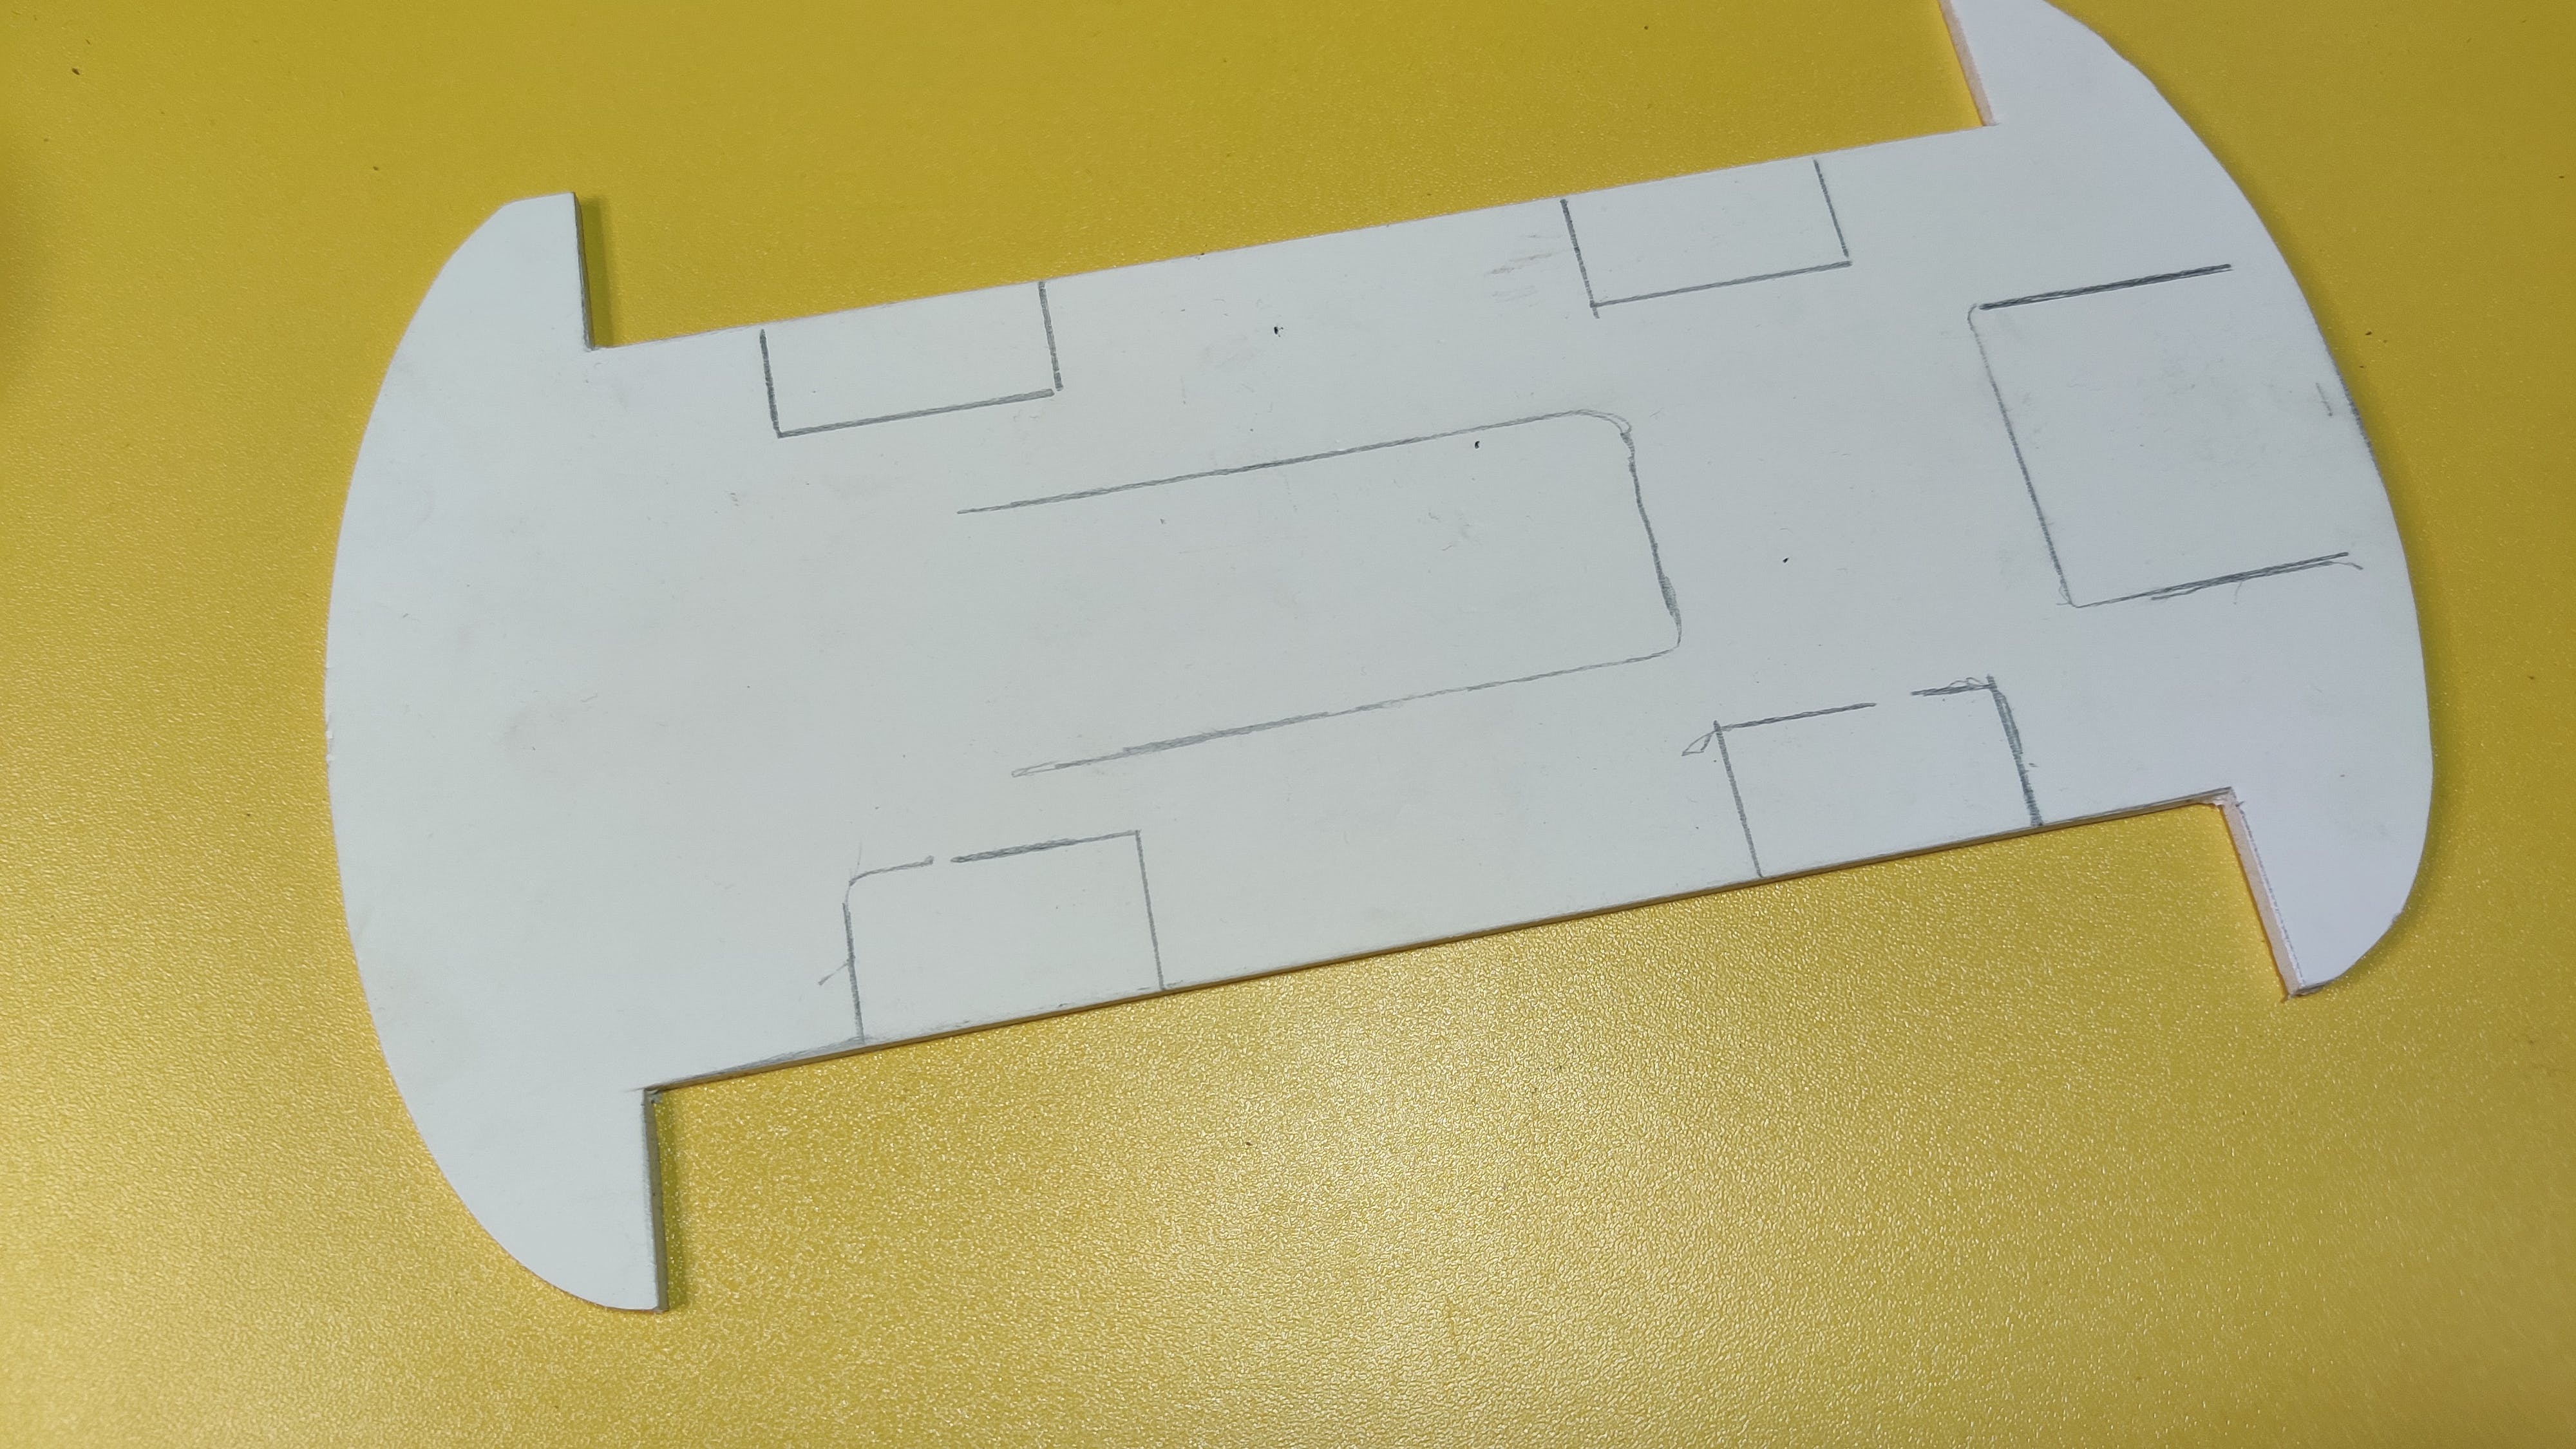
我拿了兩張PVC片材,根據(jù)我的需要剪下來。你想怎么做是你的選擇。切割板/床單后,我放置電機,用適當?shù)碾娋€連接它們。同一側(cè)的兩個電機作為一個電機,因此它們連接在一起。在圖 6 中,我使用了一些母對母跳線將電機控制引腳連接到 PCB。之后,我添加了兩個藍色 PVC 件來裝飾車身并連接輪子。
電路圖和PCB
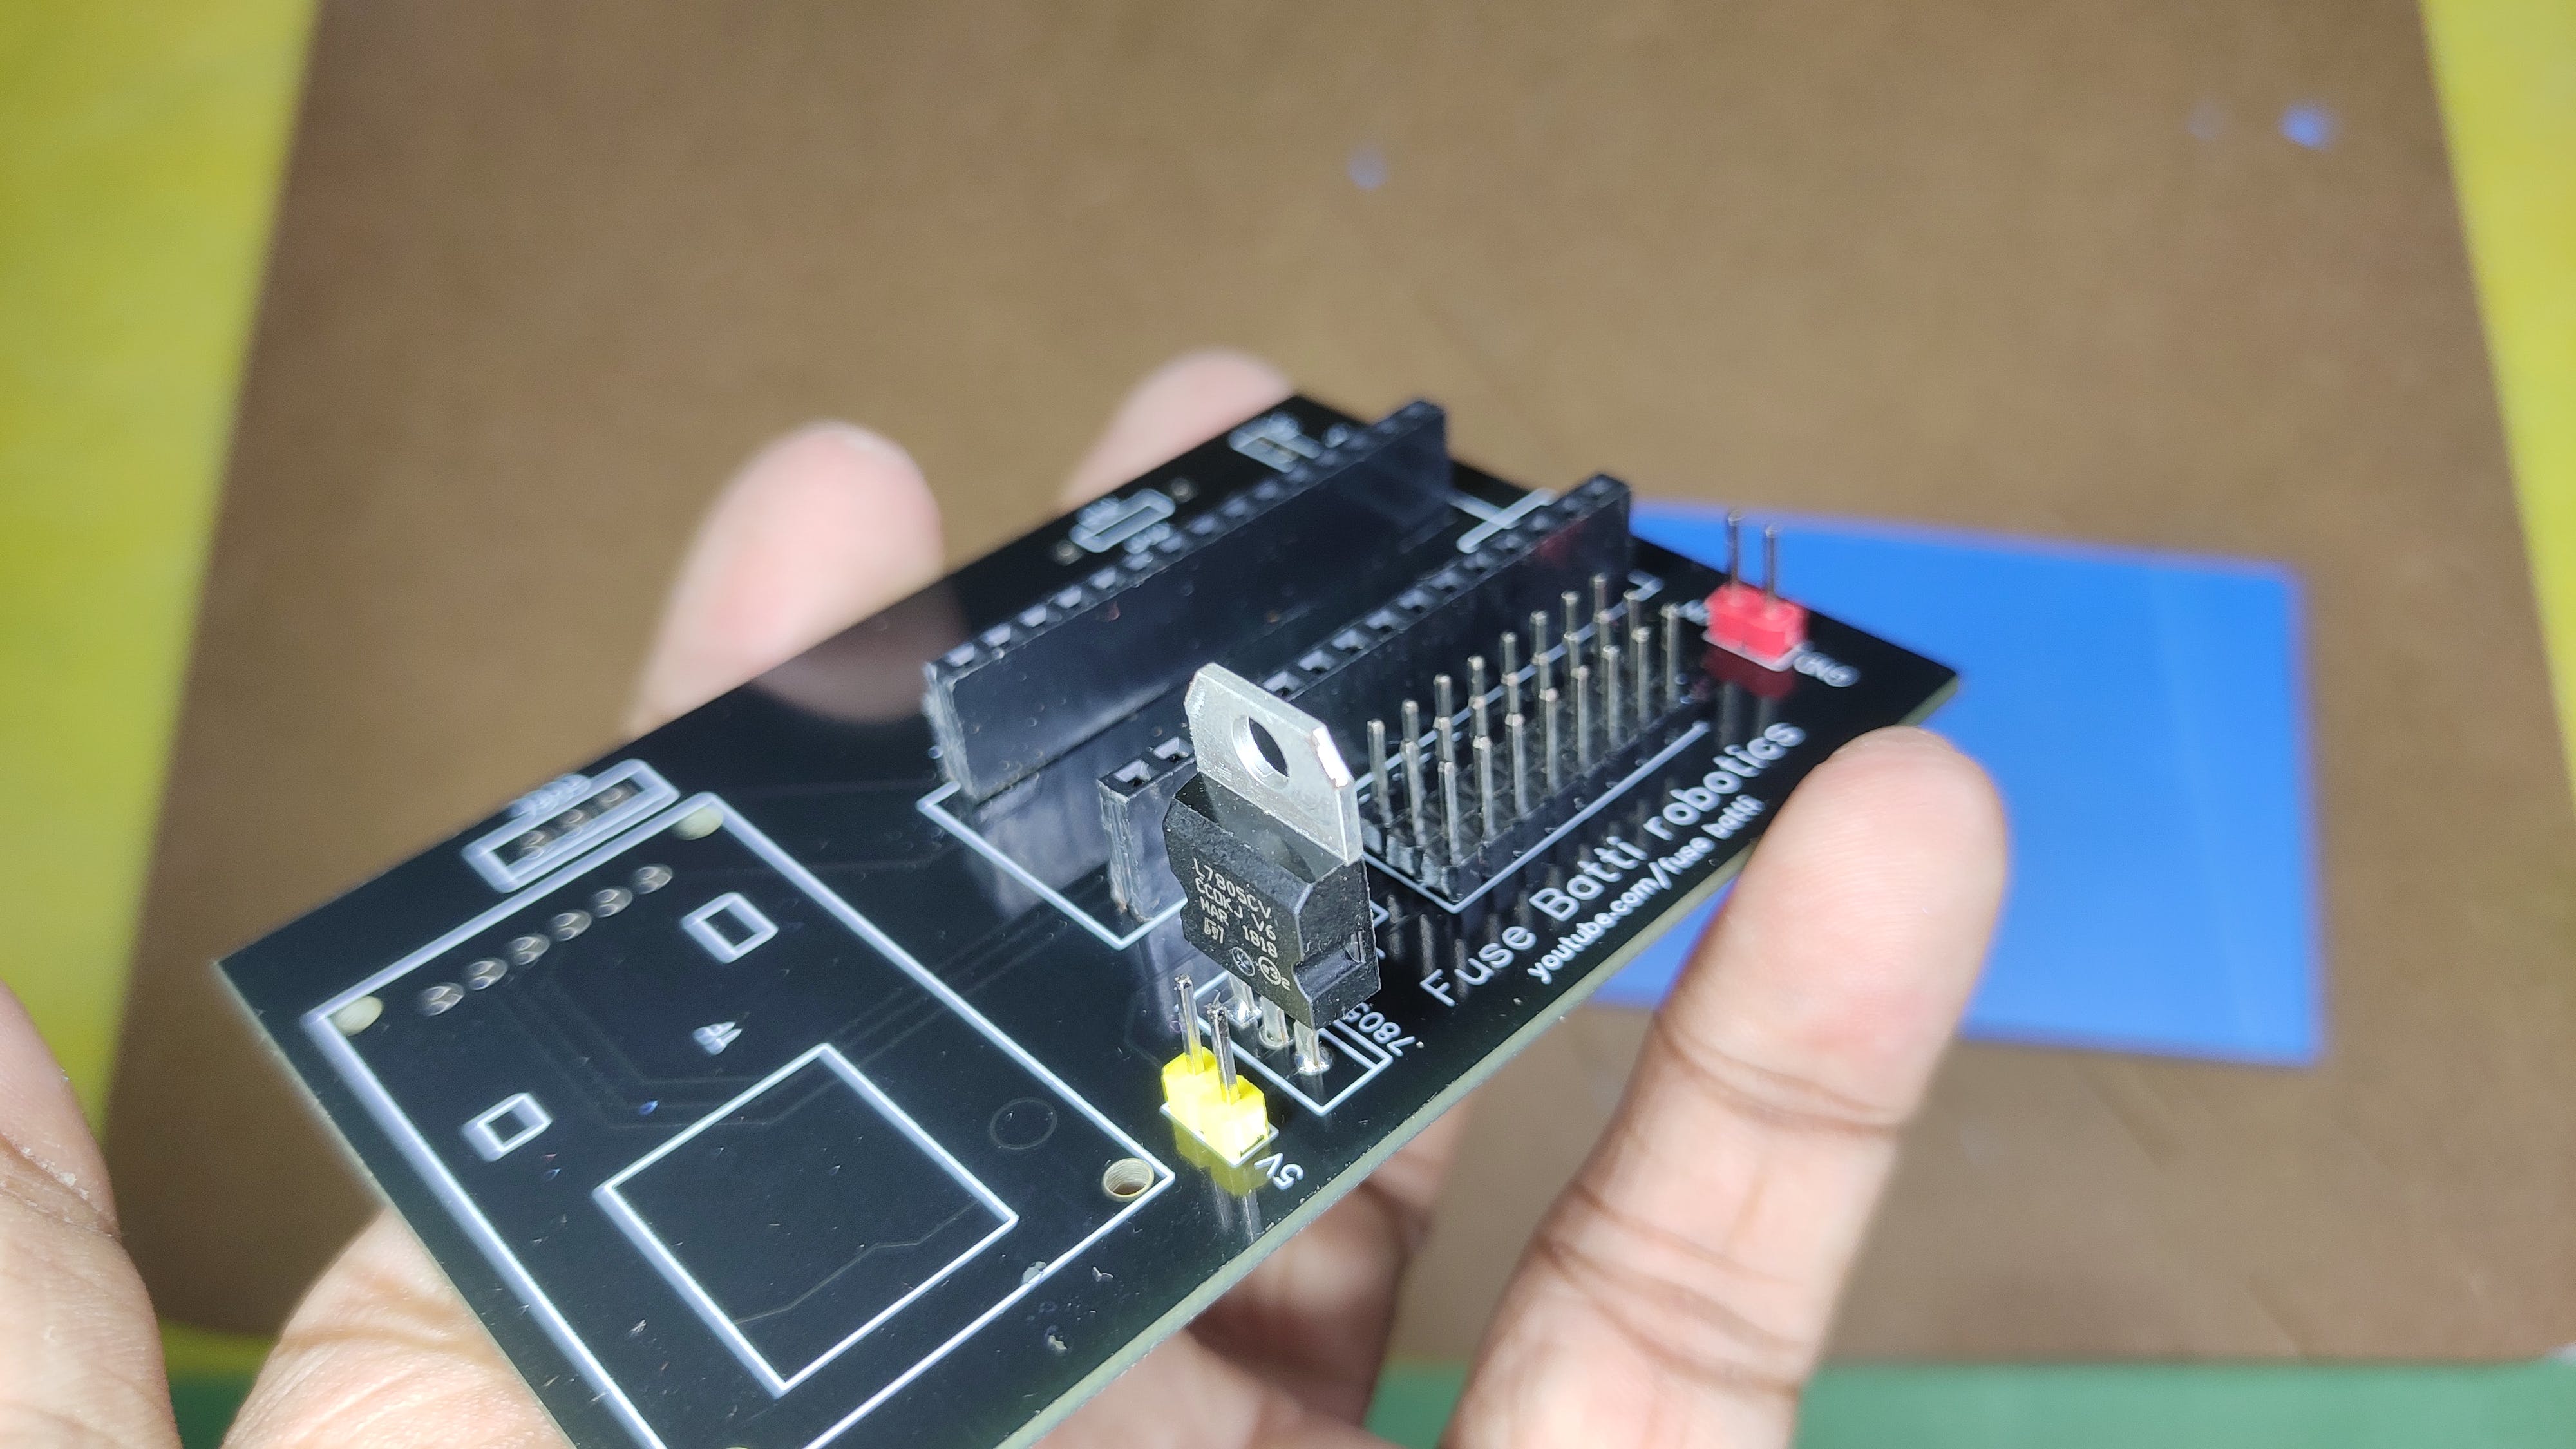
我使用EasyEDA 設計了電路。這很簡單,我留下了除了 A4、A5(用于 I2C 通信)之外的所有模擬引腳,并添加了 SD 卡讀卡器、藍牙模塊和 Arduino nano 的位置。藍牙模塊由跳線隔開(上傳數(shù)據(jù)時,我們需要斷開它)。我們不需要電阻,因為 Arduino 只會接收數(shù)據(jù),不會寫入。
之后,我從PCBWay.com 打印了 PCB。我發(fā)現(xiàn)他們的服務非常令人印象深刻。由于他們以更少的錢提供優(yōu)質(zhì)產(chǎn)品,我更喜歡將他們的服務用于我的 PCB。我去了pcb快速訂購并上傳了gerber文件。一切都是由網(wǎng)站自動完成的。在他們的工程師檢查了我的 PCB 后,我在 3 天內(nèi)付款并將它們從中國運到孟加拉國。質(zhì)量令人驚嘆,阻焊層,線條,玻璃般的外觀一如既往地讓我感到驚訝。
從這里獲取 PCB 。
連接:
我連接了
- 左電機至 D5、D6
- 右電機至 D3、D4
藍牙模塊連接在專用端口上,但要準確
- VCC 至 5v
- 接地到接地
- 發(fā)送到 Arduino Rx
- Rx 到 Arduino Tx
你發(fā)什么,我收什么。所以Arduino的接收引腳(Rx)連接到藍牙模塊發(fā)送引腳(Tx)。
之后,從電機驅(qū)動模塊為 PCB 供電。我總是喜歡在我的機器人項目中使用 7.4V 電源。兩個鋰電池就可以完成這項工作。3.7+3.7=7.4V,非常適合此類項目。
所以現(xiàn)在我們的藍牙機器人已經(jīng)準備好了。下一步是對其進行編程。
編程1:Arduino代碼
現(xiàn)在是時候?qū)⒊绦蛏蟼鞯綑C器人了。由于藍牙模塊連接在硬件串行上,我在上傳代碼之前拔下了跳線。
首先,我定義了電機連接的引腳 -
// Declare motor pins
// motors of same side work as one
// so we can consider both as one.
int rightMotor1 = 2;                // right side
int rightMotor2 = 3;
int leftMotor1 = 5;                 // left side
int leftMotor2 = 6;
然后我在 setup() 函數(shù)中將電機引腳聲明為輸出 -
 // Set pin modes
pinMode(rightMotor1, OUTPUT);
pinMode(rightMotor2, OUTPUT);
pinMode(leftMotor1, OUTPUT);
pinMode(leftMotor2, OUTPUT);
然后我初始化串行通信以從藍牙模塊接收數(shù)據(jù) -
 // Initialize serial communication
Serial.begin(9600);
它檢查藍牙模塊所連接的串行端口的字節(jié)數(shù)據(jù)。
// Variable to store received data
byte command;
// Get command data from bluetooth serial port
command = Serial.read();
如果它收到 -
- 'f' 前進
- 'b' 向后
- l' 代表左和
- 'r' 表示正確的動作
每個電機都有兩個引腳。如果我們需要將它們運行到一個方向,我們需要將一個引腳設為高電平,另一個引腳設為低電平。如果它們同時為高或低,電機將不會旋轉(zhuǎn)。請參閱此示例以將汽車向前移動 -
if (command == 'f'){
// indicates forward motion
digitalWrite(rightMotor1, HIGH);
digitalWrite(rightMotor2, LOW);
digitalWrite(leftMotor1, HIGH);
digitalWrite(leftMotor2, LOW);}
通過這種組合,我們可以使機器人工作。
從 github 下載代碼或從下面復制。我更喜歡下載以避免錯誤。
/* ** Virtual Path Following Robot *
*  Robot Actuator's program
*
*  This robot takes commands from a python program
*  and follows those commands. This robot demonstrates
*  virtual path following robots and it's scopes.
*
*  *********** License: GPL3+  *************
*  You should receive a copy of the license
*  with this program.
*
*  (c) author: ashraf minhaj
*      mail  : [email protected]
*
*  Tutorial for this project:
*      http://youtube.com/fusebatti
*      http://ashrafminhajfb.blogspot.com
*
*  written on 15th Feb 2021
*/
// Declare motor pins
// motors of same side work as one
// so we can consider both as one.
int rightMotor1 = 2;                // right side
int rightMotor2 = 3;
int leftMotor1 = 5;                 // left side
int leftMotor2 = 6;
// Variable to store received data
byte command;
void setup() {
 // Set pin modes
 pinMode(rightMotor1, OUTPUT);
 pinMode(rightMotor2, OUTPUT);
 pinMode(leftMotor1, OUTPUT);
 pinMode(leftMotor2, OUTPUT);
 // Initialize serial communication
 // at 9600 buad rate
 // sender/python code will also use
 // the same buad
 Serial.begin(9600);
}
void loop() {
 // Get command data from bluetooth serial port
 command = Serial.read();
 // Decide which way to go based on received data
 if (command == 'f'){
   // indicates forward motion
   digitalWrite(rightMotor1, HIGH);
   digitalWrite(rightMotor2, LOW);
   digitalWrite(leftMotor1, HIGH);
   digitalWrite(leftMotor2, LOW);
 }
 if (command == 'b'){
   // Backward motion
   digitalWrite(rightMotor1, LOW);
   digitalWrite(rightMotor2, HIGH);
   digitalWrite(leftMotor1, LOW);
   digitalWrite(leftMotor2, HIGH);
 }
 if (command == 'r'){
   // Right turn
   digitalWrite(rightMotor1, LOW);
   digitalWrite(rightMotor2, HIGH);
   digitalWrite(leftMotor1, HIGH);
   digitalWrite(leftMotor2, LOW);
 }
 if (command == 'l'){
   // Left turn
   digitalWrite(rightMotor1, HIGH);
   digitalWrite(rightMotor2, LOW);
   digitalWrite(leftMotor1, LOW);
   digitalWrite(leftMotor2, HIGH);
 }
 if (command == 's'){
   // Stops the robot/car
   digitalWrite(rightMotor1, LOW);
   digitalWrite(rightMotor2, LOW);
   digitalWrite(leftMotor1, LOW);
   digitalWrite(leftMotor2, LOW);
 }
}
現(xiàn)在使用 Arduino.ide 上傳代碼并繼續(xù)下一步。
Programmin2:Python 代碼
我想你的電腦上安裝了 python。如果沒有,請轉(zhuǎn)到并安裝最新的穩(wěn)定版 python。我使用 Python3.7.1,因為我發(fā)現(xiàn)它最穩(wěn)定。在下載下載可執(zhí)行安裝程序時,雙擊它進行安裝,然后單擊“將python添加到環(huán)境變量路徑”框,否則您將陷入災難。
無論如何,現(xiàn)在讓我們談談python程序。
我需要這個程序的兩個庫,pygame 和 pySerial。我像這樣從命令提示符安裝它們 -
$ pip install pygame
$ pip install pySerial
您在頂部看到的兩個圖像是迷宮和軟件汽車。python程序讀取它們-
bg  = pygame.image.load("track1.png")
car = pygame.image.load("car.png")
要將數(shù)據(jù)從 PC 發(fā)送到 Arduino 藍牙,我首先將藍牙模塊連接到我的 PC。步驟是 -
- 打開藍牙
- 轉(zhuǎn)到控制面板>設備管理器
- 搜索新設備
- 使用密碼添加設備 (HC05) [默認密碼為“0000”或“1234”]
而已。然后單擊設備屬性以獲取端口號。在 HC05 中,在 py PC 中它位于“COM8”中。所以python像這樣連接 -
PORT = "COM8"
BUADRATE = 9600
robot = serial.Serial(PORT, BUADRATE)  # connect robot
為了讓機器人先檢查周圍環(huán)境,我找到了汽車的中心,然后檢查了周圍環(huán)境——
# find the center of the car and draw a point on that
center_x, center_y = (int(car_x + 40 /2), int(car_y + 40 / 2))
代碼的其余部分是檢查周圍環(huán)境并轉(zhuǎn)動或移動汽車。如果它向前或任何方向,它會通過這樣的串行端口(字節(jié)數(shù)據(jù))將該數(shù)據(jù)發(fā)送到 Arduino -
# start the robot
robot.write(b'f')
# turn left
robot.write(b'l')
現(xiàn)在從 github 下載完整代碼或從下面復制 -
"""
   ** Virtual Path Follower Robot **
   License: GPL3
   You should receive a copy of license with this program.
   (c) author: ashraf minhaj
       mail  : [email protected]
   Written on 15th Feb 2021
"""
""" install -
$ pip install pygame
$ pip install pySerial
"""
# import library
import pygame
import serial
from time import sleep
# robot port and buadrate
# change these according to your need
PORT = "COM8"
BUADRATE = 9600
# initialize things
pygame.init()
robot = serial.Serial(PORT, BUADRATE)  # connect robot
# create window with size (our image size)
window = pygame.display.set_mode((700,400))  # track 1
#window = pygame.display.set_mode((1155,399))   # track 2
# load image file
bg  = pygame.image.load("track1.png")
#bg  = pygame.image.load("track2.png")
car = pygame.image.load("car.png")
car = pygame.transform.scale(car, (40, 40)) # resize car image
""" main loop varibales and things """
# set up timer clock
clock = pygame.time.Clock()
# initial x y axis position of the car
car_x = 30
car_y = 260
JUMP_VALUE = 25     # turning point value
direction = 'y_up'  # cars current direction
run = 1
# start the robot
robot.write(b'f')
DELAY = .400
# main loop
while run:
   clock.tick(30)         # update the window/run loop by this speed
   #check for events
   for event in pygame.event.get():
       # quit button clicked
       if event.type == pygame.QUIT:
           run = 0
   # position images
   window.blit(bg, (0, 0))          # load the track image
   window.blit(car, (car_x, car_y)) # the car image
   # record last x, y pos of car
   last_x, last_y = car_x, car_y
   # find the center of the car and draw a point on that
   center_x, center_y = (int(car_x + 40 /2), int(car_y + 40 / 2))
   pygame.draw.circle(window, (0,255,255), (center_x, center_y), 5, 5)
   # check surrounding (4 direction data)
   # the calibration value is the pixel from car's sensor/mid point
   # so it checks for road info 30 pixels far from the sensor.
   # 255 means we have a clear white road
   cal_value = 30              # calibrate this to get good data
   y_up      = window.get_at((center_x, center_y - cal_value))[0]
   y_down    = window.get_at((center_x, center_y + cal_value))[0]
   x_right   = window.get_at((center_x + cal_value, center_y))[0]
   x_left    = window.get_at((center_x - cal_value, center_y))[0]
   #print("y_up   ", y_up)
   #print("y_down ", y_down)
   #print("x_right", x_right)
   #print("x_left ", x_left)
   #print("-----------")
   # determine which way to go
   # go up
   if y_up == 255 and direction == 'y_up' and x_left != 255 and x_right != 255:
       # move up
       car_y -= 2  # decrease pixel and move the car on y axis
   # make the turn
   if y_up == 255 and direction == 'y_up' and x_left != 255 and x_right == 255:
       # make a right turn
       direction = 'x_right'
       car_y -= JUMP_VALUE
       car_x += JUMP_VALUE
       car = pygame.transform.rotate(car, -90)
       window.blit(car, (car_x, car_y))
       print('Turn Right')
       robot.write(b'r')
       sleep(DELAY)
       robot.write(b'f')
   # go x right
   if y_up != 255 and direction == 'x_right' and y_down != 255 and x_right == 255:
       car_x += 2
   if y_down == 255 and direction == 'x_right' and x_left == 255 and x_right == 255:
       # make a turn from x_right
       car = pygame.transform.rotate(car, -90)
       direction = 'y_down'
       car_y += JUMP_VALUE + 5
       car_x += JUMP_VALUE
       window.blit(car, (car_x, car_y))
       print('Turn Right')
       robot.write(b'r')
       sleep(DELAY)
       robot.write(b'f')
   # go y down
   if y_down == 255 and direction == 'y_down' and x_left != 255 and x_right != 255:
       # move down
       car_y += 2
   # left turn
   if y_down == 255 and direction == 'y_down' and x_left != 255 and x_right == 255:
       # turn from y_down
       car = pygame.transform.rotate(car, 90)
       direction = 'x_right'
       car_y += JUMP_VALUE
       car_x += JUMP_VALUE
       print('Turn left')
       robot.write(b'l')
       sleep(DELAY)
       robot.write(b'f')
   # turn to y up
   if y_up == 255 and direction == 'x_right' and x_left == 255 and x_right == 255:
       # turn from y_down
       car = pygame.transform.rotate(car, 90)
       direction = 'y_up'
       car_y -= JUMP_VALUE + 5
       car_x += JUMP_VALUE
       print('Turn left')
       robot.write(b'l')
       sleep(DELAY)
       robot.write(b'f')
   # if car is stopped
   if car_x == last_x and car_y == last_y:
       # stop the engine sound
       print("STOPPED")
       robot.write(b's')
   pygame.display.update()  # update the window
pygame.quit()      #close everything
通電,我們走吧
我使用兩節(jié) 18650 電池為機器人供電。然后運行 ??Python 程序。它的表現(xiàn)如何?你可以在視頻中看到。
這個機器人最好的部分是你不需要不時更改機器人的代碼。您只需要相應地更改 python 程序。而已。
未來范圍:
該機器人可用于帶有一些板載傳感器的行業(yè),以確定錯誤或滑出路徑并避開障礙物。天空是極限,你的大腦是主人。
謝謝你。
- AI解迷宮機器人
- 檢測機器人開源分享
- 坦克機器人開源分享
- 掃地機器人開源資料 44次下載
- 機器人守衛(wèi)開源分享
- 英雄機器人開源
- 機器人開源案例
- 赫伯特機器人虛擬寵物開源分享
- 基于DSP和PC的農(nóng)業(yè)機器人控制系統(tǒng) 18次下載
- 競賽機器人制作技術(shù)PDF電子書免費下載 46次下載
- 面向ABB IRB4600機器人的虛擬示教系統(tǒng)研究 2次下載
- 機器人的虛擬監(jiān)控技術(shù)系統(tǒng)設計研究 19次下載
- 基于LPC1114的迷宮機器人的設計與實現(xiàn) 13次下載
- 基于ARM的機器人走迷宮控制系統(tǒng)與算法設計 27次下載
- 基于虛擬監(jiān)控技術(shù)的機器人系統(tǒng) 10次下載
- 字節(jié)發(fā)布機器人領(lǐng)域首個開源視覺-語言操作大模型,激發(fā)開源VLMs更大潛能 561次閱讀
- 機器人技術(shù)中常用的路徑規(guī)劃算法的開源庫 1188次閱讀
- 工業(yè)機器人虛擬仿真軟件簡述 6148次閱讀
- 面對疫情 醫(yī)療機器人能幫上什么忙? 2236次閱讀
- dfrobotSparki機器人套裝簡介 2207次閱讀
- 工業(yè)機器人編程入門_工業(yè)機器人的編程要求 9787次閱讀
- 醫(yī)用機器人的定義_醫(yī)用機器人發(fā)展 3257次閱讀
- 醫(yī)用機器人的功能_醫(yī)用機器人分類 2462次閱讀
- 協(xié)作機器人的起源_為什么需要協(xié)作機器人 8322次閱讀
- 如何區(qū)分機器人、協(xié)作機器人和移動機器人? 7029次閱讀
- 軟體機器人 前所未見的機器人 3770次閱讀
- 機器人的最佳編程語言是什么?機器人十大流行編程語言匯總 3.5w次閱讀
- 工業(yè)機器人虛擬仿真軟件是一個很好的工業(yè)機器人入門途徑 3.4w次閱讀
- 機器人系統(tǒng)常用仿真軟件介紹和效果 8633次閱讀
- 工業(yè)機器人虛擬樣機系統(tǒng)的研究 1455次閱讀

 上傳資料賺積分
下載排行
本周
- 1貼片三極管上的印字與真實名稱的對照表詳細說明
- 0.50 MB | 76次下載 | 1 積分
- 2Altium Designer AD 25 軟件安裝包下載
- 0.00 MB | 3次下載 | 免費
- 3Altium Designer 23 軟件下載
- 0.00 MB | 2次下載 | 免費
- 4Altium Designer 22.11.1軟件安裝包下載
- 0.00 MB | 1次下載 | 免費
- 5PADS Professional vx 2.11 安裝包
- 0.00 MB | 1次下載 | 5 積分
- 6高頻率變壓器的設計
- 0.03 MB | 1次下載 | 1 積分
- 7ANT8817 1%3.5W/3.7V,同步自適應升壓,超長續(xù)航,H類防破音單聲道音頻功放中文手冊
- 1.11 MB | 1次下載 | 免費
- 8NS6326 4-30V輸入5V/3A輸出同步降壓穩(wěn)壓器中文手冊
- 1.22 MB | 次下載 | 免費
本月
- 1蘇泊爾電磁爐線路的電路原理圖資料合集
- 2.02 MB | 286次下載 | 5 積分
- 2長虹液晶電視R-HS310B-5HF01的電源板電路原理圖
- 0.46 MB | 87次下載 | 5 積分
- 3貼片三極管上的印字與真實名稱的對照表詳細說明
- 0.50 MB | 76次下載 | 1 積分
- 4U盤一鍵制作
- 23.84 MB | 41次下載 | 免費
- 5AI智能眼鏡產(chǎn)業(yè)鏈分析
- 4.43 MB | 39次下載 | 免費
- 6AO4803A雙P通道增強型場效應晶體管的數(shù)據(jù)手冊
- 0.11 MB | 28次下載 | 2 積分
- 7長虹液晶彩電LS29機芯的技術(shù)資料說明
- 3.42 MB | 16次下載 | 2 積分
- 8TP4055 500mA線性鋰離子電池充電器中文手冊
- 0.75 MB | 9次下載 | 免費
總榜
- 1matlab軟件下載入口
- 未知 | 935127次下載 | 10 積分
- 2開源硬件-PMP21529.1-4 開關(guān)降壓/升壓雙向直流/直流轉(zhuǎn)換器 PCB layout 設計
- 1.48MB | 420064次下載 | 10 積分
- 3Altium DXP2002下載入口
- 未知 | 233089次下載 | 10 積分
- 4電路仿真軟件multisim 10.0免費下載
- 340992 | 191387次下載 | 10 積分
- 5十天學會AVR單片機與C語言視頻教程 下載
- 158M | 183342次下載 | 10 積分
- 6labview8.5下載
- 未知 | 81586次下載 | 10 積分
- 7Keil工具MDK-Arm免費下載
- 0.02 MB | 73815次下載 | 10 積分
- 8LabVIEW 8.6下載
- 未知 | 65988次下載 | 10 積分


 工商網(wǎng)監(jiān)
評論