 電子發燒友App


嗨嘍,大家好,我是程序猿老王,程序猿老王就是我。
今天給大家講一講如何將u-boot.2022.10版本移植到imx6ull開發板上。
環境
| 選項 | 內容 |
|---|---|
| 編譯主機 | UbuntuLTS 18.04 |
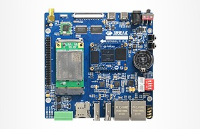
| 目標板 | ATK I.MX6ULL(512MB DDR3 + 8GB EMMC) |
| u-boot版本 | 2022.10 |
| 交叉編譯工具鏈 | gcc-linaro-7.5.0-2019.12-i686_arm-linux-gnueabihf |
一、u-boot編譯環境準備
1.u-boot源碼包下載
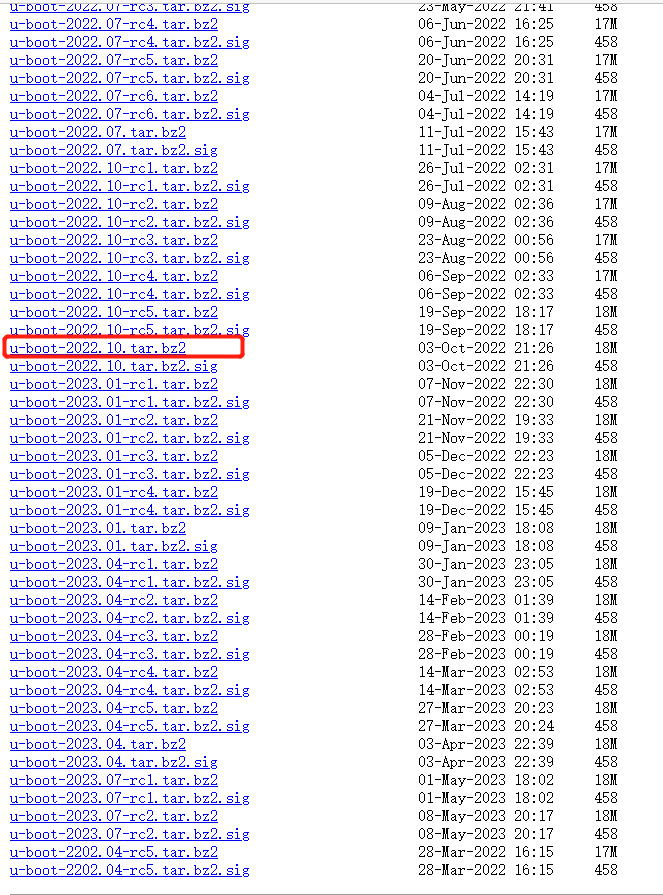
1.1、本次使用的uboot版本為2022.10版本u-boot-2022.10.tar.bz2
1.2、下載鏈接:https://ftp.denx.de/pub/u-boot/
2.編譯
2.1、通過共享文件夾或FTP服務將u-boot-2022.10.tar.bz2拷貝到ubuntu中
2.2、源碼壓縮包解壓
tar -jxvf u-boot-2022.10.tar.bz2
3.安裝依賴庫
3.1、使用默認配置進行編譯u-boot時報下面錯誤
toto@toto:~/workspace/uboot/u-boot-2022.10$ make mx6ull_14x14_evk_defconfig
YACC    scripts/kconfig/zconf.tab.c
/bin/sh: 1: bison: not found
scripts/Makefile.lib:222: recipe for target 'scripts/kconfig/zconf.tab.c' failed
make[1]: *** [scripts/kconfig/zconf.tab.c] Error 127
Makefile:578: recipe for target 'mx6ull_14x14_evk_defconfig' failed
make: *** [mx6ull_14x14_evk_defconfig] Error 2
解決辦法:
該錯誤是由于缺少一些相關庫文件導致,安裝上即可正常編譯,安裝命令:
sudo apt install bison flex
3.2、然后繼續編譯又報錯

解決辦法,安裝lib32z1依賴庫
sudo apt-get install lib32z1
3.3、繼續編譯make,報錯

解決方法:
繼續安裝依賴庫libssl-dev
sudo apt-get install libssl-dev
3.4、編譯通過,u-boot所有依賴庫已全部安裝完畢

二、U-Boot中添加自己的開發板
在U-Boot中添加自己的開發板NXP官方uboot中默認都是 NXP 自己的開發板,雖說我們可以直接在官方的開發板上直接修改,使u-boot可以完整的運行在我們的板子上。但是從學習的角度來講,這樣我們就不能了解到uboot是如何添加新平臺的。接下來我們就參考NXP官方的I.MX6ULL EVK 開發板學習如何在u-boot中添加我們的開發板或者開發平臺。
1、添加開發板默認配置文件
先在 configs 目錄下創建默認配置文件,復制 mx6ull_14x14_evk_defconfig,然后重命名為 mx6ull_toto_defconfig,命令如下:
cd configs
cp mx6ull_14x14_evk_defconfig mx6ull_toto_defconfig
然后將文件 mx6ull_toto_defconfig 中的內容改成下面的:
CONFIG_ARM=y
CONFIG_ARCH_MX6=y
CONFIG_SYS_TEXT_BASE=0x87800000
CONFIG_SYS_MALLOC_LEN=0x1000000
CONFIG_NR_DRAM_BANKS=1
CONFIG_ENV_SIZE=0x2000
CONFIG_ENV_OFFSET=0xC0000
CONFIG_MX6ULL=y
CONFIG_TARGET_MX6ULL_TOTO=y
...
可以看出,mx6ull_toto_defconfig 基本和 mx6ull_14x14_evk_defconfig中的內容一樣,只是第9行做了修改
2、添加開發板對應的頭文件
在目錄 include/configs 下添加 I.MX6ULL-ALPHA 開 發 板 對 應 的 頭 文 件 , 復 制 include/configs/mx6ullevk.h,并重命名為 mx6ull_toto.h,命令如下:
cp include/configs/mx6ullevk.h include/configs/mx6ull_toto.h
拷貝完成以后將:
#ifndef __MX6ULLEVK_CONFIG_H
#define __MX6ULLEVK_CONFIG_H
改為:
#ifndef __MX6ULL_TOTO_CONFIG_H
#define __MX6ULL_TOTO_CONFIG_H
mx6ull_toto.h 里面有很多宏定義,如配置uboot默認串口打印使用uart的第幾個口,網口默認使用哪個網口等,也有一些u-boot環境變量的的默認配置。如果我們想要改變默認的uart和enet口,那就在 mx6ull_toto.h 里面做修改即可。
3、添加開發板對應的板級文件夾
uboot 中每個板子都有一個對應的文件夾來存放板級文件,比如開發板上外設驅動文件等 等。NXP 的 I.MX 系列芯片的所有板級文件夾都存放在 board/freescale 目錄下,在這個目錄下 有個名為 mx6ullevk 的文件夾,這個文件夾就是 NXP 官方 I.MX6ULL EVK 開發板的板級文件 夾。復制 mx6ullevk,將其重命名為 mx6ull_toto,命令如下:
cd board/freescale
cp -r mx6ullevk/ mx6ull_toto
進 入 mx6ull_toto 目 錄 中 , 將 其 中 的 mx6ullevk.c 文 件 重 命 名 為mx6ull_toto.c,命令如下:
cd mx6ull_toto
mv mx6ullevk.c mx6ull_toto.c
我們還需要對 mx6ull_toto 目錄下的文件做一些修改:
3.1、修改 mx6ull_toto 目錄下的 Makefile 文件
將 mx6ull_alientek_emmc 下的 Makefile 文件內容改為如下所示:
# SPDX-License-Identifier: GPL-2.0+
# (C) Copyright 2016 Freescale Semiconductor, Inc.

obj-y  := mx6ull_toto.o
重點是第 4行的 obj-y,改為 mx6ull_toto.o,這樣才會編譯 mx6ull_toto.c 這個文件。
3.2、修改 mx6ull_toto 目錄下的 imximage.cfg 文件
將 imximage.cfg 中的下面一句:
#ifdef CONFIG_USE_IMXIMG_PLUGIN
/*PLUGIN    plugin-binary-file    IRAM_FREE_START_ADDR*/
PLUGIN  board/freescale/mx6ullevk/plugin.bin 0x00907000
#else
改為:
#ifdef CONFIG_USE_IMXIMG_PLUGIN
/*PLUGIN    plugin-binary-file    IRAM_FREE_START_ADDR*/
PLUGIN  board/freescale/mx6ull_toto/plugin.bin 0x00907000
#else
3.3、修改 mx6ull_toto 目錄下的 Kconfig 文件
修改 Kconfig 文件,修改后的內容如下:
if TARGET_MX6ULL_TOTO

config SYS_BOARD
    default "mx6ull_toto"

config SYS_VENDOR
    default "freescale"

config SYS_CONFIG_NAME
    default "mx6ull_toto"

config IMX_CONFIG
    default "board/freescale/mx6ull_toto/imximage.cfg"

endif
3.4、修改 mx6ull_toto 目錄下的 MAINTAINERS 文件
修改 MAINTAINERS 文件,修改后的內容如下:
MX6ULLTOTO BOARD
M:    Peng Fan
S:    Maintained
F:    board/freescale/mx6ull_toto/
F:    include/configs/mx6ull_toto.h
F:    configs/mx6ull_toto_defconfig
F:    configs/mx6ull_14x14_evk_plugin_defconfig
F:    configs/mx6ulz_14x14_evk_defconfig
4、修改 arch/arm/mach-imx/mx6/Kconfig
修改文件arch/arm/mach-imx/mx6/Kconfig,在 468 行加入如下內容:
config TARGET_MX6ULL_TOTO
    bool "Support mx6ull_toto"
    depends on MX6ULL
    select BOARD_LATE_INIT
    select DM
    select DM_THERMAL
    imply CMD_DM
在717行添加如下內容:
source "board/freescale/mx6ull_toto/Kconfig"
5、其他需要修改的地方
在 uboot 啟動信息中會有“Board: MX6ULL 14x14 EVK”這一句,也就是說板子名字為“MX6ULL 14x14 EVK”。那么如果要將其改為我們想要的名字,就需打開文件 mx6ull_toto.c,找到函數 checkboard ,將其改為如下所示內容:
int checkboard(void)
{
    if (is_cpu_type(MXC_CPU_MX6ULZ))
        puts("Board: MX6ULZ 14x14 EVK\n");
    else
        puts("Board: MX6ULL TOTO\n");
    return 0;
}
6、使用新添加的板子配置編譯uboot
在 uboot 根目錄下新建一個名為 build.sh 的 shell 腳本,在這個 shell 腳本里面輸入如下內容:
#!/bin/bash
make ARCH=arm CROSS_COMPILE=arm-linux-gnueabihf- distclean
make ARCH=arm CROSS_COMPILE=arm-linux-gnueabihf- mx6ull_toto_defconfig
make ARCH=arm CROSS_COMPILE=arm-linux-gnueabihf- -j8
build.sh添加可執行權限,命令如下:
chmod 777 build.sh
三、編譯、下載、驗證
1、編譯
./build.sh
2、編譯成功
...
  DTC     arch/arm/dts/imx6ulz-bsh-smm-m2.dtb
  DTC     arch/arm/dts/imx6ulz-14x14-evk.dtb
  DTC     arch/arm/dts/imx6q-apalis-eval.dtb
  DTC     arch/arm/dts/imx6dl-colibri-eval-v3.dtb
  SHIPPED dts/dt.dtb
  CAT     u-boot-dtb.bin
  COPY    u-boot.dtb
  COPY    u-boot.bin
  CFGS    u-boot-dtb.cfgout
  MKIMAGE u-boot-dtb.imx
3、下載驗證
使用imxdownload將新編譯出來的u-boot.bin燒寫到SD卡中測試,SecureCRT 輸出結果如下:
sudo ./imxdownload u-boot.bin /dev/sdb
U-Boot 2022.10-gaef9f25a-dirty (Apr 05 2023 - 17:49:18 +0800)
CPU: Freescale i.MX6ULL rev1.1 792 MHz (running at 396 MHz)
CPU: Industrial temperature grade (-40C to 105C) at 26C
Reset cause: POR
Model: Freescale i.MX6 UltraLiteLite 14x14 EVK Board
Board: MX6ULL TOTO
DRAM: 512 MiB
Core: 65 devices, 17 uclasses, devicetree: separate
MMC: FSL_SDHC: 0, FSL_SDHC: 1
Loading Environment from MMC... OK
In: serial
Out: serial
Err: serial
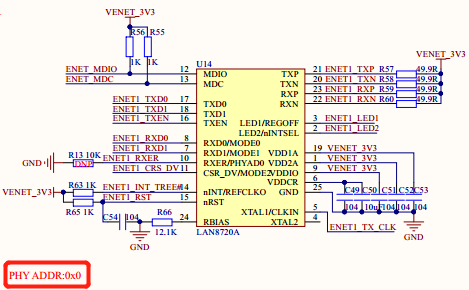
Net: Could not get PHY for FEC1: addr 1
Could not get PHY for FEC1: addr 1
Get shared mii bus on ethernet@2188000
Could not get PHY for FEC1: addr 2
Get shared mii bus on ethernet@2188000
Could not get PHY for FEC1: addr 2
No ethernet found.
Hit any key to stop autoboot:
= >
從輸出結果可以看出除網絡沒有識別出來外,其他均正常(這里不討論LCD),因為本人是沒帶LCD屏的。
u-boot下網絡調試將在下一篇文章進行詳細介紹,關注我,下期文章及時觀看!
本期的內容到這就結束了,如果覺得文章不錯,可以點贊、收藏和關注哦,謝謝大家收看,下期再見!


 工商網監
工商網監
評論