 如何操作業余RC:升級您的汽車和電池
By Terry Dunnon How To Get Into Hobby RC: Upgrading Your Car and Batteries
In my previous article, I talked about my experience with the ECX Ruckus monster truck and how it brought me back up to speed on current RC technology. One of the challenges that I faced with the Ruckus was that I thought it was too fast for my son to handle. He spent some time driving a slower car and soon had the skills necessary for the Ruckus. That gateway car was a Duratrax Evader BX buggy (which is no longer produced). It was a perfect starter car for him. It was slow enough to keep him out of too much trouble while he honed his driving reflexes. Yet, it was fast enough to get him excited about the hobby, challenge him on occasion, and satisfy the dirt-slinging ambitions of a pre-teen. Once he became comfortable with the Ruckus, however, it was clear that we needed another fast vehicle to keep both of us entertained.
The modified Evader is slightly smaller than the Ruckus, but its performance is on par. Both are powerful and fast.
The simplest route would have been to install a more powerful brushed motor and a new set of high-traction tires on the Evader. After briefly considering that option, I decided to modernize the buggy completely. I added ball bearings, a 2.4GHz radio, a brushless motor system and a quasi-monster truck makeover. Let's walk through that upgrade.
Many RC cars include bronze bushings on their moving parts rather than ball bearings. They work okay for beginners, but they eventually wear down and the tolerances between moving parts get loose. Then things get sloppy, noisy, and draggy. Upgrading to ball bearings reduces quite a bit of friction, but also maintains the same tolerances throughout the life of the car. I purchased a set of ball bearings for the Evader and guided my son through the steps to install them.
Ball bearings reduce friction between rotating parts, but they also maintain consistent tolerances over time. The bushings included with many starter cars eventually become sloppy and wear out.
To install the bearings, we had to disassemble the whole transmission. This was a good opportunity for my son to get a look inside the gearbox and get a feel for what it does and how it works. There are also bearings for the rear axles and front wheels. It probably took less about an hour to do the whole thing.
The radio that came with the Evader worked just fine. However, I wanted not only a 2.4 GHz radio, but something with more adjustability to help control the power I expected out of the souped-up Evader. I ended up with a Futaba 4PLS 4-channel radio system. What a radio! I’ll cover its range of features in the upcoming computer radio overview. But I can say that this is by far the nicest surface radio I’ve ever owned and probably the last one I’ll ever need.
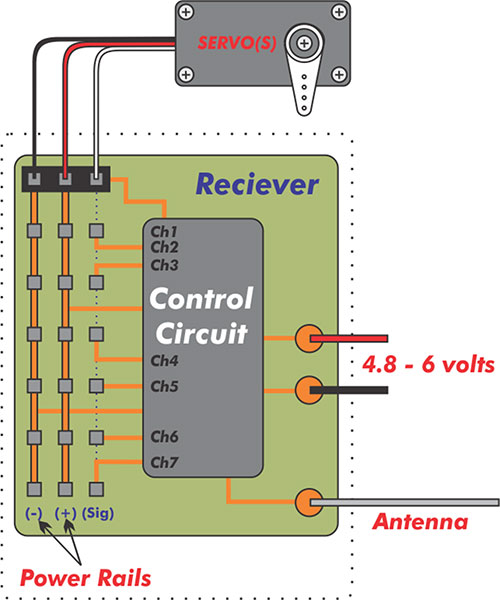
I removed the receiver that was in the car and replaced it with the Futaba receiver. It is held in place with adhesive-backed Velcro. The Evader has a flexible tube that is mounted vertically to elevate the receiver antenna. Since the antenna on the 2.4GHz receiver is considerably shorter than the antenna on the stock 27MHz receiver, I shortened this tube accordingly.
I upgraded the Evader’s stock radio with a Futaba 4PLS 4-channel radio. It is a 2.4GHz radio with built-in telemetry features.
Duratrax sells a brushless upgrade kit that is intended for 2-wheel drive buggies and trucks. Since motor mounts are pretty much universal across all hobby grade cars, this was a bolt-in replacement. I removed the stock motor and ESC from the car and the brushless components filled in the empty space. As with the receiver, the ESC is held in place with Velcro.
The only remaining step was to remove the pinion gear from the old motor and add it to the new one. The motor position is adjustable to accommodate different gears and to allow adjustment of the gear mesh between the pinion and its mating spur gear. I set the mesh by sandwiching a strip of paper between the gears.
Inserting a piece of paper between the gears is an effective way to set the proper mesh when installing a motor. In this photo, I am installing a Duratrax brushless motor on the Evader. Note the small setscrew on the pinion gear…they strip easily.
Sometimes it is necessary to change gearing when you change motors because of each motor’s specific performance characteristics. However, I was confident that the stock gearing would not overstress the brushless motor. The only question that remained in my mind was whether the stock transmission gears would hold up to the added power of the new motor. So far, they are working fine.
At this point, it is worth pointing out the value of having quality tools when working on RC cars. Many times (as with pinion gears) you will need to remove small setscrews (typically 3mm) that have been tightened as much as possible. Trying to remove these setscrews with a hex wrench (aka Allen wrench) that is the wrong size or even slightly worn will very likely strip the drive cup of the setscrew. Then you are in for some real frustration! So keep metric and standard wrenches on hand and toss them when they start to become worn. Ball-end hex wrenches wear out and strip screws easily, so I generally avoid them.
This photo illustrates the overall layout of the Evader after being modified to a brushless-powered truck.
It is also a good idea to have a few Japanese Industrial Standard (JIS) screwdrivers on hand. Many RC cars use JIS screws. They look much like Phillips screws, but the drive cups are slightly different. Using a Phillips screwdriver on JIS screws will cause premature wear on the drive cups and eventually strip them. Phillips screws, however, are quite tolerant of using JIS drivers. JIS tools tend to be rather expensive, but they are a worthwhile investment.
Test Drive
After the bearings, new radio and new motor were installed, the Evader looked pretty much like it did before. It was, in fact, a very different machine. My son and I test drove it and found that it was now much faster-nearly as fast as the Ruckus. However, the upgraded Evader had a strong tendency to spin out at every turn. There are numerous suspension adjustments that can be made to fine-tune steering response, but I think tires are the best place to start attacking traction problems.
I was still using the Evader’s stock knobby tires which were several years old. Although they didn’t look very worn, they had hardened over time. Just as with full-size cars, soft tires are sticky tires. So, I set out to find some new tires that would be softer and also have a tread pattern that would work reasonably well on dirt or paved surfaces.
The Duratrax Evader BX served as an ideal starter car for my son. It was fast enough to hold his interest, but tame enough that he could control it. Best of all, it readily accepted upgrades to improve its performance.
Tires are typically glued to the wheels, so I couldn’t just pull the old tires off of the stock wheels (not easily anyway). I had to look for new wheels and tires for the Evader. I can’t even begin to tell you how many choices there are when it comes to wheels and tires. They are made to suit any application you can think of. You can even get paddle tires to run your car in loose sand or skim it across open water! For a 1/10 scale buggy like the Evader, you can expect to spend at least $40-$50 on a full set of tires.
As I was searching for tires on the Tower Hobbies website (where I bought the Evader), I came across a set of four all-terrain tires for just $10.99. These tires are stock equipment on the Evader EXT 2.4, a not-so-distant cousin of my Evader BX. I also found the matching wheel set for only $9.99. Just glancing at photos of the EXT 2.4, I could see that it shares the same core components as my BX. With the allure of a cheap set of tires, I ordered the EXT wheels and tires with the assumption that I could use them on my BX. For the most part, I was right. I did have to install longer front axles and steering knuckles from the EXT to make the front tires work. But even with those added parts, I was ahead of the game cost-wise.
Although cost was a deciding factor, the main reason I wanted the tires from the Evader EXT was to make my Evader a little bit more versatile. The larger front and rear tires would give better footing on grass and rough ground than the smaller buggy tires (which are better suited to well-groomed dirt racetracks). Even with the bigger tires, I could have kept the original buggy body on the Evader. Keeping that form-fitting cover in place would help keep out a lot of the detritus that inevitably permeates into all parts of the car. The only problem is that it would have looked a little odd (oh vanity!).
I found a prepainted monster truck body on sale for about $20 (a very good deal), so I picked that up as well. Because this body wasn’t specifically made for the Evader or any of its variants, I knew that I would have to find my own way to mount it to the car. I bought an EXT front body mount and I was able to fit it on the BX with a homemade adapter plate made from a scrap circuit board. The rear of the body is held in place with Velcro.
I adapted the front body mount from the Evader EXT by fabricating a simple adapter plate from scrap circuit board.
When I was done, my Evader was a hybrid of the BX buggy and EXT 2.4 truck models. After installing the larger rear tires (which is equivalent to changing gears), it now keeps pace with the Ruckus. The softer tires also alleviated much of the spin-out problem. I plan to tweak it further with suspension adjustments.
The Evader upgrade was a very straightforward project and just a hint of the customization that is possible with RC cars. My goal was also to illustrate that older cars need not be discarded. In many cases, they can be upgraded to take advantage of new technology. My son and I now have a pair of cars with similar performance that we can enjoy together on the street or down at the park.
The completed truck conversion of the Evader BX looks very different from the original buggy style. This radical change only required a few component swaps. Such adaptability is common in the RC car world.Battery Choices
Batteries have progressed a long way during the past decade--a very long way. Lithium-Polymer (LiPo) batteries matured to the point where they can finally handle the extremely high discharge rates that hobbyists demand. These batteries are not only lighter, but they have much higher energy densities than Nickel-Cadmium (NiCad) and Nickel Metal Hydride (NiMH) cells. Along with brushless motors, LiPo batteries are responsible for making ridiculous performance available to the RC car masses. Cars with out-of-the-box speeds of 50+ mph are not uncommon, with some cars being capable of more than 100mph!
The performance advantages of LiPo technology come with a tradeoff--they are intolerant of abuse and mishandling.
With all of the performance available using LiPo batteries, you may be surprised that I’m going to suggest that you ignore them for now. The performance advantages of LiPo technology come with a tradeoff. LiPos are intolerant of abuse and mishandling. The consequences of a scorned LiPo may be as slight as a premature death for the battery pack. A more severe reaction would be fire. Yes, cars (RC and full-scale) and homes have burned to the ground because an angry LiPo caught spewed flames.
Don’t think that LiPos are akin to live hand grenades - it’s not that severe. They do however require respect, diligence, and knowledge of their proper care and feeding. A common rookie mistake is leaving a battery plugged into your model and simply turning off the switch to deactivate it. If left overnight in this condition, housekeeping current demanded by the ESC could drain the battery below its safe discharge voltage…leaving you with an irreparable battery. As you get more familiar with the quirks of RC equipment, you may decide that you’re ready for the jump to LiPos. Then again, maybe you won’t. I have a workshop full of LiPo batteries that I use in my RC aircraft, but I still have not found a compelling reason to use them in my RC cars.
Here are examples of three different battery chemistries used in RC. The top battery is a 7-cell (8.4V nominal) 2400mAh NiMH pack. Below it is a 2-cell (7.4V nominal) 2100mAh LiPo battery. The bottom battery is a 2-cell (6.6V nominal) 2300mAh A123.
As the advancement of LiPo technology has stolen the RC spotlight for several years, NiMH batteries have quietly seen similar leaps in capability. For instance, the battery that came with my ECX Ruckus truck is a 7-cell NiMH with 2400mAh capacity. Other 7-cell NiMH packs are available in the same physical size (classified as Sub-C, as compared to AA, D, et al) but with more than 5000mAh capacity. Theoretically, such a battery would provide the same performance, but with more than twice the run time. The primary difference between the batteries is cost.
Whereas LiPos have some unintuitive requirements, NiMH cells can tolerate users with layman-level battery knowledge.
Of course, you can also do stupid things with NiMH batteries that would cause them to perish or catch fire. However, such things usually require malicious intent. Whereas LiPos have some unintuitive requirements, NiMH cells can tolerate users with layman-level battery knowledge. For that reason, I suggest that beginners start out with NiMH batteries. NiCad batteries are also a valid option, but they are not as prevalent as they once were.
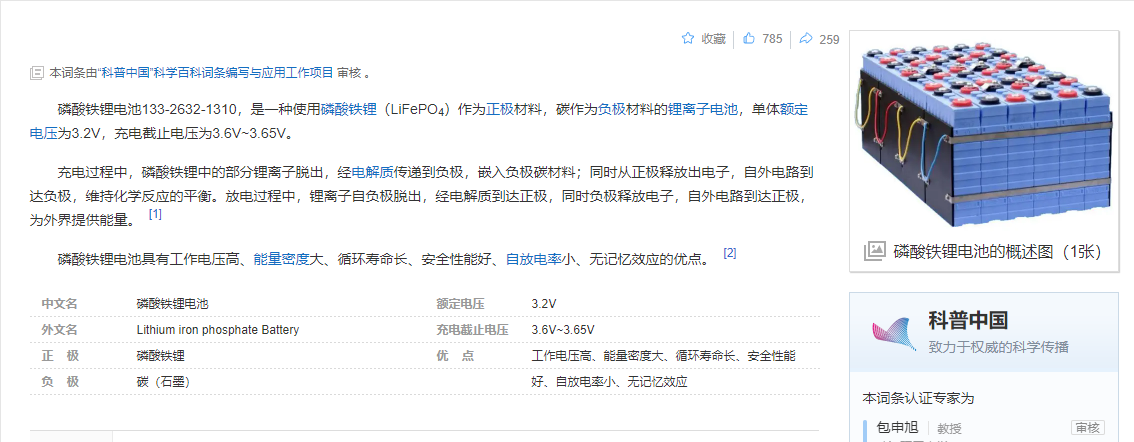
The batteries that I most often use in my cars are called A123 cells. Specifically, their chemistry is Lithium-Nanophoshate (LiFePO4). A123 Systems is the company that brought this battery technology to market several years back. In short, A123 batteries are a compromise between the energy density of LiPo cells with the robustness of NiMH cells. There are other LiFe batteries on the market, but as I write this, only the A123 cells have the discharge rates needed for powering amp-hungry electric motors. Along with A123 cells, the other LiFe batteries are often used to power the onboard radio equipment for gas/nitro-powered cars and larger airplane models (where the required discharge rate is much, much lower).
A123 cells are my preferred battery type for RC cars. Here, we have a triad of different configurations: a side by side 2-cell pack (bottom), and end-to-end 2-cell pack (top left), and a factory-assembled 3-cell pyramid pack.
Most often, I use a 2-cell A123 pack in my cars. The fully charged voltage is 7.2v, which is roughly equivalent to a 6-cell NiMH battery. Each cylindrical cell is about the same diameter of a standard C-sise battery, but the A123 is roughly .6 inches longer. The original version of this cell has a 2300mAh capacity, but newer models (which I have not yet used) are 2500mAh. Compared to an average 6-cell 2500mAh NiMH battery, the 2-cell A123 has slightly less voltage and capacity, but only 45% of the mass (5.5oz vs. 12oz).
A123 batteries are a compromise between the energy density of LiPo cells with the robustness of NiMH cells.
Without getting mired in the discharge characteristics of the different cells, I will say that I detect very little difference performance-wise between the A123 and the stock NiMH in my Ruckus. If I didn’t know which battery was installed, I couldn’t tell the difference by driving. The only issue I run into with A123s is their form-factor. Side by side packs are often too wide to fit in stock battery compartments (the Evader is a notable exception). End to end packs have a small girth that may not mesh with the car’s battery retention method. I’ve always been able to figure out a workable solution with Velcro in strap form (Ruckus) and/or the adhesive-backed variety (Evader).
I think that I may be somewhat alone in my continued usage of A123 batteries. If you care to join me, you can buy factory assembled A123 packs from numerous vendors. Those of you comfortable with heavy soldering can save a few bucks by assembling your own packs from individual cells. In fact, most of my A123 packs were built with cells scavenged from certain DeWalt cordless drill batteries. Also note that A123 cells require specific chargers. Hooking one to a NiMH charger would be a bad idea. Many new RC chargers can handle multiple battery chemistries, including A123.
Coming Up
This concludes my RC car overview. I hope you now have a better idea of what is available off-the-shelf, as well as the potential for customization and experimentation. In reality, what I’ve shown here is a very narrow snapshot of the hobby. I’ll revisit the car topic periodically to touch on new developments or interesting projects. Next time, I'll assume the role of the Fun Police and take a critical look at Norm and Will’s testing of the DJI Phantom 2 Vision + quadrotor. They committed a few common rookie mistakes that are worth pointing out!
自動翻譯僅供參考
如何操作業余RC:升級您的汽車和電池
特里DunnonHow進入業余愛好RC:升級你的車,電池
在我以前的文章中,我談到了我的經驗與ECX Ruckus的怪物卡車,以及如何把我帶回提高速度目前RC技術。相反,我所面臨的Ruckus的挑戰是,我認為這是太快,我的兒子來處理。他花了一些時間駕駛一輛慢車,很快就有必要對Ruckus的技能。該網關輛車是Duratrax BX強制收兌車(現已不再生產)。這是一個完美的入門車了。這是緩慢的,足以讓他出去太麻煩,而他磨練了他的駕駛反射。然而,它是速度不夠快,讓他興奮的愛好,有時他挑戰,并滿足前十幾歲的污垢吊索的野心。一旦他熟悉了Ruckus的,但是,很明顯,我們需要另一種快速的車輛,以保持我們倆娛樂。
修改后的強制收兌比Ruckus的略小,但其性能卻不相上下。兩者都是強大的,快速的。
最簡單的路線將是安裝一個更強大的有刷電機和強制收兌一套新的高牽引力的輪胎。在簡要考慮這種選擇,我決定把車徹底的現代化。我加了滾珠軸承,2.4GHz的無線電,無刷電機系統和準怪物卡車改造。讓我們走過的升級。
許多遙控汽車包括他們的移動部件,而不是球軸承青銅襯套。他們的工作好,適合初學者,但他們最終拖垮和運動部件之間的公差松動。然后事情就變得馬虎,嘈雜的,和拖拉。升級到球軸承減少相當多的摩擦,同時也保持了相同的公差在整個汽車的使用壽命。我購買了一套球軸承強制收兌,并一步步引導我的兒子來安裝它們。
球軸承減少摩擦旋轉部件之間,但它們也保持一致的公差隨時間。該襯套包括許多起動汽車最終成為馬虎和磨損。
要安裝軸承時,我們不得不拆開整個傳輸。這是我兒子的好機會一睹變速箱內,感受一下它做什么以及它是如何工作的。也有軸承為后軸和前輪。大概花了更少的大約一個小時來做這件事。
附帶強制收兌的無線電工作就好了。不過,我想不僅是一個2.4 GHz無線電的事,但有更多的可調節性,以幫助控制我的預期了馬力向上強制收兌的力量。我結束了一個雙葉4PLS 4通道無線電系統。什么是無線!我將介紹即將推出的電腦無線概述功能范圍。但我可以說,這是迄今為止我永遠需要最好的表面收音機我曾經擁有的,可能是最后一個。
我刪除了,這是在汽車,并與雙葉接收器取代了它的接收器。它舉行的地方用膠粘劑支持魔術貼。強制收兌具有被垂直安裝于提升接收機天線的柔性管。由于在2.4GHz接收機上的天線是比股票27MHz的接收器上的天線相當短,我相應地縮短該管。
我用雙葉4PLS 4頻道無線電升級強制收兌的股票收音機。它是具有內置遙測功能的2.4GHz的無線電。
Duratrax銷售無刷升級套件,適用于2輪驅動越野車和卡車。由于電機安裝是非常普遍的所有愛好高檔轎車,這是螺栓式替代。我刪除從車上股票馬達和ESC和無刷部件填補了空白。與接收機中,該ESC被保持在適當位置與魔術貼。
唯一剩下的步驟是從舊電機拆下小齒輪和將其添加到新的。電機的位置是可調節的,以適應不同的齒輪,并允許該小齒輪及其配對正齒輪之間的調整的齒輪的嚙合。余由齒輪之間夾著一張片設置網格。
插入齒輪之間的一張紙是一種有效的方式在安裝電機時,設置適當的網格。在這張照片中,我安裝上強制收兌一個Duratrax無刷電機。注意在小齒輪的小型固定螺絲......他們很容易剝離。
有時是必要的時候,你改變,因為每個發動機的具體性能特點馬達來改變傳動裝置。但是,我相信,股票資產負債不會過分強調無刷電機。那留在我的腦海里唯一的問題是股票傳動齒輪是否會撐起來的新電機的附加能力。到目前為止,他們工作的罰款。
在這一點上,值得指出的遙控汽車工作時,有質量的工具的價值。很多時候(與小齒輪),你將需要刪除的小定位螺絲(通常為3毫米)已擰緊盡可能。試圖刪除這些固定螺釘用內六角扳手(也稱為內六角扳手),這是錯誤的大小,甚至輕微磨損很可能會剝離驅動杯的固定螺絲的。那么你是在一些真正的無奈!因此,保持指標和標準扳手的手,折騰他們,當他們開始變得磨損。球頭內六角扳手磨損,帶螺絲很容易,所以我盡量避免使用它們。
這張照片顯示了強制收兌被修改為無刷動力卡車之后的整體布局。
這也是手頭上有幾個日本工業標準(JIS)螺絲刀一個好主意。許多遙控汽車使用JIS螺絲。它們看起來很像十字螺絲,但驅動杯略有不同。使用在JIS螺絲十字螺絲刀將導致在驅動杯過早磨損,并最終帶他們。十字螺絲,卻是相當寬容使用JIS驅動程序。 JIS工具往往是相當昂貴的,但他們是一個值得的投資。
試駕
軸承,新的無線電和新的發動機被安裝后,強制收兌看起來很像以前那樣。它是,實際上,一個非常不同的機器。我的兒子和我試駕了一下,發現這是現在快得多,幾乎快如Ruckus的。然而,升級后有強制收兌傾向較強分拆動不動。有跡象表明,可微調的轉向反應無數懸掛的調整,但我覺得輪胎開始進攻牽引問題的最佳場所。
我還是用強制收兌的股票多節的輪胎這幾個歲。雖然他們并沒有看起來非常破舊,他們已經硬化隨著時間的推移。正如全尺寸轎車,軟胎是粘性的輪胎。于是,我開始尋找一些新的輪胎,這將是更柔軟,還具有將工作相當好有污點或鋪設路面的胎面花紋。
該Duratrax BX強制收兌擔任一個理想的首發車為我的兒子。這是速度不夠快,保持他的興趣,但馴服,以至于他可以控制它。最重要的是,它欣然接受了升級,以提高其性能。
輪胎通常粘在車輪,所以我不能只是拉了舊的輪胎掉股票輪(不容易反正)的。我不得不尋找新的輪轂和輪胎強制收兌。我不能甚至開始告訴你有多少選擇,有當談到車輪和輪胎。它們是由以適應任何應用程序,你能想到的。你甚至可以槳輪胎跑你的車在松軟的沙土或在水開撇去了!對于一個1/10規模的越野車一樣強制收兌,你可以期望花費至少$ 40- $ 50上,一套完整的輪胎。
當我正在尋找塔愛好網站上的輪胎(我在那里買強制收兌),我遇到了一組四全地形輪胎為$ 10.99。這些輪胎是車輛設備上強制收兌EXT 2.4,我的BX強制收兌的不那么遙遠的表妹。我還發現了匹配輪只有9.99 $設置。只是看了一眼照片EXT 2.4的,我看得出來,它共享相同的核心部件為我的BX。有了一套輪胎的價格便宜的誘惑,我下令EXT車輪和輪胎,我可以用他們對我的BX的假設。在大多數情況下,我是對的。我也必須從EXT安裝較長的前軸和轉向節,使前輪工作。但即使有這些增加的部分,我是超前的游戲成本方面。
雖然成本是一個決定性的因素,最主要的原因我想從強制收兌EXT輪胎是為了讓我的一個強制收兌一點更靈活。較大的前部和后部的輪胎將給草和粗糙的地面比小越野車輪胎(這是更適合整齊干凈的污垢賽道)打下基礎。即使有更大的輪胎,我可以保持原來的馬車身體上強制收兌。保持這種形式的合蓋到位,將有助于保持了很多不可避免地滲透到汽車的各個部位的碎屑。唯一的問題是,它會顯得有些奇怪(哦虛榮!)。
我發現在售約$ 20(一個非常好的協議)一彩涂怪物卡車的身體,讓我挑了好了。因為這個機構沒有專門針對強制收兌或任何其變種而成,我知道我必須找到我自己的方式將其安裝到車上。我買了一個EXT前機身卡口,我是能夠在BX適合它用自制的適配器板從廢舊電路板制成。主體的后部以替代與魔術貼保持。
我改編自強制收兌EXT編造廢鋼電路板一個簡單的適配器板前部機身卡口。
當我完成后,我被強制收兌的BX車和EXT 2.4卡車車型的混合體。安裝更大的后輪胎(這等效于改變齒輪)之后,現在保持同步的騷動。較軟的輪胎也減輕多的紡出的問題。我打算與懸掛的調整進一步調整它。
強制收兌升級是一個非常簡單的項目和自定義這是可能的RC車只是一個提示。我的目標是也以說明舊車不必丟棄。在許多情況下,它們可以被升級以利用新技術。我和兒子現在有一個對汽車行駛性能相似,我們可以在公園一起享受在大街上或向下的。
強制收兌BX的完成卡車轉換看起來與原車風格非常不同。這徹底改變只需要幾個組件互換。這種適應性在車模world.Battery選擇常見
一個很長的路 - 在過去十年中的電池已經發展很長的路要走。鋰聚合物(鋰聚合物)電池成熟的地步,他們終于可以處理極高的放電速率的愛好者的需求。這些電池不僅輕,但它們具有高得多的能量密度比鎳鎘(鎳鎘)和鎳金屬氫化物(NiMH)電池。隨著無刷電機,鋰聚合物電池有責任荒謬的性能提供給車模群眾。汽車行駛出的現成的50 +英里每小時的速度并不少見,一些汽車能夠超過百英里每小時!
鋰聚合物電池技術的性能優勢配備了一個折衷 - 他們是不寬容的濫用和不當的。
所有可用使用鋰聚合物電池的性能,你可能會驚訝,我會建議你忽略它們現在。鋰聚合物電池技術的性能優勢配備了一個權衡。 LiPos無法容忍濫用和不當的。一個蔑視鋰聚合物電池的后果可能是輕微的過早死亡的電池組。更嚴重的反應將是火。是的,汽車(RC和滿量程)和家園被夷為平地,因為憤怒的鋰聚合物陷入噴出火焰。
不要以為LiPos是如同活手榴彈 - 它不是那么嚴重。不過,它們需要尊重他們適當的照顧和喂養,勤奮和知識。一個常見的新手的錯誤離開插入到你的模型電池,簡單地關閉開關,關閉它。如果在這種情況下放置過夜,按ESC要求的看家電流會消耗電池低于其安全放電電壓......讓你有一個無法彌補的電池。當你更熟悉的遙控設備的怪癖,你可能會認為你已經準備好為跳轉到LiPos。話又說回來,也許你不會。我有一個完整的,我在我的遙控飛機用鋰聚合物電池的生產車間,但我仍然沒有找到一個令人信服的理由來使用他們在我的遙控車。
下面是在混凝土中使用三種不同的電池化學組成的例子。頂部電池是一個7小區(8.4V標稱)2400mAh的鎳氫包。下面是2節(7.4V標稱值)2100MAH鋰聚合物電池。底部電池2節(6.6V標稱值)2300mAh A123。
隨著鋰聚合物科技的進步偷了RC聚光燈數年,鎳氫電池已經悄然出現在功能類似的飛躍。例如,隨我ECX Ruckus的卡車電池是7鎳氫電池具有2400mAh的容量。其他7節鎳氫包是在相同的物理尺寸限制(列為子C,好比至AA,D等人),但與超過5000mAh的容量。從理論上說,這種電池將提供相同的性能,但具有兩倍以上的運行時間。電池之間的主要區別是成本。
而LiPos有一些直觀的要求,鎳氫電池可以容忍用戶外行級電池知識。
當然,你也可以做鎳氫電池愚蠢的事情,會導致其毀滅或著火。然而,這樣的事情通常需要惡意。而LiPos有一些直觀的要求,鎳氫電池可以容忍用戶外行級電池知識。出于這個原因,我建議初學者開始時鎳氫電池。鎳鎘電池也是一個有效的選擇,但他們并不像流行,因為他們曾經是。
我在我的車最常使用的電池被稱為A123細胞。具體而言,它們的化學性質是鋰Nanophoshate鋰(LiFePO4)。 A123系統公司是把這個電池技術推向市場幾年前的公司。總之,A123電池是鋰聚合物電池與NiMH電池的穩健性的能量密度之間的折衷。目前市場上的其他壽命電池,但因為我寫這篇文章,只有A123細胞有需要的電源放大器饑渴電動馬達的排出速度。隨著A123細胞中,其它的LiFe電池經常被用來板載無線電設備用于氣體/硝基為動力的汽車,以及較大的飛機模型(其中所需的放電速率是非常非常低)供電。
A123細胞是我的遙控車首選的電池類型。在這里,我們有不同的配置的三元組:一并排2-電池組(下部),并結束對終端2-電池組(左上),以及工廠裝配-3-細胞金字塔包。
大多數情況下,我使用的是2節A123包在我的車。在完全充電電壓為7.2V,這大約相當于一個6芯鎳氫電池。各圓筒型電池是一個關于一個標準的C-SISE電池的直徑相同,但A123是大致0.6英寸長。這種細胞的原始版本具有2300mAh的容量,但較新的型號(我還沒用過)是2500mAh的。與之相比,平均6芯2500mAh的鎳氫電池,兩細胞A123具有略低的電壓和容量,但只有45%的質量(5.5盎司與12盎司)的。
A123的電池是鋰聚合物電池與NiMH電池的穩健性的能量密度之間的折衷。
而不會深陷于不同細胞的放電特性,我會說,我發現非常小的差別的性能,明智的A123和股票鎳氫電池在我的Ruckus之間。如果我不知道是安裝的電池,我不知道通過驅動的差別。我跑與A123s唯一的問題是他們的外形。并排包往往過于廣泛,以適應股票電池艙(強制收兌是一個明顯的例外)。端到端的包有一個小的周長,可能無法與汽車的電池保持方法目。我一直能夠找出魔術貼的帶子的形式(優科)和/或粘性襯里品種(強制收兌)一個可行的解決方案。
我想我可能是在A123的電池我繼續使用有些孤單。如果你愿意和我一起,你可以買到從眾多供應商的工廠組裝的A123包。那些你熟悉重型焊接可以從單個細胞組裝自己的包節省幾塊錢。事實上,我的大部分A123包均建有細胞一定得偉電鉆電池清除。還要注意的是A123細胞需要特定的充電器。掛鉤一個鎳氫充電器將是一個壞主意。許多新的RC充電器可以處理多種電池化學組成,其中包括A123。
接下來
這結束我的遙控車的概述。我希望你現在有一個更好地了解什么是可用的現成的架子,以及定制和試驗的可能性。在現實中,我在這里顯示的是愛好的一個很窄的快照。我會定期重新汽車話題觸及新的發展或有趣的項目。下一次,我會承擔玩轉警察的作用,并采取關鍵看DJI幻影2遠景+ quadrotor的規范和意志的測試。他們犯了一些常見的新秀的錯誤,值得指出的!
-
遙控車
+關注
關注
9文章
82瀏覽量
24329
發布評論請先 登錄
正方科技歐荷智能電池助力無人機植保作業
淺談車規MCU (MGEQ1C064) OTA升級
了解 RC 電源系統的基礎知識
植保無人機電池的選擇和保養策略
朗凱威鋰電池定制深度解析深藍 L07 新能源汽車鋰電池/電動汽車鋰電池
正方科技歐荷智能電池守護無人機植保作業安全
基于作業成本法的電動汽車充電站建設項目成本控制方法及應用
NTC溫度傳感器:護航新能源汽車電池安全運行
3D視覺技術:汽車鉛蓄電池自動化拆垛的‘智慧之眼’
帶你分析電池分選機的操作技巧


 工商網監
工商網監
評論