 安信可GP-02-Kit測試過程+GPS 時鐘制作
以下作品由安信可社區用戶
無垠的廣袤測試及制作
產品介紹
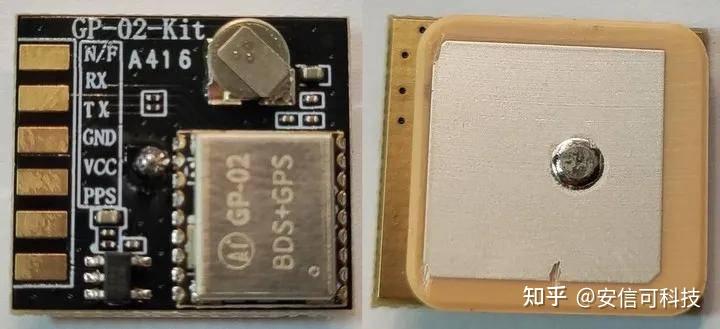
GP-02-Kit是一款高集成帶有陶瓷天線、高性能 BDS/GNSS 多模衛星導航接收機SoC 開發板,主芯片為AT6558R衛星定位芯片。集成了射頻前端,數字基帶處理器,32 位的 RISC CPU,電源管理和有源天線檢測與保護功能。支持多種衛星導航系統,包括北斗衛星導航系統 BDS、 GPS、GLONASS,可實現多系統聯合定位。
該開發板遵循NMEA協議,通過串口通訊發送指令來控制開發板的工作內容。
詳見:GPS 模組系列 | 安信可科技 https://docs.ai-thinker.com/gps
芯片架構
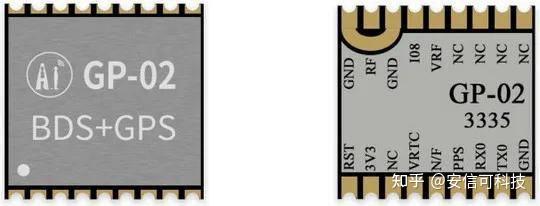
GP-02 模組架構

模組外觀
參數特性
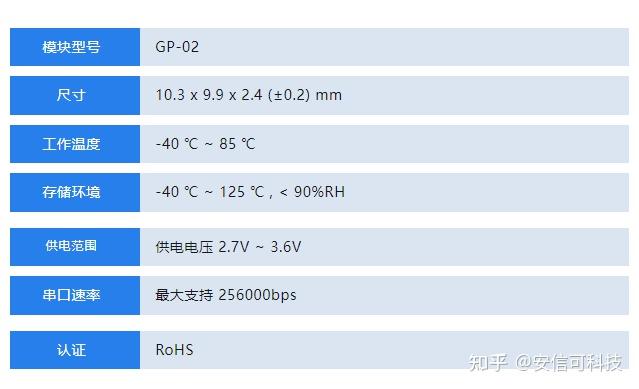
特點
●支持
BDS/GPS/GLONASS/GALILEO/QZSS/SBAS 多系統聯合定位和單系統獨立定位
●支持D-GNSS 差分定位,A-GNSS 輔助定位,星歷預測,DR 組合導航應用,最快數據更新率 10Hz
●32位應用處理器,最高頻率 133MHz,支持頻率動態調整
●支持 PPS 輸出
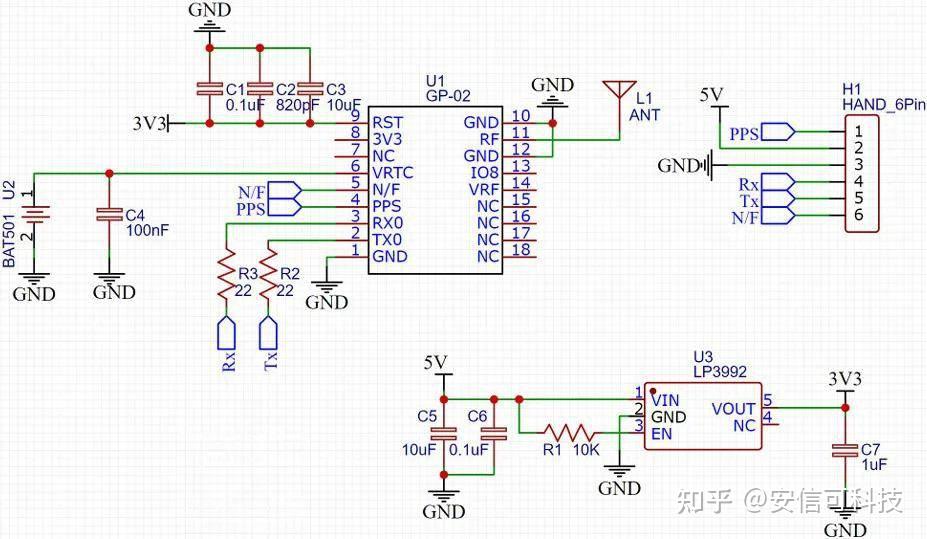
原理圖
模組原理圖
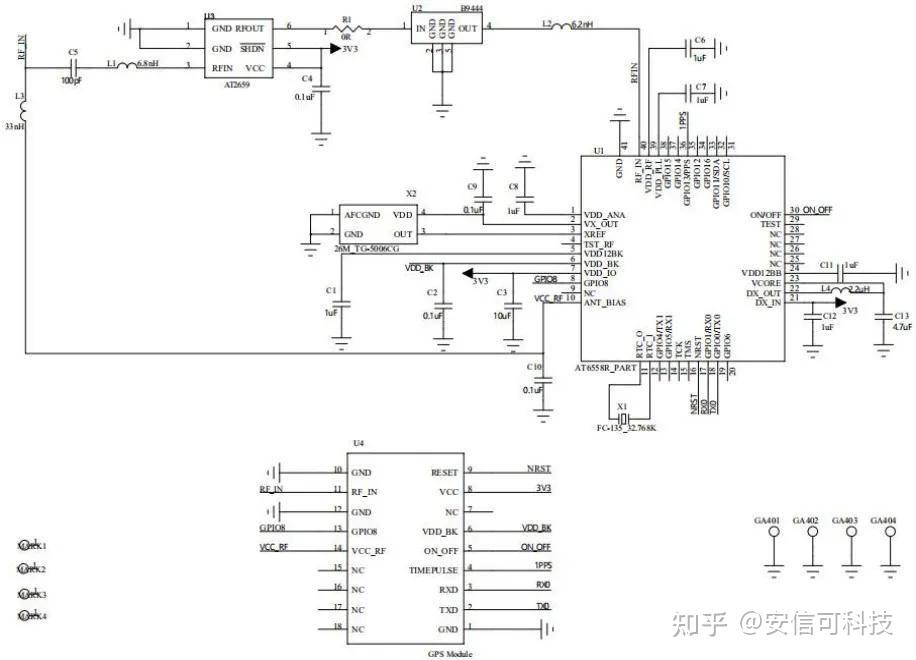
開發板原理圖
硬件連接
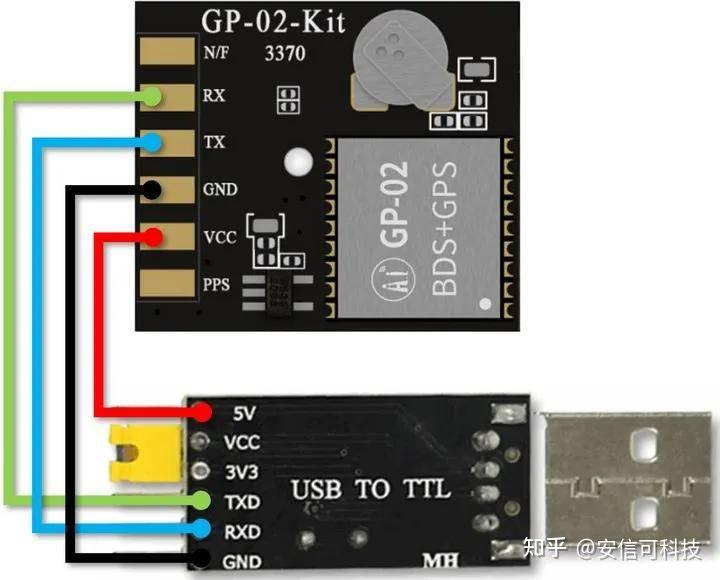
上電測試
通過 USB 轉 TTL 工具連接 GP-02-Kit 和電腦,使用安信可串口調試助手獲取串口輸出信息。
串口打印(波特率默認 9600 bps)

輸出信息
$GNGSA,A,1,,,,,,,,,,,,,25.5,25.5,25.5,4*04 $GPGSV,1,1,00,0*65
$BDGSV,1,1,00,0*74 $GNRMC,,V,,,,,,,,,,N,V*37 $GNVTG,,,,,,,,,N*2E
$GNZDA,,,,,,*56 $GPTXT,01,01,01,ANTENNA OPEN*25
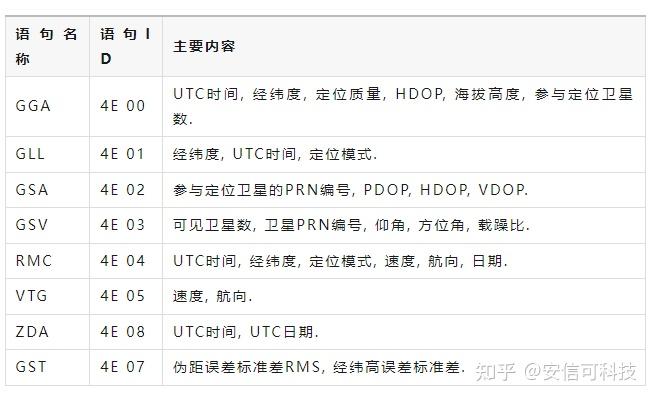
輸出信息為 NMEA 格式,具體定義如下
軟件測試
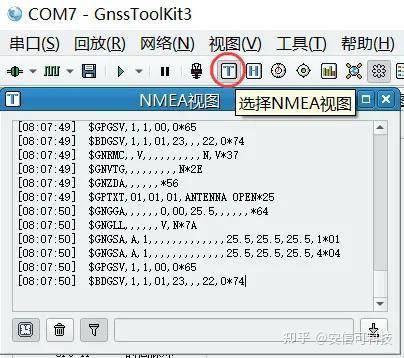
下載并運行GnssToolKit3軟件。
點擊主菜單上的 串口 菜單項, 打開 串口菜單 (該菜單用于配置串口)
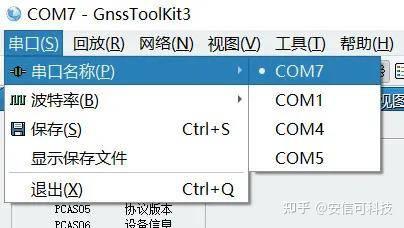
選擇 波特率 菜單項,列出對接收機有效的波特率。
NMEA 視圖
波特率默認為 9600, 用戶需要根據接收機的實際情況選擇相應的值。
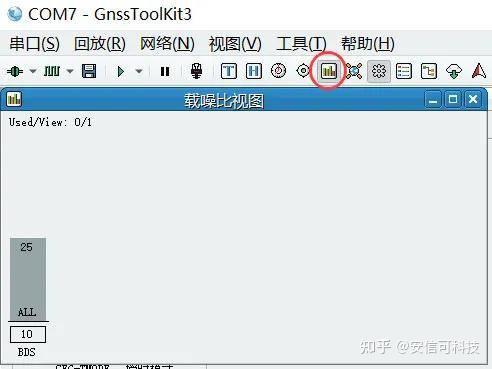
載躁比柱狀圖
用柱狀圖顯示衛星的載噪比, 每個柱狀條代表一顆衛星。
星位視圖
在 視圖 菜單中, 選擇 星位圖, 打開 星位圖視圖。
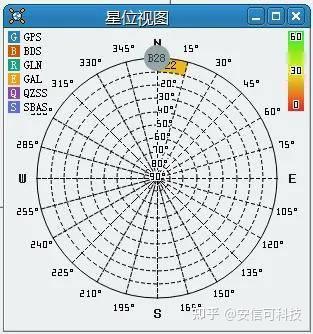
這里沒有將產品拿到室外進行測試,因此獲取的衛星信號較弱。
好了,來用安信可 GP-02-Kit 開發板結合 Arduino IDE 實現 GPS 時鐘吧。
GPS時鐘
GP-02-Kit 結合Arduino IDE 實現 GPS 時鐘
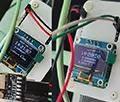
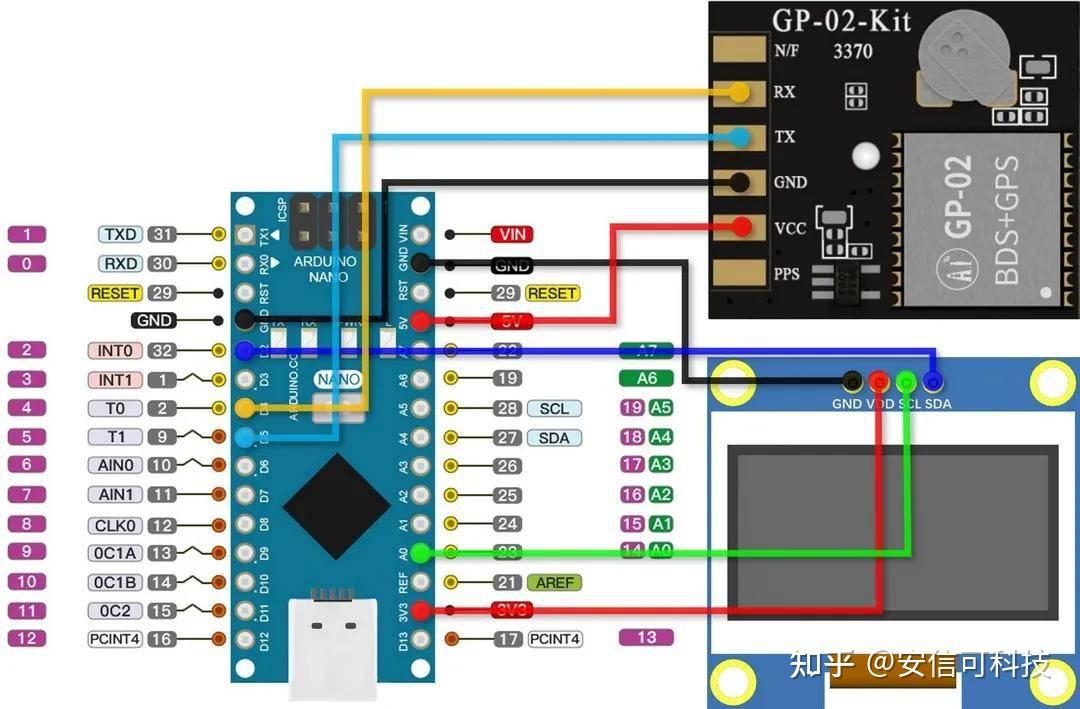
硬件連接
OLED_SCL -> 14
OLED_SDA -> 02
GP-02-Kit_RX -> 04
GP-02-Kit_TX -> 05
示意圖
代碼
#include
#include
#include
#include
#include
#include
// I2C款接線說明
// NodeMCU開發板 0.96寸OLED 引腳連接對應關系
// GND GND
// 3V3 VCC
// SCL D1 (GPIO 5)
// SDA D2 (GPIO 4)
#define SCREEN_WIDTH 128 // OLED display width, in pixels
#define SCREEN_HEIGHT 64 // OLED display height, in pixels
#define OLED_SDA 02 // SDA引腳,gpio2(D4)
#define OLED_SCL 14 // SCL引腳,gpio14(D5)
#define OLED_RESET 13 // 重置引腳
#define SCREEN_ADDRESS 0x3C // OLED 顯示屏的地址,固化在芯片上
Adafruit_SSD1306 display(SCREEN_WIDTH, SCREEN_HEIGHT, &Wire, OLED_RESET); // 創建實例
// gps模塊引腳定義
#define RXPin 4 // GPIO 12 對應nodemcu D6
#define TXPin 5 // GPIO 14 對應nodemcu D5
// The serial connection to the GPS device
SoftwareSerial ss(RXPin, TXPin);
// The TinyGPSPlus object
TinyGPSPlus gps;
// 一些需要使用的變量
int Year, Month, Date, Hour, Minute, Second, Yea, Mon, Dat, Hou;
double Lat, Lng;
String sMonth, sDate, sHour, sMinute, sSecond;
void setup() {
Wire.begin(OLED_SDA, OLED_SCL);
Serial.begin(9600);
WiFi.mode(WIFI_OFF); //關閉WIFI模塊省電
WiFi.forceSleepBegin();
ss.begin(9600); //GPS模塊虛擬串口
// SSD1306_SWITCHCAPVCC = generate display voltage from 3.3V internally
if (!display.begin(SSD1306_SWITCHCAPVCC, SCREEN_ADDRESS)) {
Serial.println(F("SSD1306 allocation failed"));
for (;;)
; // Don't proceed, loop forever
}
display.clearDisplay(); // 清屏
display.setTextColor(WHITE); // 設置字體顏色為白色
display.display(); // 顯示
//OLED屏初始化代碼
}
void loop() {
boolean newData = false;
for (unsigned long start = millis(); millis() - start < 300;) {
while (ss.available()) {
if (gps.encode(ss.read())) {
newData = true;
}
}
} //上面是GPS數據接收的固定代碼
Yea = gps.date.year(); //年
Mon = gps.date.month(); //月
Dat = gps.date.day(); //日
Hou = gps.time.hour(); //時
Minute = gps.time.minute(); //分
Second = gps.time.second(); //秒
Lng = gps.location.lng(); //經度
Lat = gps.location.lat(); //緯度
//年月日時轉換部分,將UTC時間轉換為北京時間,并消除錯誤
Hour = Hou + 8; //修正時區
if (Hour >= 24) {
Hour = Hour - 24; //修正小時超程
}
if (Hou + 8 >= 24) {
Date = Dat + 1;
if ((Mon == 1 || Mon == 3 || Mon == 5 || Mon == 7 || Mon == 8 || Mon == 10 || Mon == 12) && (Date > 31)) {
Date = Date - 30;
Month = Mon + 1; //大月進位
} else {
Month = Mon;
Year = Yea;
}
if ((Mon == 4 || Mon == 6 || Mon == 9 || Mon == 11) && (Date > 30)) {
Date = Date - 29;
Month = Mon + 1; //小月進位
} else {
Month = Mon;
Year = Yea;
}
if ((Yea % 4 == 0) && (Date > 29)) {
Date = Date - 28;
Month = Mon + 1; //閏月判定并進位
} else {
Month = Mon;
Year = Yea;
}
if ((Yea % 4 != 0) && (Date > 28)) {
Date = Date - 27;
Month = Mon + 1; //非閏月判定并進位
} else {
Month = Mon;
Year = Yea;
}
if (Month > 12) {
Month = Month - 12;
Year = Yea + 1; //年超程進位
}
} else {
Date = Dat;
Month = Mon;
Year = Yea;
}
//結果顯示部分
display.setTextColor(SSD1306_WHITE);
display.setCursor(38, 0);
display.setTextSize(1);
display.print(Year);
display.setCursor(63, 0);
display.setTextSize(1);
display.print("-");
display.setTextSize(1);
display.setCursor(71, 0);
sMonth = formatNumber(Month, 2);
display.print(sMonth);
display.setCursor(83, 0);
display.setTextSize(1);
display.print("-");
display.setTextSize(1);
display.setCursor(91, 0);
sDate = formatNumber(Date, 2);
display.print(sDate);
display.setTextSize(2);
display.setCursor(26, 13);
sHour = formatNumber(Hour, 2);
display.print(sHour);
display.setCursor(46, 13);
display.setTextSize(2);
display.print(":");
display.setTextSize(2);
display.setCursor(56, 13);
sMinute = formatNumber(Minute, 2);
display.print(sMinute);
display.setCursor(76, 13);
display.setTextSize(2);
display.print(":");
display.setTextSize(2);
display.setCursor(86, 13);
sSecond = formatNumber(Second, 2);
display.print(sSecond);
display.setTextSize(1);
display.setCursor(35, 33);
display.print(gps.location.lng(), 8);
display.setTextSize(1);
display.setCursor(35, 43);
display.print(gps.location.lat(), 8);
display.setCursor(105, 53);
display.setTextSize(1);
display.print("m");
display.setCursor(50, 53);
display.setTextSize(1);
display.print("km/h");
display.setTextSize(1);
display.setCursor(80, 53);
display.print(gps.speed.mps());
display.setTextSize(1);
display.setCursor(25, 53);
display.print(gps.speed.kmph());
display.display();
delay(500);
display.clearDisplay();
}
// 格式化數字的函數
String formatNumber(int number, int digits) {
String formatted = "";
if (number < pow(10, digits - 1)) {
formatted = String(number, DEC);
while (formatted.length() < digits) {
formatted = "0" + formatted;
}
} else {
formatted = String(number, DEC);
}
return formatted;
}
編譯代碼,選擇端口號并上傳固件,短按 RST 復位運行程序。
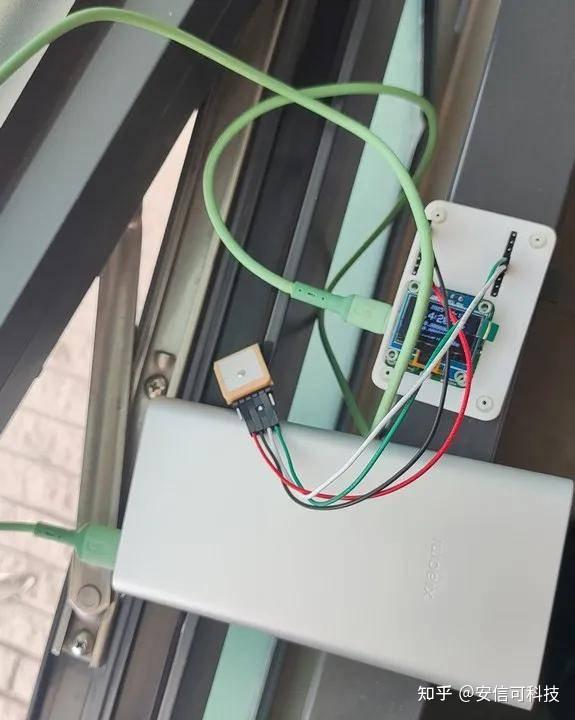
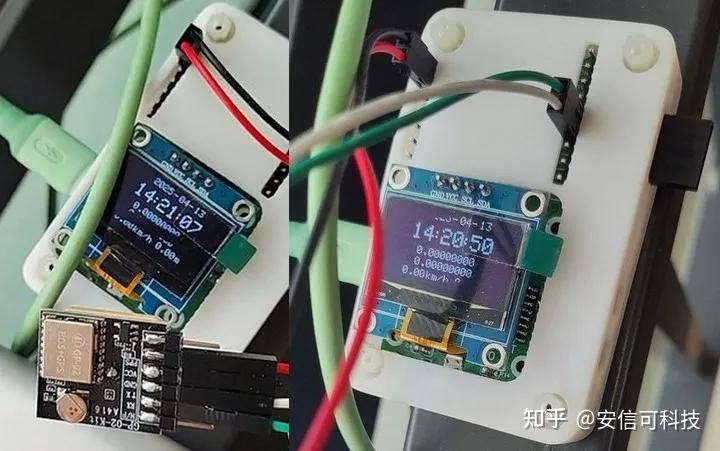
效果
選擇室外或窗邊放置天線,保持連接狀態,上電首次通信需 30 秒左右便能接收并識別出時鐘、坐標和速度等信息。
開發板詳見:
立創開源硬件平臺https://oshwhub.com/lijinlei0907/intelligent-portable-thermometer
OLED 顯示
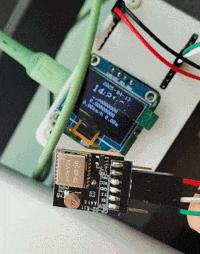
動態演示
審核編輯 黃宇
-
測試
+關注
關注
8文章
5623瀏覽量
128281 -
gps
+關注
關注
22文章
2960瀏覽量
168465 -
安信可
+關注
關注
0文章
184瀏覽量
4352
發布評論請先 登錄
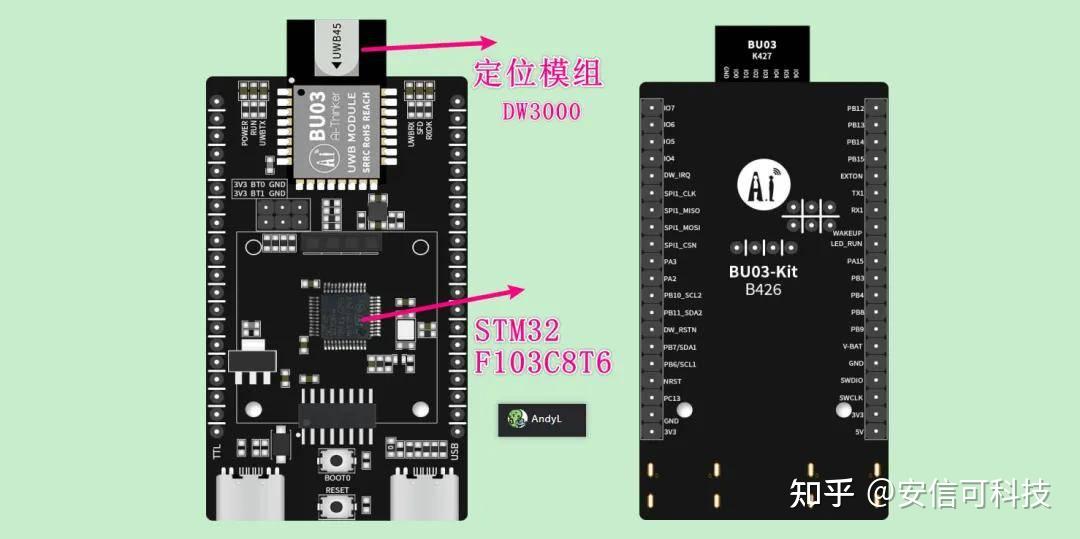
安信可定位開發板BU03-Kit使用指南 ——硬件&軟件
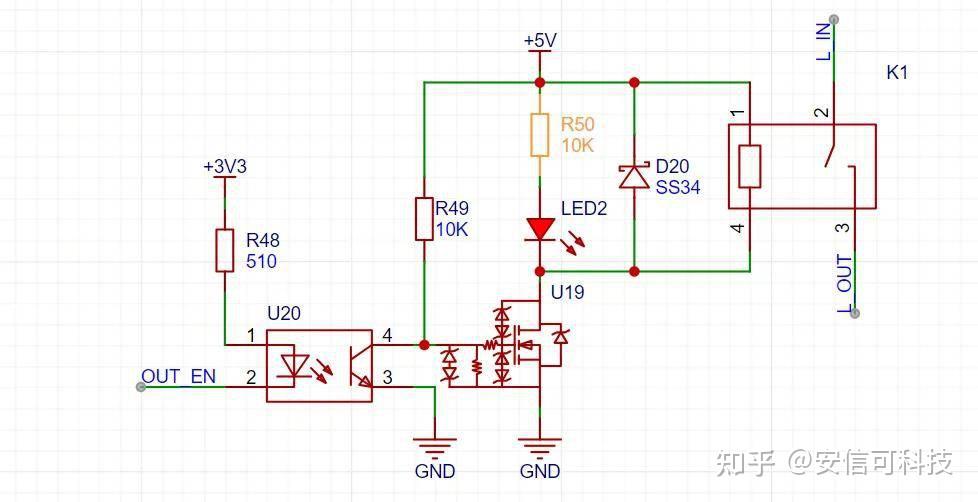
如何用安信可藍牙模塊遠程控制家中的設備?
安信可語音開放平臺的使用——VC系列SDK的獲取

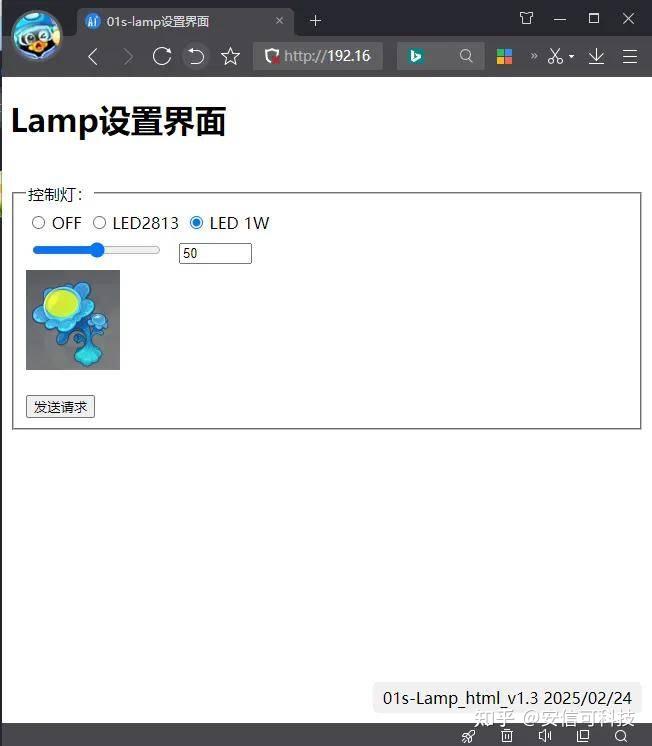
用安信可Ai-WB2-01S做一個可用網頁控制的簡易燈
用安信可AI人臉識別開發板BW21-CBV-Kit驅動墨水屏

安信可藍牙模組PB系列常見問題
【安信可LoRa答疑】Ra-01、Ra-02常見問題
安信可本地人臉識別方案來啦,支持 Arduino 環境

安信可的本地人臉識別方案
安信可,可安心!安信可科技亮相2024德國慕尼黑電子展會

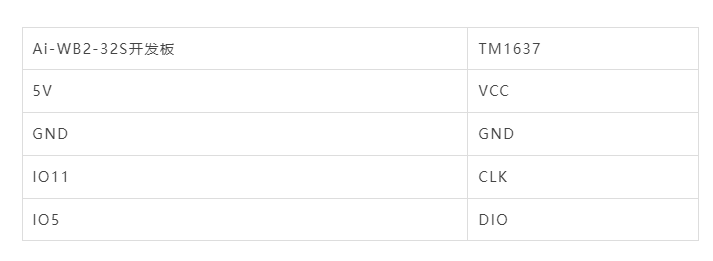
外設移植 安信可Ai-WB2-32S開發板+TM1637 NTP時鐘
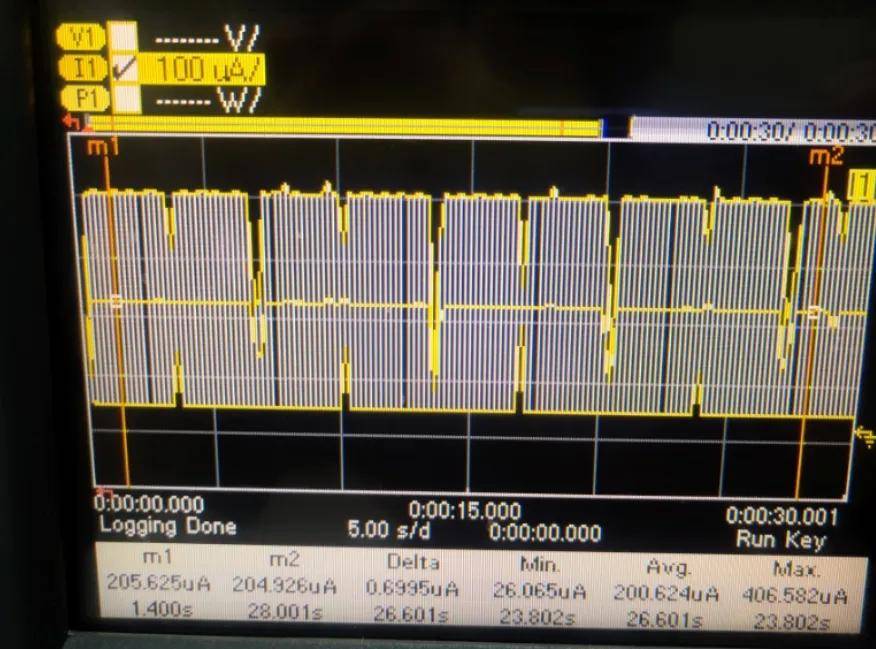
安信可藍牙模組的低功耗領域使用(附測試情況


 工商網監
工商網監
評論