 harmony OS NEXT-Navagation基本用法
# Navagation基本用法
> Navigation組件是路由導航的根視圖容器,一般作為Page頁面的根容器使用,其內部默認包含了標題欄,內容欄和公工具欄,其中內容區默認首頁顯示導航內容(Navigation的子組件)或非首頁顯示(NavDestination的子組件),首頁和非首頁通過路由進行切換
* 使用Navigation跳轉的組件不需要再使用Entry來修飾,普通組件即可
* Navigation是一個導航組件,API9和API11的使用官方推薦方式各不相同
## 1. Navagation API9的用法-(Navigation-NavRouter-(其他組件+NavDestination的用法))
### 1. 1**導航組件層次關系**
| 組件 | 作用 | 層級規則 |
| ---------------- | ------------------------ | ------------------------- |
| `Navigation` | 管理所有導航頁面的根容器 | 必須包含多個 `NavRouter` |
| `NavRouter` | 定義一個跳轉入口 | 必須配對 `NavDestination` |
| `NavDestination` | 目標頁面內容 | |
### **1. **2 按鈕覆蓋問題
- **代碼現象**:`跳轉B` 覆蓋 `跳轉A`
- **根本原因**:
在 `NavRouter` 內部放置多個直接同級組件時,僅最后一個組件會被渲染。
- **ArkUI規則**:
一個 `NavRouter` 只能關聯 **一個觸發元素** (如Button),如需多個跳轉需使用多個 `NavRouter`。
### 1.3 代碼案例
```ts
@Entry
@Component
struct TestNavgationAPI9 {
build() {
Navigation() {
// --------------------- 第一跳轉入口 ---------------------
NavRouter() { // ? 觸發元素
Button('跳轉A')
Button('跳轉B') //放置的第二個界面會覆蓋第一個
//要跳轉的界面
NavDestination() { // ? 目標頁面A
Image($r('app.media.Coverpeople'))
.width(50)
.aspectRatio(1)
// --------------------- 第二跳轉入口 ---------------------
NavRouter() { // ? 觸發元素
//第一個組件就是跳轉的
// --------------------- 第二跳轉入口 ---------------------
Text('我跳轉啦') // ? 目標頁面B
NavDestination() {
Text('第三個界面') // ? 目標頁面C
}
}
}
}
}
.height('100%')
.width('100%')
}
}
```
### 1.4 效果展示

## 2.Navagation 10的用法
### 2.1 路由棧自主管理
- `NavPathStack`
核心方法:
```ts
pushPath() // 壓入新頁面(保留前頁)
replacePath() // 替換當前頁面(銷毀前頁)
pop() // 回到上一頁
```
### 2.2 頁面加載控制
- **`navDestination(builder)`**
通過 `Builder` 函數動態渲染路由目標:
* 函數動態渲染路由目標:
```ts
.navDestination(this.navDesBuilder) // 動態路由映射
```
```ts
@Builder
navDesBuilder(name: string) {
if (name === "pageTwo") {
NavgationChild02() // 根據 name 組裝對應頁面
}
}
```
### 2.3 跨組件通信
- `@Provide` 與 `@Consume` 裝飾器
```ts
// 父級定義提供值
@Provide navPathStack: NavPathStack = new NavPathStack()
// 子組件自動獲取
@Consume navPathStack: NavPathStack
```
無需顯式傳遞,自動向下注入。
### 2.4 實現步驟
#### 1. 自己管理頁面棧 創建一個頁面棧 (用@Provide修飾,方便跨組件使用)
```ts
@Provide
navPathStack: NavPathStack = new NavPathStack()
```
#### 2.將創建的頁面棧實例傳遞給主界面
* `ps`:這一步還是蠻關鍵的,很多頁面不展示就是這個原因
```ts
Navigation(this.navPathStack) {
Text('這是第一頁-首頁')
Button('去下一頁')
.onClick(() => {
this.navPathStack.pushPath({
name: 'pageOne'
})
})
}
.height('100%')
.width('100%')
```
#### 3.通過 `Builder` 函數動態渲染路由目標
##### 1. 先創建一個自定義Builder
```ts
@Builder
myNavPathStackBuilder(name: string) {
//根據傳入的名字區渲染對應的頁面
if (name === 'pageOne') {
Children01()
} else if (name === 'pageTwo') {
Children02()
} else if (name === 'pageThree') {
Children03()
}
}
```
##### 2. 傳入Builder
```ts
.navDestination(this.navDesBuilder)
```
* 不需要加括號,這里有個底層原因
1. **ArkUI 的 `navDestination` 機制**
- **設計邏輯**:框架需要在導航時動態調用構建函數生成頁面。若傳遞this.navDesBuilder()則:
- 代碼執行時**立即運行該函數**(而非按需調用)
- 返回結果可能為 `void` 或非組件類型,導致**渲染異常**。
2. **`@Builder` 函數的特性**
- **延遲執行**:`@Builder` 定義的 UI 編譯時會轉為**獨立閉包代碼塊**
- **調用時機**:由 導航框架 在需要時(如`pushPath`)根據name參數觸發構建
```ts
this.navPathStack.pushPath({ name: 'pageTwo' });
// ?? 此時 ArkUI 內部通過 `.navDestination` 關聯的 Builder 按需執行
```
##### 3.跳轉的實現
1. 通過點擊事件調用當前`navPathStack`實例`pushPath`方法
2. 傳入你要跳轉頁面的名字,進行跳轉
```ts
Button('去下一頁')
.onClick(() => {
this.navPathStack.pushPath({
name: 'pageOne'
})
})
```
#### 4.子界面的定義
```ts
@Component
struct Children01 {
//接收主界面傳遞過來的頁面棧
@Consume navPathStack: NavPathStack
build() {
NavDestination() {
Column({ space: 5 }) {
Text('這是我從主頁跳轉的第一個界面')
.fontSize(24)
.fontWeight(500)
Button('跳轉到第二個頁面去')
.onClick(() => {
this.navPathStack.pushPath({
name: 'pageTwo'
})
})
}
}
}
}
@Component
struct Children02 {
@Consume
navPathStack: NavPathStack
build() {
NavDestination() {
Column({ space: 5 }) {
Text('這是我從主頁跳轉的第二個界面')
.fontSize(24)
.fontWeight(500)
Button('跳轉到第三個頁面去')
.onClick(() => {
this.navPathStack.pushPath({
name: 'pageThree'
})
})
}
}
}
}
@Component
struct Children03 {
@Consume
navPathStack: NavPathStack
build() {
NavDestination() {
Column() {
Text('這是我從主頁跳轉的第三個界面')
.fontSize(24)
.fontWeight(500)
}
}
}
}
```
#### 5.效果展示

## 3.NavagationAPI10使用的補充內容
### 3.1 常見的API
| 配置組合 | 代碼示例 | 效果描述 |
| ----------------- | ------------------------------------------------------------ | ----------------------------------- |
| 默認狀態 | `Navigation() .title('主標題')` | 標題欄顯示 "主標題",采用 Free 模式 |
| 精簡模式+隱藏標題 | `Navigation() .titleMode(NavigationTitleMode.Mini) .hideTitleBar(true)` | 標題欄完全不可見 |
| 子頁面獨立配置 | `NavDestination() .title('子頁標題') .hideTitleBar(true)` | |
### 3.2 傳參獲取參數的實現
#### 1.定義數據結構
```ts
interface hobby {
name: string,
hobby: string
}
```
#### 2.即將跳轉頁面傳入參數
```ts
NavDestination() {
Column({ space: 5 }) {
Text('這是我從主頁跳轉的第二個界面')
.fontSize(24)
.fontWeight(500)
Button('跳轉到第三個頁面去')
.onClick(() => {
this.navPathStack.pushPath({
name: 'pageThree',
param: { name: '貓貓球', hobby: '喜歡玩毛線球' } as hobby
})
})
}
}
```
#### 3.跳轉的頁面接收數據
```ts
@Component
struct Children03 {
@State
hobby: hobby[] = [] as hobby[]
@Consume
navPathStack: NavPathStack
aboutToAppear(): void {
this.hobby = this.navPathStack.getParamByName('pageThree') as hobby[]
promptAction.showToast({
message: JSON.stringify(this.hobby)
})
}
build() {
NavDestination() {
Column() {
Text('這是我從主頁跳轉的第三個界面')
Text('這是我獲取的數據')
Text(this.hobby[0].name)
Text(this.hobby[0].hobby)
.fontWeight(500)
}
}
}
}
```
#### 4.效果展示

審核編輯 黃宇
-
Harmony
+關注
關注
0文章
63瀏覽量
2885
發布評論請先 登錄
harmony OS NEXT-雙向數據綁定MVVM以及$$語法糖介紹
harmony OS NEXT-通過用戶首選項實現數據持久化
harmony OS NEXT-評論功能小demo
單模光纖os1和os2的區別分析
Google Cloud Next 2025大會亮點回顧
HarmonyOS Next V2 @Local 和@Param
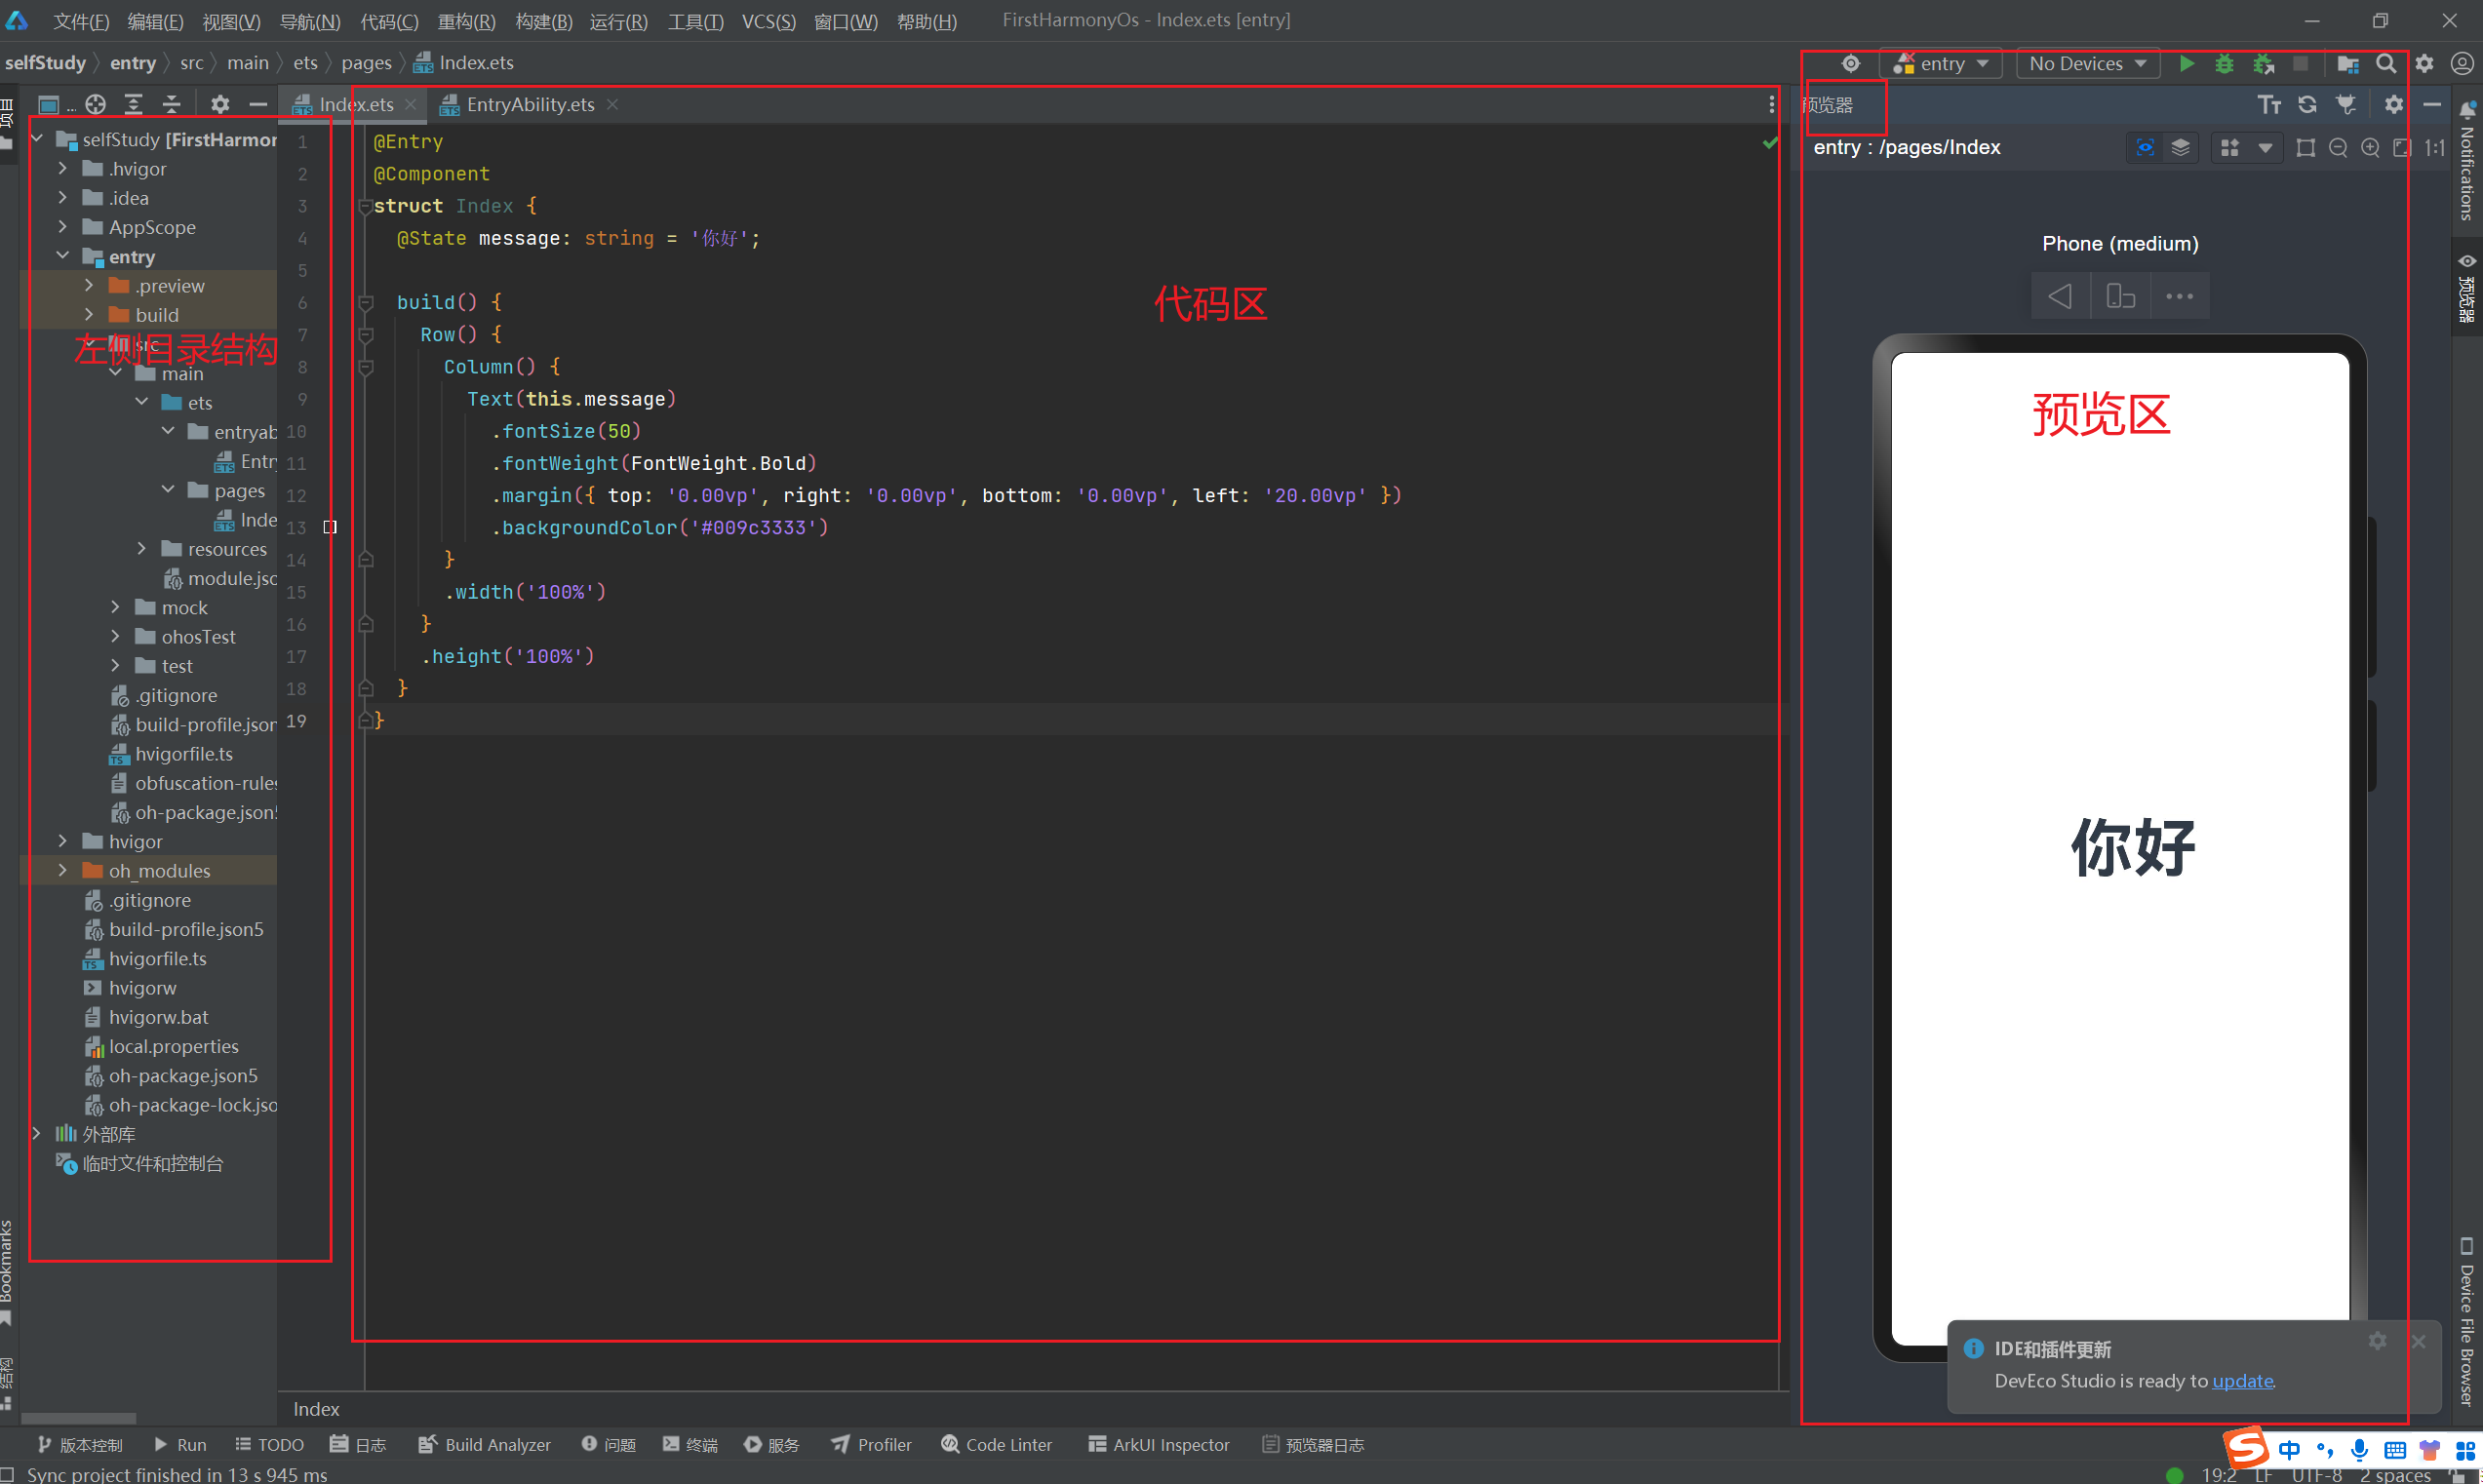
harmony OS NEXT-基本介紹及DevcoStudiop基本使用
華為鴻蒙NEXT系統的優勢與劣勢
華為HarmonyOS NEXT 10月8日開啟公測

OpenAI宣布啟動GPT Next計劃
華為發布鴻蒙原生智能,OS深度融合AI,小藝升級為系統級智能體
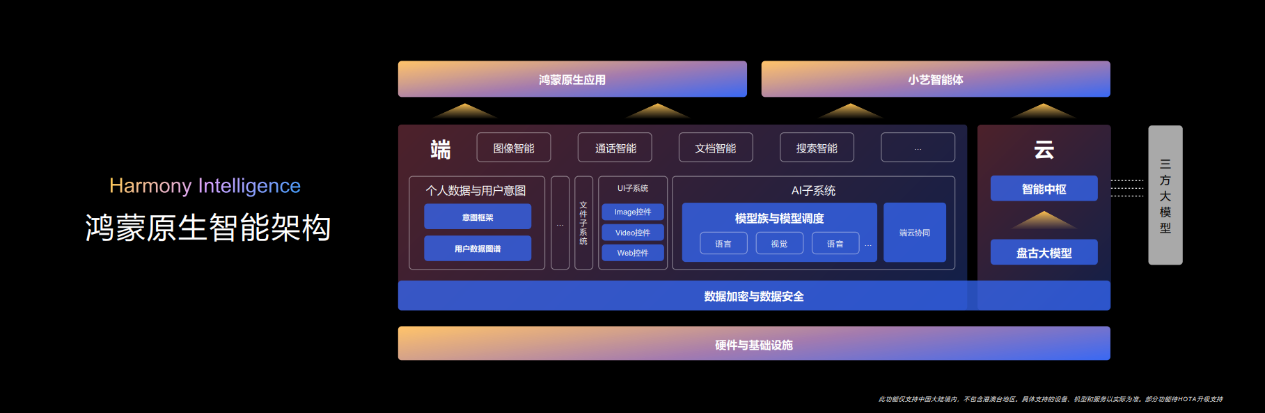
HDC2024華為發布鴻蒙原生智能:AI與OS深度融合,開啟全新的AI時代

HDC 2024上,HarmonyOS NEXT有哪些精彩亮點值得期待?


 工商網監
工商網監
評論