 ElfBoard技術貼|如何在ELF 1開發板上交叉移植Qt
在嵌入式系統開發領域,針對特定硬件平臺進行Qt框架的移植與適配是一項關鍵技術任務。作為業界主流的跨平臺應用開發框架,Qt憑借其完善的圖形界面支持能力,在嵌入式開發圖形界面應用程序中占據重要地位。本文將基于ELF 1開發板詳細闡述Qt 5.12 版本的交叉編譯與系統移植方案。
1、源碼下載
Qt5.12可在Qt官網或者GitHub等下載,以下為GitHub鏈接:https://github.com/zhoujun59761/qtsrc512
2、源碼配置修改
(1)解壓源碼包并設置權限
elf@ubuntu:~/work$ unzip qtsrc512-master.zip elf@ubuntu:~/work$ chmod 777 -R qtsrc512-master(設置最大權限,避免編譯時權限問題) elf@ubuntu:~/work$ cd qtsrc512-master/
(2)修改qmake.conf配置文件
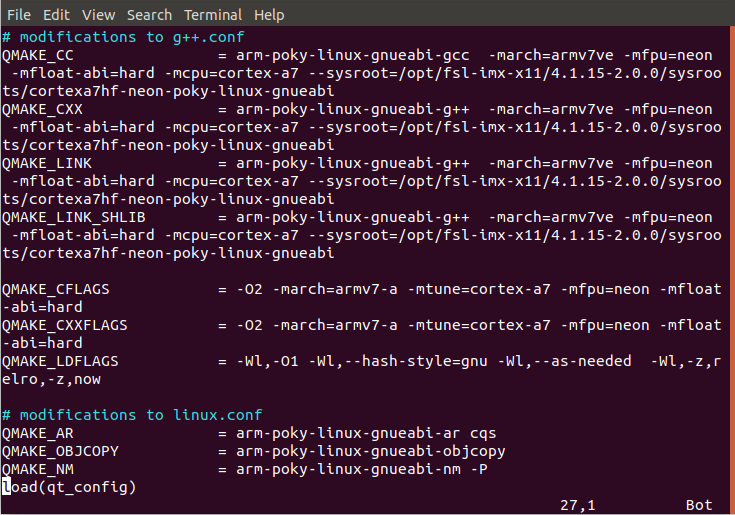
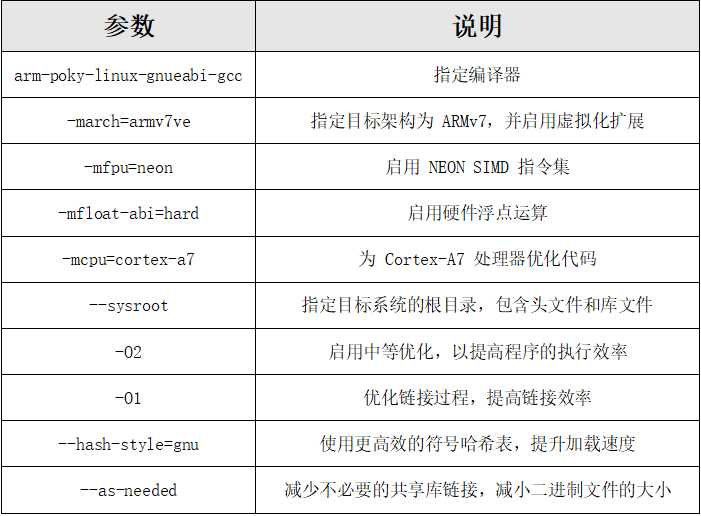
由于ELF 1開發板是 ARM 架構,所以需要修改 qmake.conf 文件以適應交叉編譯環境。編輯文件路徑為 qtbase/mkspecs/linux-arm-gnueabi-g++/qmake.conf,并進行如下修改。
elf@ubuntu:~/work/qtsrc512-master$ vi qtbase/mkspecs/linux-arm-gnueabi-g++/qmake.conf
內容如下:
# # qmake configuration for building with arm-linux-gnueabi-g++ # MAKEFILE_GENERATOR = UNIX CONFIG += incremental QMAKE_INCREMENTAL_STYLE = sublib include(../common/linux.conf) include(../common/gcc-base-unix.conf) include(../common/g++-unix.conf) # modifications to g++.conf QMAKE_CC = arm-poky-linux-gnueabi-gcc -march=armv7ve -mfpu=neon -mfloat-abi=hard -mcpu=cortex-a7 --sysroot=/opt/fsl-imx-x11/4.1.15-2.0.0/sysroots/cortexa7hf-neon-poky-linux-gnueabi QMAKE_CXX = arm-poky-linux-gnueabi-g++ -march=armv7ve -mfpu=neon -mfloat-abi=hard -mcpu=cortex-a7 --sysroot=/opt/fsl-imx-x11/4.1.15-2.0.0/sysroots/cortexa7hf-neon-poky-linux-gnueabi QMAKE_LINK = arm-poky-linux-gnueabi-g++ -march=armv7ve -mfpu=neon -mfloat-abi=hard -mcpu=cortex-a7 --sysroot=/opt/fsl-imx-x11/4.1.15-2.0.0/sysroots/cortexa7hf-neon-poky-linux-gnueabi QMAKE_LINK_SHLIB = arm-poky-linux-gnueabi-g++ -march=armv7ve -mfpu=neon -mfloat-abi=hard -mcpu=cortex-a7 --sysroot=/opt/fsl-imx-x11/4.1.15-2.0.0/sysroots/cortexa7hf-neon-poky-linux-gnueabi QMAKE_CFLAGS = -O2 -march=armv7-a -mtune=cortex-a7 -mfpu=neon -mfloat-abi=hard QMAKE_CXXFLAGS = -O2 -march=armv7-a -mtune=cortex-a7 -mfpu=neon -mfloat-abi=hard QMAKE_LDFLAGS = -Wl,-O1 -Wl,--hash-style=gnu -Wl,--as-needed -Wl,-z,relro,-z,now # modifications to linux.conf QMAKE_AR = arm-poky-linux-gnueabi-ar cqs QMAKE_OBJCOPY = arm-poky-linux-gnueabi-objcopy QMAKE_NM = arm-poky-linux-gnueabi-nm -P load(qt_config)
3、交叉編譯
(1)編寫編譯腳本
由于 configure 生成 Makefile 時需要大量參數,可以編寫一個腳本保存這些配置。首先創建腳本文件 shell.sh。
elf@ubuntu:~/work/qtsrc512-master$ touch shell.sh elf@ubuntu:~/work/qtsrc512-master$ chmod 777 shell.sh
在 shell.sh 中填入以下內容(-prefix 后面的路徑需要根據實際情況修改)。
./configure -prefix /home/elf/work/qtsrc512-master/__install \ -opensource \ -confirm-license \ -release \ -shared \ -xplatform linux-arm-gnueabi-g++ \ -optimized-qmake \ -c++std c++11 \ --rpath=no \ -pch \ -skip qt3d \ -skip qtactiveqt \ -skip qtandroidextras \ -skip qtcanvas3d \ -skip qtconnectivity \ -skip qtdatavis3d \ -skip qtdoc \ -skip qtgamepad \ -skip qtlocation \ -skip qtmacextras \ -skip qtnetworkauth \ -skip qtpurchasing \ -skip qtremoteobjects \ -skip qtscript \ -skip qtscxml \ -skip qtsensors \ -skip qtspeech \ -skip qtsvg \ -skip qttools \ -skip qttranslations \ -skip qtwayland \ -skip qtwebengine \ -skip qtwebview \ -skip qtwinextras \ -skip qtxmlpatterns \ -make libs \ -make examples \ -nomake tools -nomake tests \ -gui \ -widgets \ -dbus-runtime \ --glib=no \ --iconv=no \ --pcre=qt \ --zlib=qt \ -no-openssl \ --xcb=qt \ --freetype=qt \ --harfbuzz=qt \ -no-opengl \ --libpng=qt \ --libjpeg=qt \ --sqlite=qt \ -plugin-sql-sqlite \ -recheck-all \ -no-strip
(2)執行環境變量
elf@ubuntu:~/work/qtsrc512-master$ . /opt/fsl-imx-x11/4.1.15-2.0.0/environment-setup-cortexa7hf-neon-poky-linux-gnueabi
(3)編譯
運行腳本并進行編譯。
elf@ubuntu:~/work/qtsrc512-master$ ./shell.sh
執行腳本可能會出現以下錯誤。
+ cd qtbase + /home/elf/work/qtsrc512-master/qtbase/configure -top-level -prefix /home/elf/work/qtsrc512-master/__install -opensource -confirm-license -release -strip -shared -xplatform linux-arm-gnueabi-g++ -optimized-qmake -c++std c++11 --rpath=no -pch -skip qt3d -skip qtactiveqt -skip qtandroidextras -skip qtcanvas3d -skip qtconnectivity -skip qtdatavis3d -skip qtdoc -skip qtgamepad -skip qtlocation -skip qtmacextras -skip qtnetworkauth -skip qtpurchasing -skip qtremoteobjects -skip qtscript -skip qtscxml -skip qtsensors -skip qtspeech -skip qtsvg -skip qttools -skip qttranslations -skip qtwayland -skip qtwebengine -skip qtwebview -skip qtwinextras -skip qtxmlpatterns -make libs -make examples -nomake tools -nomake tests -gui -widgets -dbus-runtime --glib=no --iconv=no --pcre=qt --zlib=qt -no-openssl --xcb=qt --freetype=qt --harfbuzz=qt -no-opengl --libpng=qt --libjpeg=qt --sqlite=qt -plugin-sql-sqlite -recheck-all Please make sure to unset the QMAKESPEC, XQMAKESPEC, QMAKEPATH, and QMAKEFEATURES environment variables prior to building Qt.
這是因為Ubuntu中已經有Qt的環境了,如需解決可以參考提示執行如下命令。
elf@ubuntu:~/work/qtsrc512-master$ unset QMAKESPEC XQMAKESPEC QMAKEPATH QMAKEFEATURES
繼續執行shell.sh腳本。
elf@ubuntu:~/work/qtsrc512-master$ ./shell.sh elf@ubuntu:~/work/qtsrc512-master$ make elf@ubuntu:~/work/qtsrc512-master$ make install
編譯完成后,__install 文件夾包含了 Qt 5.12 所需的所有文件。
elf@ubuntu:~/work/qtsrc512-master$ cd __install/ elf@ubuntu:~/work/qtsrc512-master/__install$ ls bin doc examples include lib mkspecs plugins qml
其中,lib文件夾為所需的lib庫,examples文件夾為demo工程。
4、功能測試
(1)打包Qt文件夾
將編譯生成的文件打包。
elf@ubuntu:~/work/qtsrc512-master/__install$ tar -cjvf qt5.12.tar.bz2 *
(2)解壓至開發板
將打包后的文件放到U盤,拷貝至開發板并解壓。
root@ELF1:~# tar -mxvf qt5.12.tar.bz2 -C /
(3)執行環境變量
在開發板上設置環境變量,確保 Qt 正常運行。其中export QT_ROOT=/ 為qt5.12文件相關的路徑(填解壓的路徑)。
export QT_ROOT=/ export QT_QPA_FONTDIR=/usr/share/fonts export QT_QPA_PLATFORM_PLUGIN_PATH=$QT_ROOT/plugins export QT_PLUGIN_PATH=$QT_ROOT/plugins export LD_LIBRARY_PATH=$QT_ROOT/lib:$QT_ROOT/plugins/platforms export QML2_IMPORT_PATH=$QT_ROOT/qml //兩種顯示框架根據需求進行設置 export QT_QPA_PLATFORM=linuxfb:tty=/dev/fb0 //采用Linuxfb顯示框架 export QT_QPA_PLATFORM=xcb:tty=/dev/fb0 //采用x11顯示框架
(4)運行示例應用
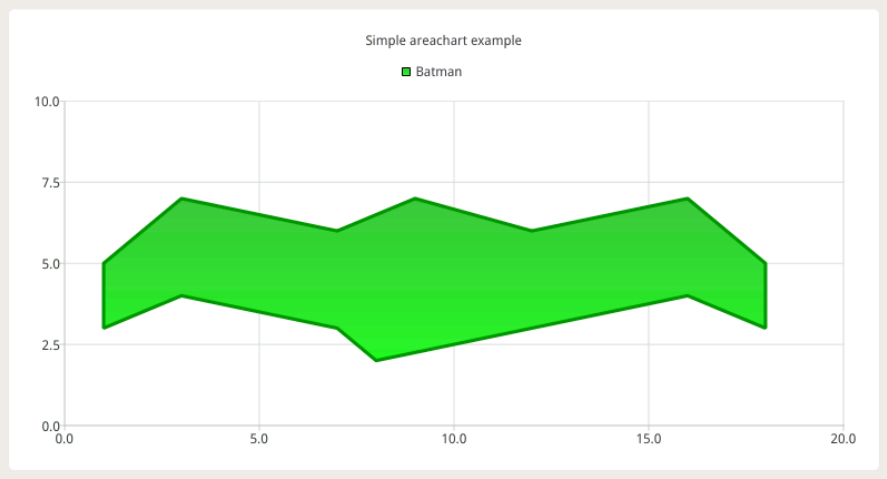
Linuxfb顯示框架運行 Qt 的示例應用進行功能測試。
root@ELF1:~# /examples/charts/areachart/areachart
效果如下:
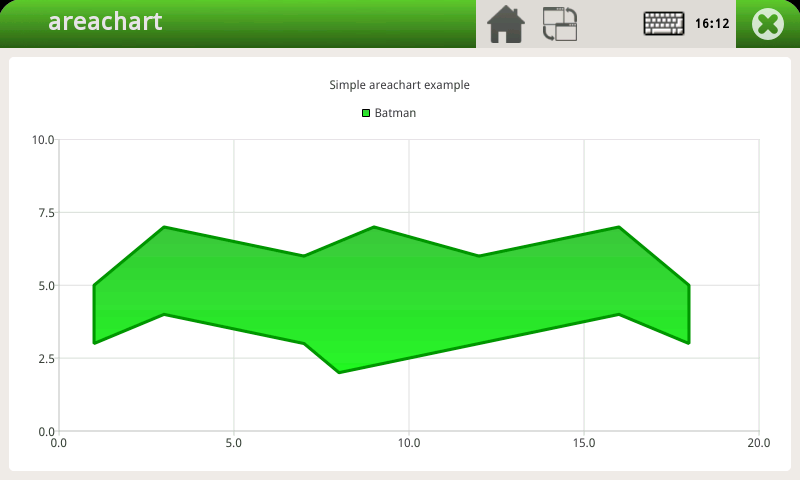
X11 顯示框架運行 Qt 的示例應用進行功能測試。
root@ELF1:~# export DISPLAY=:0.0 root@ELF1:~# /examples/charts/areachart/areachar
效果如下:
經過上述一系列步驟就可以順利地將Qt 5.12版本交叉編譯并成功移植至ELF 1開發板。衷心希望本文能為屏幕前的小伙伴在嵌入式開發領域的Qt移植工作帶來實質性的幫助與指導!
-
單片機
+關注
關注
6063文章
44915瀏覽量
646768 -
嵌入式
+關注
關注
5141文章
19524瀏覽量
314804 -
開發板
+關注
關注
25文章
5499瀏覽量
102164 -
Qt
+關注
關注
1文章
313瀏覽量
38781
發布評論請先 登錄
如何在嵌入式Linux開發板上配置Qt運行環境
ElfBoard技術貼|如何在NXP源碼基礎上適配ELF 1開發板的UART功能

ElfBoard技術貼|ELF 1開發板適配攝像頭詳解

飛凌ElfBoard ELF 1板卡-如何在ELF 1開發板上實現對java的支持
飛凌嵌入式ElfBoard ELF 1板卡-在ELF 1開發環境中使用QT Creator進行遠程調試
飛凌嵌入式-ElfBoard-項目分享|基于ELF 1S開發板完成的物聯網開源項目
飛凌嵌入式ElfBoard ELF 1板卡-開發板適配之移植前的準備
技術分享 | i.MX8M Plus開發板交叉編譯qt5.15.2

ELF 1技術貼|在NXP源碼基礎上適配ELF 1開發板的LED功能

如何將Go程序編譯到ELF 1開發板

ELF 1技術貼|如何移植Boa 到開發板上

ELF 1技術貼|如何將Python3.6.9移植到開發板上

ELF技術貼|如何在開發板上實現對Java的支持

ElfBoard技術貼|在NXP源碼基礎上適配ELF 1開發板的按鍵功能

ElfBoard技術貼|如何在ELF 1開發板上搭建流媒體服務器


 工商網監
工商網監
評論