 零知開源——玩轉WS2812B燈條模塊
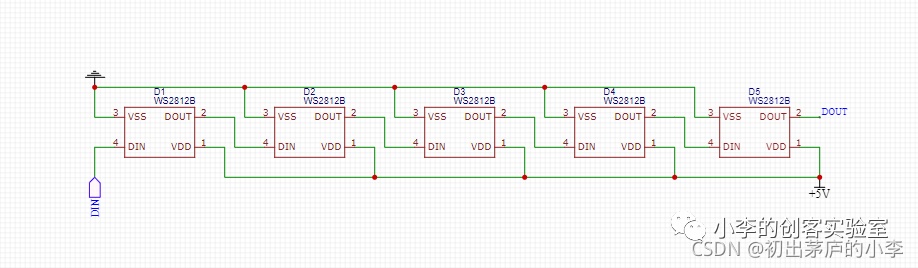
WS2812RGB燈帶
通過零知標準開發板平臺上驅動WS2812RGB燈珠,包括WS2812B的供電電壓、接線和代碼實現。通過創建延時函數和設置級聯數據,實現對RGB燈珠的控制,展示了從關閉到開啟不同顏色以及跑馬燈、呼吸燈和彩虹燈等效果。
一、工具原料
電腦、Windows系統
零知開發板
Micro-usb線
WS2812RGB燈
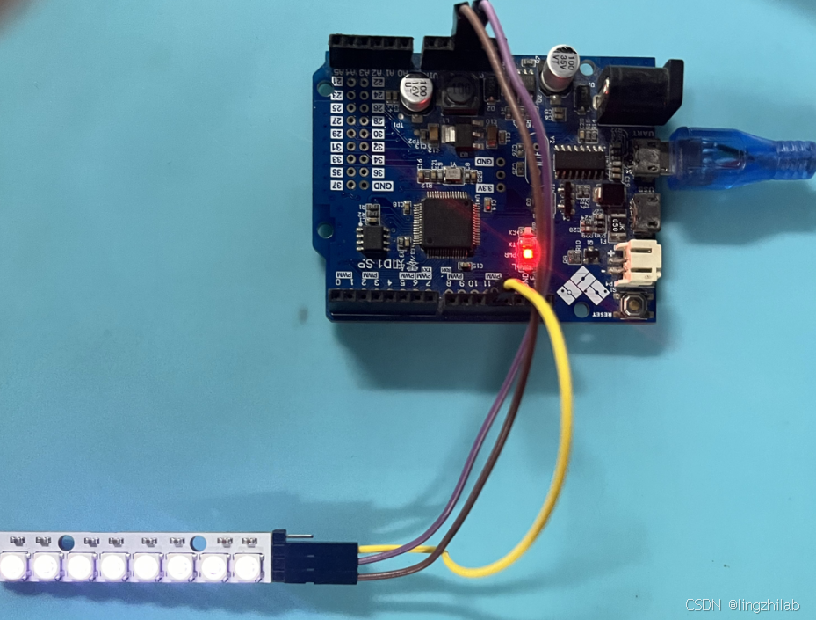
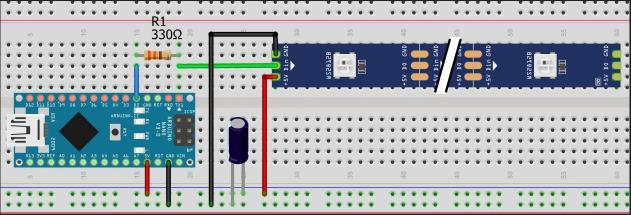
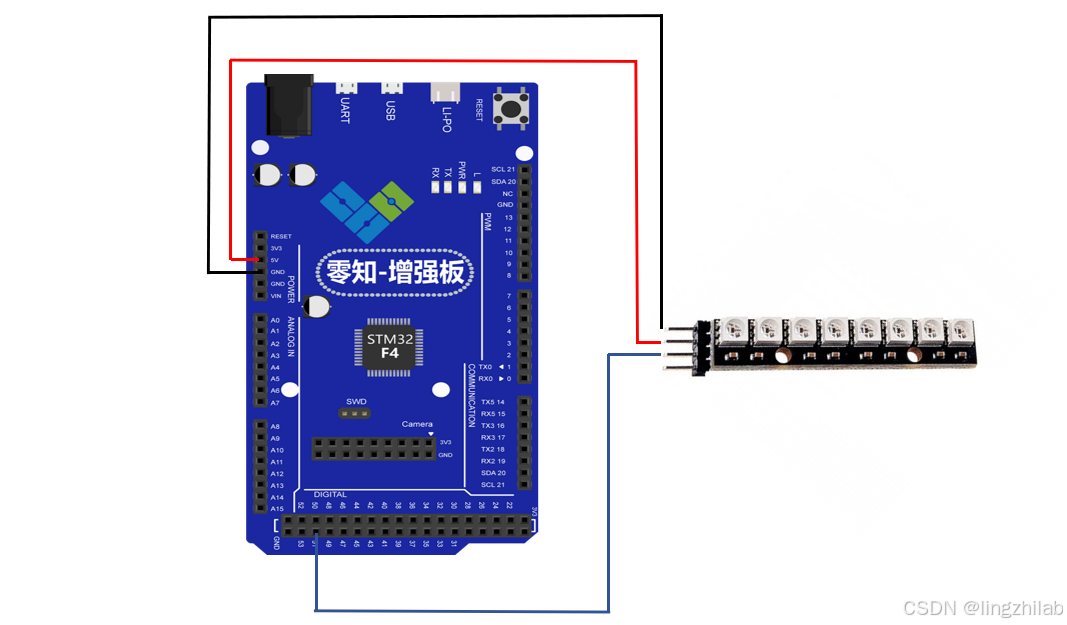
二、硬件連接
| 零知標準開發板 | WS2812B |
| 5V | VCC |
| GND | GND |
| 11 | Din |
硬件連接示意圖


實際連接

三、方法步驟
1、打開零知實驗室軟件開發工具,然后新建項目,輸入代碼
2、將庫文件解壓放到庫文件存放的目錄下
3、選擇端口進行編譯,然后上傳到開發板中。
引用庫文件WS2812B.h
?#include   // 引入用于控制WS2812B LED燈帶的庫

#define NUM_LEDS 9  // 定義燈帶上的LED數量

#define DELAYVAL 500 // 定義延遲時間(單位:毫秒),用于在不同效果之間的暫停時間

/*
 * 注意:該庫使用SPI1進行數據傳輸
 * 將WS2812B的數據信號輸入引腳連接到開發板的MOSI引腳。
 */
WS2812B strip = WS2812B(NUM_LEDS);  // 創建一個WS2812B對象,用于控制燈帶
設置SPI、點亮不同效果的RGB燈
 // 請注意。庫中并不真正支持Gamma,它只是在本例中使用的一些函數需要Gamma時才包含
uint8_t LEDGamma[] = {
    0,  0,  0,  0,  0,  0,  0,  0,  0,  0,  0,  0,  0,  0,  0,  0,
    0,  0,  0,  0,  0,  0,  0,  0,  0,  0,  0,  0,  1,  1,  1,  1,
    1,  1,  1,  1,  1,  1,  1,  1,  1,  2,  2,  2,  2,  2,  2,  2,
    2,  3,  3,  3,  3,  3,  3,  3,  4,  4,  4,  4,  4,  5,  5,  5,
    5,  6,  6,  6,  6,  7,  7,  7,  7,  8,  8,  8,  9,  9,  9, 10,
   10, 10, 11, 11, 11, 12, 12, 13, 13, 13, 14, 14, 15, 15, 16, 16,
   17, 17, 18, 18, 19, 19, 20, 20, 21, 21, 22, 22, 23, 24, 24, 25,
   25, 26, 27, 27, 28, 29, 29, 30, 31, 32, 32, 33, 34, 35, 35, 36,
   37, 38, 39, 39, 40, 41, 42, 43, 44, 45, 46, 47, 48, 49, 50, 50,
   51, 52, 54, 55, 56, 57, 58, 59, 60, 61, 62, 63, 64, 66, 67, 68,
   69, 70, 72, 73, 74, 75, 77, 78, 79, 81, 82, 83, 85, 86, 87, 89,
   90, 92, 93, 95, 96, 98, 99,101,102,104,105,107,109,110,112,114,
  115,117,119,120,122,124,126,127,129,131,133,135,137,138,140,142,
  144,146,148,150,152,154,156,158,160,162,164,167,169,171,173,175,
  177,180,182,184,186,189,191,193,196,198,200,203,205,208,210,213,
  215,218,220,223,225,228,231,233,236,239,241,244,247,249,252,255 };

void setup()
{
  strip.begin();// 設置SPI
  strip.show();// 清除strip,因為默認情況下條帶數據設置為所有LED關閉。
 // strip.setBrightness(8);
}

void loop() {
    // 實現不同的燈光效果
    colorWipe(strip.Color(0, 255, 0), 20);  // 使用綠色逐個點亮燈帶
    colorWipe(strip.Color(255, 0, 0), 20); // 使用紅色逐個點亮燈帶
    colorWipe(strip.Color(0, 0, 255), 20); // 使用藍色逐個點亮燈帶
    rainbow(10);                          // 顯示彩虹漸變效果
    rainbowCycle(10);  // 顯示循環的彩虹效果

    theaterChase(strip.Color(255, 0, 0), 20);
    theaterChase(strip.Color(0, 255, 0), 20);
    theaterChase(strip.Color(0, 0, 255), 20);
    theaterChaseRainbow(10);

    whiteOverRainbow(20, 75, 5);  // 白光覆蓋在彩虹效果上
    fullWhite();                  // 將燈帶上的所有LED點亮為白光
    delay(250);                   // 暫停250毫秒
    rainbowFade2White(3, 3, 1);   // 彩虹效果逐漸過渡到白光
    theaterChaseWhiteAndOff(DELAYVAL); // 實現白光追逐與關閉的效果
    delay(250);

    flowingLight(100); // 實現流動光效果,速度為100ms

    breathLight(255, 50); // PWM呼吸燈效果

}
將呼吸燈、彩虹燈和流水燈等功能的庫函數封裝
void breathLight(uint8_t maxBrightness, uint8_t speed) {
    // 實現PWM呼吸燈效果
    for (uint8_t brightness = 0; brightness <= maxBrightness; brightness++) {
        for (uint16_t i = 0; i < strip.numPixels(); i++) {
            // 設置每個LED的顏色,使用伽馬校正后的亮度值
            strip.setPixelColor(i, strip.Color(LEDGamma[brightness], LEDGamma[brightness], LEDGamma[brightness]));
        }
        strip.show();
        delay(speed); // 延遲以實現亮度變化
    }
    for (uint8_t brightness = maxBrightness; brightness > 0; brightness--) {
        for (uint16_t i = 0; i < strip.numPixels(); i++) {
            strip.setPixelColor(i, strip.Color(LEDGamma[brightness], LEDGamma[brightness], LEDGamma[brightness]));
        }
        strip.show();
        delay(speed);
    }
}

void flowingLight(uint8_t speed) {
  // 實現流動光效果
  uint16_t index = 0;        // 記錄當前流動的索引
  uint8_t currentColor = 0;  // 記錄當前的顏色(紅、綠、藍)

  while (true) {
    for (uint16_t i = 0; i < NUM_LEDS; i++) {
      // 根據當前索引計算目標索引
      uint16_t targetIndex = (i + index) % NUM_LEDS;

      switch (currentColor) {
        case 0:
          strip.setPixelColor(targetIndex, strip.Color(255, 0, 0)); //  設置為紅色
          break;
        case 1:
          strip.setPixelColor(targetIndex, strip.Color(0, 255, 0)); //  設置為綠色
          break;
        case 2:
          strip.setPixelColor(targetIndex, strip.Color(0, 0, 255)); //  設置為藍色
          break;
      }

      strip.setPixelColor(i, strip.Color(0, 0, 0)); // 將之前的LED關閉

      strip.show();
      delay(speed);// 設置流動光的速度
    }

   // 切換到下一個顏色
    currentColor = (currentColor + 1) % 3;

     // 增加索引,實現流動效果
    index++;
    if (index >= NUM_LEDS) {
      index = 0; //重置索引
    }
  }
}

void theaterChaseWhiteAndOff(uint8_t wait) {
  for (int j = 0; j < 10; j++) {  // 10 cycles of chasing
    for (int q = 0; q < 3; q++) {
      for (uint16_t i = 0; i < strip.numPixels(); i = i + 3) {
        strip.setPixelColor(i + q, (j % 2 == 0 ? strip.Color(128, 0, 128) : 0));
      }
      strip.show();
      delay(wait);
      for (uint16_t i = 0; i < strip.numPixels(); i = i + 3) {
        strip.setPixelColor(i + q, 0);  // Turn every third pixel off
      }
    }
  }
}

// Fill the dots one after the other with a color
void colorWipe(uint32_t c, uint8_t wait)
{
  for(uint16_t i=0; i= 0 ; j--){ // 亮度從255漸變回0
    for(uint16_t i=0; i 255 - fadeMax){
        // 最后一次循環,亮度逐漸減少
        fadeVal--;
      }
      strip.show();
      delay(wait);
    }
  }

  delay(500);

  for(int k = 0 ; k < whiteLoops ; k ++){ // 循環執行白色漸變效果
    for(int j = 0; j < 256 ; j++){
      for(uint16_t i=0; i < strip.numPixels(); i++) {
        strip.setPixelColor(i, strip.Color(LEDGamma[j],LEDGamma[j],LEDGamma[j] ) );
      }
      strip.show();
      delay(wait);
    }
    delay(2000);
    for(int j = 255; j >= 0 ; j--){
      for(uint16_t i=0; i < strip.numPixels(); i++) {
        strip.setPixelColor(i, strip.Color(LEDGamma[j],LEDGamma[j],LEDGamma[j] ) );
      }
      strip.show();
      delay(wait);
    }
  }
}


void whiteOverRainbow(uint8_t wait, uint8_t whiteSpeed, uint8_t whiteLength ) {
  // 功能:在彩虹背景上疊加白色的流動效果
  // 參數:
  //   wait - 動畫更新間隔
  //   whiteSpeed - 白色流動速度
  //   whiteLength - 白色光束長度
  if(whiteLength >= strip.numPixels()) whiteLength = strip.numPixels() - 1;

  int head = whiteLength - 1;
  int tail = 0;

  int loops = 3;
  int loopNum = 0;

  static unsigned long lastTime = 0;


  while(true){
    for(int j=0; j= tail && i <= head) || (tail > head && i >= tail) || (tail > head && i <= head) ){
          // 如果在白色光束范圍內,設置為白色
          strip.setPixelColor(i, strip.Color(255,255,255 ) );
        }
        else{
           // 否則,根據j值設置彩虹顏色
          strip.setPixelColor(i, Wheel(((i * 256 / strip.numPixels()) + j) & 255));
        }

      }

      if(millis() - lastTime > whiteSpeed) {
        head++;
        tail++;
        if(head == strip.numPixels()){
          loopNum++;
        }
        lastTime = millis();
      }

      if(loopNum == loops) return;

      head%=strip.numPixels();
      tail%=strip.numPixels();
        strip.show();
        delay(wait);
    }
  }
}

void fullWhite() {
  // 功能:點亮所有LED為白色
  for(uint16_t i=0; i> 16);
}

// green 函數: 提取顏色值中的綠色分量
// 參數:
//   c: RGB 顏色值(32 位整數)
// 返回值:
//   綠色分量(0-255)
uint8_t green(uint32_t c) {
    return (c >> 8);
}

// blue 函數: 提取顏色值中的藍色分量
// 參數:
//   c: RGB 顏色值(32 位整數)
// 返回值:
//   藍色分量(0-255)
uint8_t blue(uint32_t c) {
    return (c);
}
四、成果展示
將上述代碼驗證后上傳到零知板,就可以看到測試結果,實現流水燈、彩虹燈和呼吸燈等效果
?https://live.csdn.net/v/435823?spm=1001.2014.3001.5501
審核編輯 黃宇
聲明:本文內容及配圖由入駐作者撰寫或者入駐合作網站授權轉載。文章觀點僅代表作者本人,不代表電子發燒友網立場。文章及其配圖僅供工程師學習之用,如有內容侵權或者其他違規問題,請聯系本站處理。
舉報投訴
-
開源
+關注
關注
3文章
3572瀏覽量
43412 -
開發板
+關注
關注
25文章
5475瀏覽量
101844
發布評論請先 登錄
相關推薦
熱點推薦
什么是WS2812B?WS2812B燈帶是怎么連接的呢?
WS2812B是一款全彩LED控制IC,單總線控制,何為單總線我的理解就是數據線在一根線上傳輸的控制方式就是單總線。
零知開源——使用 GPIO 模擬時序驅動 WS2812B LED 燈帶
、Windows系統
零知增強版開發板
Micro-usb線
WS2812RGB燈 WS2812B 是一款內含控制器芯片的全彩 LED
發表于 02-20 14:31
WS2812B RGB全彩LED燈珠
WS2812B RGB全彩LED燈珠,只需通過一根信號線控制多個燈顯示,本教程使用X-CTR100控制器驅動WS2812燈環。原理
發表于 08-06 08:15
用ws2812b led燈條做遠程區域面板控制器的教程
描述WS2812B 遠程區域面板控制器我用ws2812b led燈條做了一個面板,你可以把覆盆子前面的動畫放到面板上使用此板,您可以控制面板并將其放置在任何有 wifi 的地方PCB代
發表于 07-29 07:16
使用WS2812b Led燈條的diy光劍光劍控制器
描述使用 WS2812b Led 燈條的 diy 光劍光劍控制器,包括用于聲音的微型 SD 插槽、用于運動跟蹤的 6 軸傳感器和用于光劍聲音的揚聲器。通過板載 USB 端口和 Arduino IDE 進行編程。
發表于 08-25 07:40
使用WS2812B實現一個帶有麥克風的RGB LED燈條控制電路
描述RGB LED游戲燈在這個項目中,我們將使用可編程LED條WS2812B Yeladuino nano實現一個帶有麥克風的RGB LED燈條
發表于 08-29 06:45
Arduino WS2812B LED燈帶設計方案
Arduino WS2812B LED燈帶可單獨控制每個LED的亮度和顏色,提供了一種簡單而酷炫的LED效果體驗。
發表于 04-24 08:36
?1.4w次閱讀
迷你乒乓球含Arduino Nano WS2812B LED燈條
電子發燒友網站提供《迷你乒乓球含Arduino Nano WS2812B LED燈條.zip》資料免費下載
發表于 11-02 11:00
?0次下載

零知開源——使用 GPIO 模擬時序驅動 WS2812B LED 燈帶
?利用零知增強版的GPIO 模擬時序 ???????在本教程中,我們將探討如何使用 零知增強版的 GPIO 接口來模擬 WS2812B LE


 工商網監
工商網監
評論