 OpenHarmony3.0上編譯C控制Hi3516開發板的LED閃爍
OpenHarmony 分為輕量系統、小型系統、標準系統,目前對應 LiteOS-M、LiteOS-A、Linux 內核。但好像并沒有說一定是按照使用內核來劃分。我們這里姑且先這么區分。
本文使用的是比較新的 OpenHarmony 3.0 LTS 版本,Linux 內核,編譯標準系統。
官方文檔已經說明了,如何使用 DevEco Studio 開發 hap 包,并運行在開發板,但是 ACE 框架能力有限。
設備硬件開發還是需要 C,所以這篇文章,將在標準系統下編譯 C 控制 Hi3516 開發板的 LED 閃爍。
環境準備
3.0 源碼下載:
repo init -u https://gitee.com/openharmony/manifest.git -b OpenHarmony-3.0-LTS --no-repo-verify
repo sync -c
repo forall -c ‘git lfs pull’
區別于 2.0 需要安裝 ruby,其他基本都一樣。
sudo apt-get install ruby-full
編譯命令:
build/prebuilts_download.sh
。/build.sh --product-name Hi3516DV300
編寫 helloworld.c
在 applicationsstandard 目錄下新建一個 app 目錄來存放 .c 的業務代碼。
比如 applicationsstandardapphelloworld.c 內容容下:
#include 《stdio.h》int main(){
printf(“Hello world.
”);
return 0;
}
然后在當前目錄新建編譯腳本 BUILD.gn 內容如下:
import(“//build/ohos.gni”)
import(“//drivers/adapter/uhdf2/uhdf.gni”)
ohos_executable(“helloworld”) {
sources = [
“helloworld.c”
]
subsystem_name = “applications”
part_name = “prebuilt_hap”
}
然后添加到編譯框架 applicationsstandardhapohos.build 增加如下內容。
“//applications/standard/app:helloworld”
最后執行編譯命令即可,開發板使用的是 Hi3516,在不指定 out 目錄時,缺省生成在 /system/lib64 或 /system/lib 下。

點亮開發板 LED
能打印 helloworld 說明環境是沒問題的,接下來嘗試點亮開發板的 LED。查看 Hi3516DV300 原理圖:
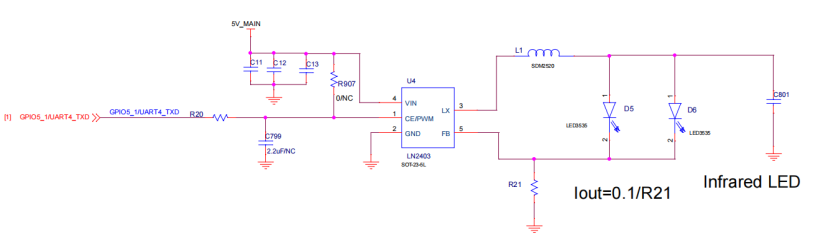
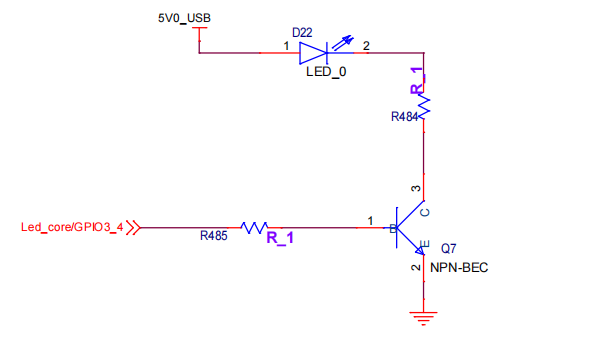
Hi3516DV300 共有 4 層板,由原理圖可知:最上層板的紅外補光燈接在 GPIO5_1,綠色 LED 指示燈在 GPIO2_3,核心板的紅色 LED 在 GPIO3_4。
接下來參考 OpenHarmony GPIO 驅動說明:
https://gitee.com/openharmony/docs/blob/master/zh-cn/device-dev/driver/driver-platform-gpio-des.md
確定GPIO管腳號:不同SOC芯片由于其GPIO控制器型號、參數、以及控制器驅動的不同,GPIO管腳號的換算方式不一樣。
①Hi3516DV300:控制器管理 12 組 GPIO 管腳,每組 8 個。
GPIO 號 = GPIO 組索引 (0~11) * 每組 GPIO 管腳數(8) + 組內偏移
舉例:GPIO10_3 的 GPIO 號 = 10 * 8 + 3 = 83。
②Hi3518EV300:控制器管理 10 組 GPIO 管腳,每組 10 個。
GPIO 號 = GPIO 組索引 (0~9) * 每組 GPIO 管腳數(10) + 組內偏移
舉例:GPIO7_3 的 GPIO 管腳號 = 7 * 10 + 3 = 73
由此可以得出:
GPIO5_1 = 5 * 8 + 1;
GPIO2_3 = 2 * 8 + 3;
GPIO3_4 = 3 * 8 + 4;
然后新建 applicationsstandardappledtest.c,內容如下:
#include 《stdlib.h》 // standard library 標準庫函數頭文件#include 《stdio.h》 // standard input output 標準輸入輸出函數#include 《stdint.h》 // 定義了擴展的整數類型和宏#include 《unistd.h》 // POSIX 系統 API 訪問功能的頭文件#include 《fcntl.h》 // unix標準中通用的頭文件 define O_WRONLY and O_RDONLY // #include 《string.h》#define GPIO_DIR_IN “in”#define GPIO_DIR_OUT “out”#define GPIO_VAL_LOW 0#define GPIO_VAL_HIGHT 1int32_t GpioSetDir(uint16_t gpio, char* dir){
char path[100] = {0};
sprintf(path,“echo %d 》 /sys/class/gpio/export”,gpio);
system(path);
printf(“info:%s
”,path);
char direction[100] = {0};
sprintf(direction,“echo %s 》 /sys/class/gpio/gpio%d/direction”,dir,gpio);
system(direction);
printf(“info:%s
”,direction);
return 0;
}
int32_t GpioWrite(uint16_t gpio, uint16_t val)
{
char path[100] = {0};
sprintf(path,“echo %d 》 /sys/class/gpio/gpio%d/value”,val,gpio);
system(path);
printf(“info:%s
”,path);
return 0;
}
int main(){
uint16_t GPIO5_1 = 5 * 8 + 1;
uint16_t GPIO2_3 = 2 * 8 + 3;
uint16_t GPIO3_4 = 3 * 8 + 4;
printf(“LED test start
”);
int32_t ret;
// uint16_t val;
ret = GpioSetDir(GPIO5_1,GPIO_DIR_OUT);
if (ret != 0) {
printf(“GpioSerDir: failed, ret %d
”, ret);
return 0;
}
ret = GpioSetDir(GPIO2_3,GPIO_DIR_OUT);
if (ret != 0) {
printf(“GpioSerDir: failed, ret %d
”, ret);
return 0;
}
ret = GpioSetDir(GPIO3_4,GPIO_DIR_OUT);
if (ret != 0) {
printf(“GpioSerDir: failed, ret %d
”, ret);
return 0;
}
while(1)
{
GpioWrite(GPIO5_1, GPIO_VAL_HIGHT);
usleep(1000000);
GpioWrite(GPIO5_1, GPIO_VAL_LOW);
usleep(1000000);
GpioWrite(GPIO2_3, GPIO_VAL_HIGHT);
usleep(1000000);
GpioWrite(GPIO2_3, GPIO_VAL_LOW);
usleep(1000000);
GpioWrite(GPIO3_4, GPIO_VAL_HIGHT);
usleep(1000000);
GpioWrite(GPIO3_4, GPIO_VAL_LOW);
usleep(1000000);
}
return 0;
}
將業務代碼添加到 BUILD.gn:
import(“//build/ohos.gni”)
import(“//drivers/adapter/uhdf2/uhdf.gni”)
ohos_executable(“helloworld”) {
sources = [
“helloworld.c”
]
subsystem_name = “applications”
part_name = “prebuilt_hap”
}
ohos_executable(“ledtest”) {
sources = [
“ledtest.c”
]
subsystem_name = “applications”
part_name = “prebuilt_hap”
}
applicationsstandardhapohos.build:
“//applications/standard/app:ledtest”
之后將程序燒錄到開發板,執行 。/system/bin/ledtest:
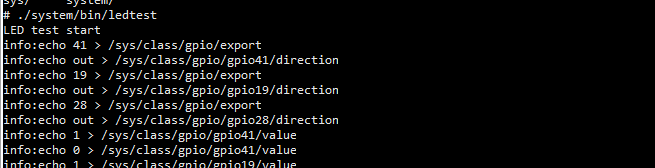
就可以看到 LED 閃爍起來了。
本來是打算使用鴻蒙的 GPIO 接口來實現這個功能的,不過調試了很久也沒調通,最后無奈還是用的 system 自己實現的 GPIO 函數。
有沒使用 OpenHarmony 的 GPIO 成功的小伙伴可以留言一起交流啊。
責任編輯:haq
-
led
+關注
關注
242文章
23694瀏覽量
670836 -
開發板
+關注
關注
25文章
5501瀏覽量
102180 -
鴻蒙系統
+關注
關注
183文章
2639瀏覽量
67699 -
OpenHarmony
+關注
關注
26文章
3820瀏覽量
18125
原文標題:OpenHarmony 3.0上點亮開發板LED
文章出處:【微信號:gh_834c4b3d87fe,微信公眾號:OpenHarmony技術社區】歡迎添加關注!文章轉載請注明出處。
發布評論請先 登錄
貝啟BQ3568HM 開發板被選用為 OpenHarmony 明星開發板

基于小凌派RK2206開發板:OpenHarmony如何使用IoT接口控制FLASH外設

基于小凌派RK2206開發板:OpenHarmony如何使用IoT接口控制UART外設
基于小凌派RK2206開發板:OpenHarmony如何使用IoT接口控制GPIO中斷
基于小凌派RK2206開發板:OpenHarmony如何使用IoT接口控制GPIO外設
基于小凌派RK2206開發板:OpenHarmony如何使用IoT接口控制ADC外設
北京迅為iTOP-RK3568開發板OpenHarmony系統南向驅動開發實操-HDF驅動配置LED

北京迅為RK3568開發板OpenHarmony系統南向驅動開發內核HDF驅動框架架構
迅為RK3568開發板篇OpenHarmony實操HDF驅動控制LED-添加內核編譯
迅為RK3568開發板篇OpenHarmony實操HDF驅動控制LED-編寫內核 LED HDF 驅動程序
迅為RK3568開發板篇OpenHarmony配置HDF驅動控制LED-新增 topeet子系統
OpenHarmony源碼編譯后燒錄鏡像教程,RK3566鴻蒙開發板演示

OpenHarmony怎么修改DPI密度值?觸覺智能RK3566鴻蒙開發板演示


 工商網監
工商網監
評論