") 如何在 Vitis 中使用 UIO 驅(qū)動框架創(chuàng)建簡單的 Linux 用戶應(yīng)用
如何在 Vitis 中使用 UIO 驅(qū)動框架創(chuàng)建簡單的 Linux 用戶應(yīng)用
Linux嵌入式設(shè)計中最基本的任務(wù)之一是創(chuàng)建用戶應(yīng)用程序。
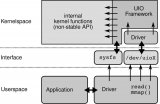
在本篇博文中,我們將探討如何在 Vitis 中使用 UIO 驅(qū)動框架創(chuàng)建簡單的 Linux 用戶應(yīng)用。
1
硬件設(shè)計
本次使用的是 Zynq UltraScale+ MPSoC ZCU104 評估板。但是,無論您使用任何器件,下列步驟都應(yīng)適用。
先使用 Vivado 來創(chuàng)建了塊設(shè)計。建立了 Zynq UltraScale PS,并把 AXI GPIO 連接到 ZCU104 評估板上的 4 個 LED。
地址映射如下所示:
首先 在創(chuàng)建 XSA 時使用了以下選項:
2
Linux 鏡像
如果您使用開發(fā)板,則建議使用 BSP(如果存在)。
但在本示例中,我們使用模板來創(chuàng)建鏡像。已經(jīng)添加了 UIO 驅(qū)動程序,用于 AXI GPIO。
然后創(chuàng)建了 sysroot,在 Vitis 中需要使用它來進行交叉編譯。
petalinux-create -t project --template zynqMP -n zcu104_linux
cd zcu104_linux
petalinux-config --get-hw-description=
依次選擇“DTG Settings -> (zcu104-revc)MACHINE_NAME”
petalinux-config -c kernel
Select Device Drivers -> Userspace I/O drivers
<*> Userspace I/O platform driver with generic IRQ handing
<*> Userspace platform driver with generic irq and dynamic memory
將 system-user.dtsi 替換為:
/include/ "system-conf.dtsi"
/ {
chosen {
bootargs = "earlycon clk_ignore_unused uio_pdrv_genirq.of_id=generic-uio";
stdout-path = "serial0:115200n8";
};
};
&axi_gpio_0 {
compatible = "generic-uio";
};
然后,運行以下命令:
petalinux-build
cd images/linux
petalinux-build --sdk
petalinux-package --sysroot
3
創(chuàng)建平臺
這并非必要步驟,因為用戶只需在 Vitis 中使用 sysroot 即可。
但為了便于使用,我們可以創(chuàng)建一個平臺并在 Vitis 中使用此平臺來創(chuàng)建 Linux 應(yīng)用。
首先,設(shè)置平臺文件。
把平臺文件組織為一種文件夾結(jié)構(gòu)。這并非必要步驟,但用戶需要注意 BIF 中的文件路徑。
在 Bootgen 中使用 BIF 來創(chuàng)建可啟動的鏡像。此處我們僅使用占位符文件名。
mkdir -p sw_comp/src/a53/xrt/image
mkdir sw_comp/src/boot
將 image.ub、boot.scr 和 rootfs.cpio.gz 文件從 PetaLinux image/linux 文件夾復(fù)制到sw_comp/src/a53/image
將 system.bit、bl31.elf、uboot.elf、zynqmp_fsbl(已重命名為 fsbl.elf)和 pmufw.elf 文件從 PetaLinux image/linux 文件夾復(fù)制到sw_comp/src/boot
創(chuàng)建 BIF:
the_ROM_image:
{
[fsbl_config] a53_x64
[bootloader]
[pmufw_image]
[destination_device=pl]
[destination_cpu=a53-0, exception_level=el-3, trustzone]
[destination_cpu=a53-0, exception_level=el-2]
}
將 linux.bif 復(fù)制到sw_comp/src/boot。現(xiàn)在,在 Vitis 中創(chuàng)建一個新平臺工程,如下所示:
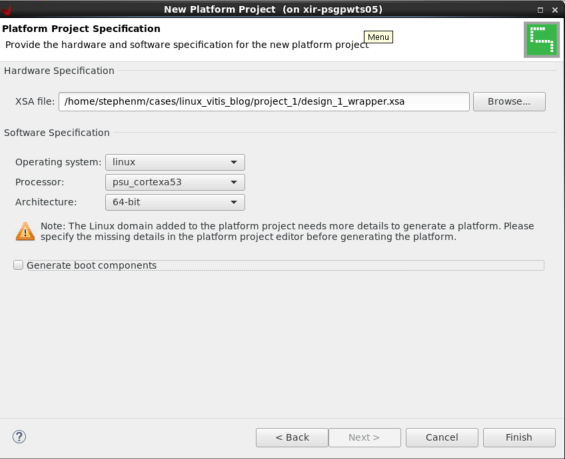
這樣就會在zcu104_base/export中創(chuàng)建平臺。
4
在 Vitis 中創(chuàng)建 Linux 鏡像
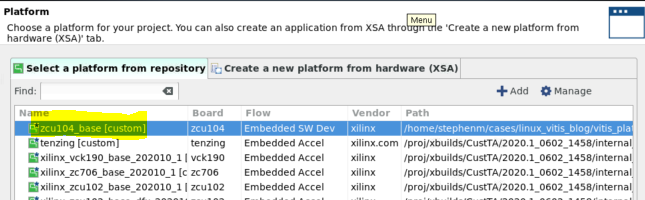
選擇“從存儲庫中選擇平臺 (Select a platform from therepository)”,單擊 + 圖標(biāo)并瀏覽至您的平臺。
創(chuàng)建新應(yīng)用:
此處可以看到,“應(yīng)用設(shè)置 (Application settings)”默認(rèn)使用的是平臺中的設(shè)置。
選擇“空白應(yīng)用 (Empty Application)”模板,因為我們將創(chuàng)建自己的自定義應(yīng)用。
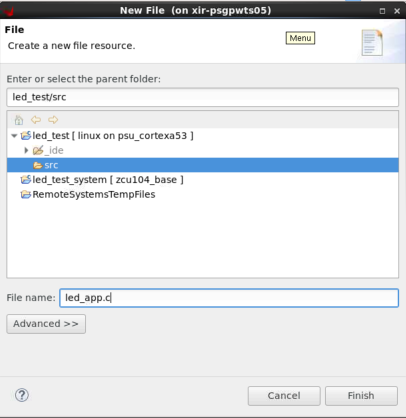
右鍵單擊 led_test 應(yīng)用下的 src 文件夾,然后選擇“新建 (New)”->“文件 (File)”
指定其文件名 (.c),然后單擊“完成 (Finish)”。
現(xiàn)在,即可將以下代碼復(fù)制到其中。這是一個簡單的 UIO 示例,可用于開關(guān) LED。
#include
#include
#include
#include
#include
#define GPIO_MAP_SIZE 0x10000
#define GPIO_DATA 0x00
#define GPIO_TRI 0x04
#define LED_NUM 256
#define LED_DELAY 10000000
int main(int argc, char *argv[])
{
int fd;
char *uiod = "/dev/uio0";
void *gpio_ptr;
volatile int Delay;
printf("AXI GPIO UIO test. ");
// open the UIO device file to allow access to the device in user space
fd = open(uiod, O_RDWR);
if (fd < 1) {
printf("Invalid UIO device file:%s. ", uiod);
return -1;
}
// mmap the GPIO device into user space
gpio_ptr = mmap(NULL, 4096, PROT_READ|PROT_WRITE, MAP_SHARED, fd, 0);
if (gpio_ptr == MAP_FAILED) {
printf("Mmap call failure. ");
return -1;
}
// set bit0 on the GPIO to be output
// see pg144 for ref
*((volatile unsigned *)(gpio_ptr + GPIO_TRI)) = 0x0;
// Toggle the LED
while (1) {
int i;
unsigned char led_pin = 0x0;
for (i = 0; i < LED_NUM; i++) {
*((volatile unsigned *)(gpio_ptr + GPIO_DATA)) = led_pin;
for (Delay = 0; Delay < LED_DELAY; Delay++);
*((volatile unsigned *)(gpio_ptr + GPIO_DATA)) = 0x0;
led_pin++;
}
}
// unmap the GPIO device from user space
munmap(gpio_ptr, 4096);
return 0;
}
選擇系統(tǒng)工程,然后單擊錘子圖標(biāo)。這樣即可構(gòu)建可執(zhí)行文件,并創(chuàng)建啟動鏡像。
5
在硬件上執(zhí)行測試
將所有鏡像從led_app_systemDebugsd_card復(fù)制到 SD 卡上。
啟動后,將自動裝載 SD 卡。
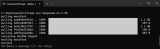
在此處更改目錄,并執(zhí)行l(wèi)ed_app.elf,如下所示:
同時,您在板上應(yīng)該還可以看到 LED 閃爍。
使用 Ctrl + c 即可取消。
責(zé)任編輯:xj
原文標(biāo)題:開發(fā)者分享 | 在 Zynq UltraScale 器件上通過 Vitis 創(chuàng)建 Linux 用戶應(yīng)用
文章出處:【微信公眾號:XILINX技術(shù)社區(qū)】歡迎添加關(guān)注!文章轉(zhuǎn)載請注明出處。
-
Linux
+關(guān)注
關(guān)注
87文章
11448瀏覽量
212678 -
Zynq
+關(guān)注
關(guān)注
10文章
614瀏覽量
47983 -
Vitis
+關(guān)注
關(guān)注
0文章
147瀏覽量
7812
原文標(biāo)題:開發(fā)者分享 | 在 Zynq UltraScale 器件上通過 Vitis 創(chuàng)建 Linux 用戶應(yīng)用
文章出處:【微信號:gh_2d1c7e2d540e,微信公眾號:XILINX開發(fā)者社區(qū)】歡迎添加關(guān)注!文章轉(zhuǎn)載請注明出處。
發(fā)布評論請先 登錄
Linux環(huán)境再升級:PLIN驅(qū)動程序正式發(fā)布

飛凌嵌入式ElfBoard ELF 1板卡-字符驅(qū)動之字符驅(qū)動框架描述
如何在USB視頻類(UVC)框架中使用EZ-USB?FX3實現(xiàn)圖像傳感器接口USB視頻類(UVC)
使用Linux UIO框架實現(xiàn)ARM和FPGA的高效通信
如何在MATLAB中使用DeepSeek模型
如何在Windows中使用MTP協(xié)議
Linux中的用戶與創(chuàng)建
如何在智能手機系統(tǒng)中使用bq27505

如何在MSP430?MCU中使用智能模擬組合
如何在反向降壓-升壓拓?fù)?b class='flag-5'>中使用TPS6290x


 工商網(wǎng)監(jiān)
評論