") PyPortal Adafruit報(bào)價(jià)書(shū)的制作
PyPortal Adafruit報(bào)價(jià)書(shū)的制作
概述

使用PyPortal IoT設(shè)備在您自己有吸引力的PyPortal報(bào)價(jià)書(shū)上動(dòng)態(tài)顯示Adafruit報(bào)價(jià)!
借助CircuitPython和板載WiFi,PyPortal Adafruit報(bào)價(jià)書(shū)從Adafruit報(bào)價(jià)頁(yè)面動(dòng)態(tài)加載JSON格式的數(shù)據(jù),并自動(dòng)顯示文本和作者姓名,以使您整日(整夜)受到啟發(fā)!
將PyPortal安裝在一個(gè)小書(shū)本中(或挖空)
零件
Adafruit PyPortal-CircuitPython支持的Internet顯示
產(chǎn)品ID:4116
PyPortal是我們易于使用的IoT設(shè)備,可讓您在幾分鐘內(nèi)為“物聯(lián)網(wǎng)”創(chuàng)建所有東西。制作自定義觸摸屏界面。..
$ 54.95
進(jìn)貨
添加到購(gòu)物車(chē)

USB電纜-USB A至Micro-B
產(chǎn)品ID:592
這是您用于USB 1.1或USB 2.0的標(biāo)準(zhǔn)A到Micro-B USB電纜。非常適合將PC連接到Metro,F(xiàn)eather,Raspberry Pi或其他開(kāi)發(fā)板或。..
$ 2.95
IN STOCK
添加到購(gòu)物車(chē)
材料和工具
要安裝PyPortal,您需要:
小裝飾“書(shū)盒”或“可以用紙板或木材制成的書(shū)保險(xiǎn)箱,大約5-1/2“ x 3-3/4” x 1-1/4“-您可以在業(yè)余愛(ài)好/家庭商店或在線(xiàn)購(gòu)買(mǎi)
四M3 x 10mm螺釘和螺母
直邊
愛(ài)好刀
可選的小鑿子
》安裝CircuitPython
CircuitPython是MicroPython的派生版,旨在簡(jiǎn)化低成本微控制器上的實(shí)驗(yàn)和教學(xué)。它不需要任何前期桌面軟件下載,因此比以往任何時(shí)候都更容易獲得原型。只需復(fù)制并編輯 CIRCUITPY “閃存”驅(qū)動(dòng)器上的文件即可進(jìn)行迭代。
以下說(shuō)明將向您展示如何安裝CircuitPython。如果您已經(jīng)安裝了CircuitPython,但希望對(duì)其進(jìn)行更新或重新安裝,則同樣的步驟也適用!
設(shè)置CircuitPython快速入門(mén)!
請(qǐng)遵循以下快速逐步操作以獲取超快速的Python功能:)
通過(guò)CircuitPython.org為該板下載最新版本的CircuitPython
點(diǎn)擊上面的鏈接,為PyPortal下載最新版本的CircuitPython。
下載并將其保存到您的桌面(或方便的任何地方)。
使用已知良好的USB電纜將PyPortal插入計(jì)算機(jī)。
A很多人最終使用僅可充電的USB電纜,這非常令人沮喪!因此,請(qǐng)確保您擁有知道對(duì)數(shù)據(jù)同步有用的USB電纜。
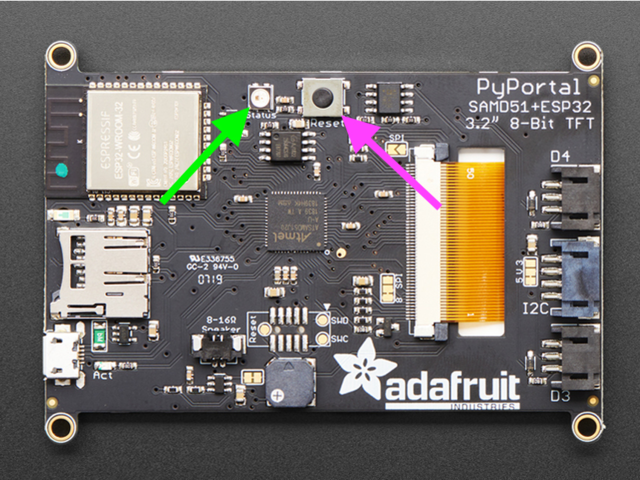
雙擊中間頂部頂部的重置按鈕(洋紅色箭頭)在板上,您將看到NeoPixel RGB LED(綠色箭頭)變?yōu)榫G色。如果它變成紅色,請(qǐng)檢查USB電纜,嘗試使用另一個(gè)USB端口,等等。注意:USB接口旁邊的紅色小LED指示燈將呈紅色閃爍。沒(méi)關(guān)系!
如果第一次雙擊不起作用,請(qǐng)重試。有時(shí)可能需要一些嘗試才能使節(jié)奏正確!


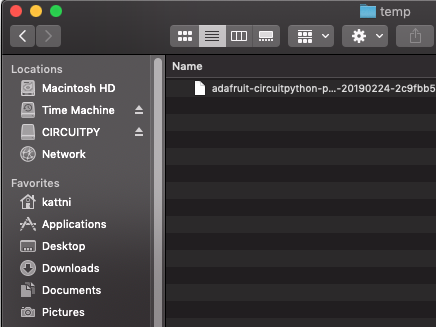
您將看到一個(gè)名為 PORTALBOOT 。
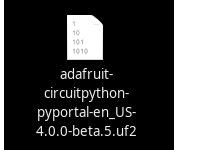
將 adafruit-circuitpython-pyportal- .uf2 文件拖到 PORTALBOOT。
LED將閃爍。然后, PORTALBOOT 驅(qū)動(dòng)器將消失,并且將出現(xiàn)一個(gè)名為 CIRCUITPY 的新磁盤(pán)驅(qū)動(dòng)器。
如果未在板上添加任何代碼,唯一存在的文件是 boot_out.txt 。這是絕對(duì)正常的!是時(shí)候添加您的 code.py 并開(kāi)始使用它了!
就這樣,您完成了! :)
PyPortal默認(rèn)文件
單擊下面的按鈕,下載PyPortal附帶的文件的zip。
PyPortal默認(rèn)文件
PyPortal CircuitPython設(shè)置
要在CircuitPython中使用PyPortal的所有出色功能,必須首先安裝許多庫(kù)。本頁(yè)涵蓋了該過(guò)程。
Adafruit CircuitPython捆綁包
下載Adafruit CircuitPython庫(kù)捆綁包。您可以在此處找到最新版本:
最新的Adafruit CircuitPython庫(kù)包
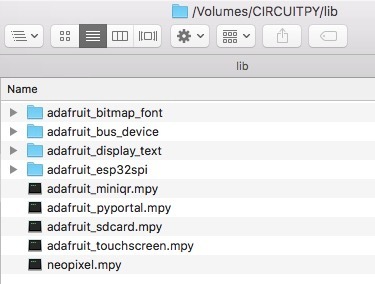
下載 adafruit-circuitpython-bundle-4。 x-mpy-*。zip 捆綁zip文件,然后解壓縮同名文件夾。在內(nèi)部,您會(huì)找到一個(gè) lib 文件夾。您有兩個(gè)選擇:
您可以將 lib 文件夾添加到您的 CIRCUITPY 驅(qū)動(dòng)器中。這將確保您擁有所有驅(qū)動(dòng)程序。但是這將占用8 MB磁盤(pán)上的一堆空間
根據(jù)需要添加每個(gè)庫(kù),這將減少空間使用量,但您需要
至少,我們推薦以下庫(kù),實(shí)際上我們比推薦的要多。基本上是必需的。因此,立即抓住它們并將它們安裝到 CIRCUITPY/lib !
adafruit_esp32spi -這是一個(gè)庫(kù),可通過(guò)ESP32進(jìn)行互聯(lián)網(wǎng)訪問(wèn)使用(您猜對(duì)了!)SPI傳輸。 Internet所需的任何東西都需要使用它
adafruit_requests -該庫(kù)使我們能夠執(zhí)行HTTP請(qǐng)求并從服務(wù)器獲取響應(yīng)。 GET/POST/PUT/PATCH-它們都在這里!
adafruit_pyportal -這是我們友好的包裝器庫(kù),可處理很多項(xiàng)目,顯示圖形和文本,從互聯(lián)網(wǎng)上獲取數(shù)據(jù)。
adafruit_touchscreen -一個(gè)用于從電阻式觸摸屏讀取觸摸的庫(kù)。
adafruit_cursorcontrol -用于讀取PyGamer和PyBadge游戲桿和按鈕的庫(kù)。為您處理所有圖形,按鈕閱讀和操縱桿移動(dòng)。
adafruit_io -該庫(kù)有助于將PyPortal連接到我們的免費(fèi)數(shù)據(jù)記錄和查看服務(wù)
adafruit_imageload -任何圖形所需的圖像顯示助手!
adafruit_display_text -毫不奇怪,它在屏幕上顯示文本
adafruit_bitmap_font -我們擁有精美的字體支持,并且易于制作新字體。該庫(kù)讀取并解析字體文件。
adafruit_slideshow -用于制作圖像幻燈片-方便快速顯示圖形和聲音
neopixel -用于控制板載新像素
adafruit_adt7410 -用于從板載Analog Devices ADT7410精密溫度傳感器讀取溫度的庫(kù)
adafruit_sdcard -支持從板載SD卡插槽中讀取/寫(xiě)入數(shù)據(jù)。
adafruit_bus_device -對(duì)I2C/SPI的低級(jí)支持
Internet連接!
一旦您安裝了CircuitPython安裝程序和庫(kù),我們就可以將您的電路板連接到Internet。請(qǐng)注意,目前不支持訪問(wèn)企業(yè)級(jí)安全的WiFi網(wǎng)絡(luò),僅支持需要SSID和密碼的WiFi網(wǎng)絡(luò)。
要建立連接,您需要先創(chuàng)建一個(gè)秘密文件。
什么是機(jī)密文件?
我們希望人們?cè)跇?gòu)建CircuitPython WiFi小部件時(shí)共享大量項(xiàng)目。我們要避免的是人們不小心共享了他們的密碼或秘密令牌和API密鑰。因此,我們?cè)O(shè)計(jì)了所有示例,以使用 CIRCUITPY 驅(qū)動(dòng)器中的secrets.py文件來(lái)保存秘密/私有/自定義數(shù)據(jù)。這樣,您就可以共享您的主項(xiàng)目,而不必?fù)?dān)心意外共享私有內(nèi)容。
您的 secrets.py 文件應(yīng)如下所示:
下載:文件
復(fù)制代碼
# This file is where you keep secret settings, passwords, and tokens!
# If you put them in the code you risk committing that info or sharing it
secrets = {
‘ssid’ : ‘home ssid’,
‘password’ : ‘my password’,
‘timezone’ : “America/New_York”, # http://worldtimeapi.org/timezones
‘github_token’ : ‘fawfj23rakjnfawiefa’,
‘hackaday_token’ : ‘h4xx0rs3kret’,
}
Inside是一個(gè)名為secrets的python字典,每個(gè)條目都有一行。每個(gè)條目都有一個(gè)條目名稱(chēng)(例如‘ssid’),然后是一個(gè)冒號(hào)以將其與條目鍵‘home ssid’分開(kāi),最后是一個(gè)逗號(hào),
至少您需要ssid和password用于您的本地WiFi設(shè)置。在創(chuàng)建項(xiàng)目時(shí),您可能需要更多的令牌和密鑰,只需一次添加一行即可。例如,請(qǐng)參見(jiàn)其他令牌,例如用于訪問(wèn)github或hackaday API的令牌。其他非機(jī)密數(shù)據(jù)(例如您的時(shí)區(qū))也可以在此處,僅因?yàn)槠浞Q(chēng)為機(jī)密的信息并不意味著您不能在其中包含常規(guī)的自定義數(shù)據(jù)!
有關(guān)正確的時(shí)區(qū)字符串,請(qǐng)查看http://worldtimeapi.org/timezones,請(qǐng)記住,如果未列出您的城市,請(qǐng)?jiān)谕粫r(shí)區(qū)中查找城市,例如,波士頓,紐約,費(fèi)城,華盛頓特區(qū)和邁阿密都與紐約位于同一時(shí)間。
當(dāng)然,不要共享您的 secrets.py -將其保存在GitHub,Discord或其他項(xiàng)目共享站點(diǎn)之外。
連接到WiFi
好,現(xiàn)在您已設(shè)置好機(jī)密-您可以連接到Internet。讓我們使用ESP32SPI和Requests庫(kù)-您需要訪問(wèn)CircuitPython捆綁包并安裝:
adafruit_bus_device
adafruit_esp32spi
adafruit_requests
neopixel
進(jìn)入您的lib文件夾。完成后,使用Mu或您喜歡的編輯器加載以下示例:
下載:項(xiàng)目郵編或 esp32spi_simpletest.py | 在Github上查看
復(fù)制代碼
import board
import busio
from digitalio import DigitalInOut
import adafruit_esp32spi.adafruit_esp32spi_socket as socket
from adafruit_esp32spi import adafruit_esp32spi
import adafruit_requests as requests
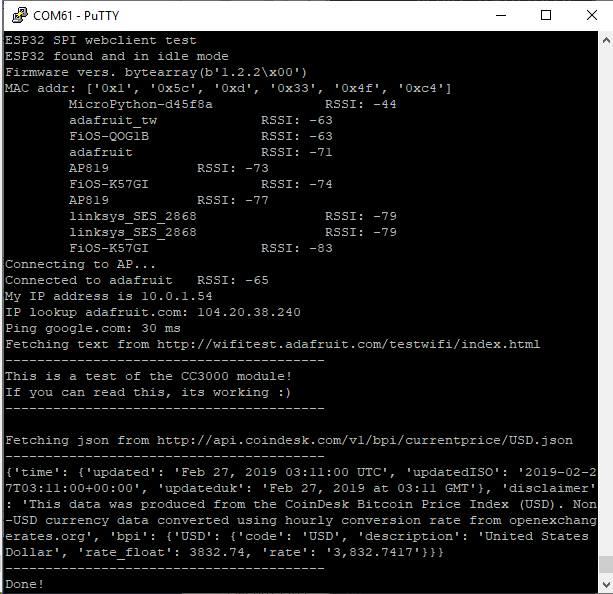
print(“ESP32 SPI webclient test”)
TEXT_URL = “http://wifitest.adafruit.com/testwifi/index.html”
JSON_URL = “http://api.coindesk.com/v1/bpi/currentprice/USD.json”
# If you are using a board with pre-defined ESP32 Pins:
esp32_cs = DigitalInOut(board.ESP_CS)
esp32_ready = DigitalInOut(board.ESP_BUSY)
esp32_reset = DigitalInOut(board.ESP_RESET)
# If you have an externally connected ESP32:
# esp32_cs = DigitalInOut(board.D9)
# esp32_ready = DigitalInOut(board.D10)
# esp32_reset = DigitalInOut(board.D5)
spi = busio.SPI(board.SCK, board.MOSI, board.MISO)
esp = adafruit_esp32spi.ESP_SPIcontrol(spi, esp32_cs, esp32_ready, esp32_reset)
requests.set_socket(socket, esp)
if esp.status == adafruit_esp32spi.WL_IDLE_STATUS:
print(“ESP32 found and in idle mode”)
print(“Firmware vers.”, esp.firmware_version)
print(“MAC addr:”, [hex(i) for i in esp.MAC_address])
for ap in esp.scan_networks():
print(“ %s RSSI: %d” % (str(ap[‘ssid’], ‘utf-8’), ap[‘rssi’]))
print(“Connecting to AP.。.”)
while not esp.is_connected:
try:
esp.connect_AP(b‘MY_SSID_NAME’, b‘MY_SSID_PASSWORD’)
except RuntimeError as e:
print(“could not connect to AP, retrying: ”,e)
continue
print(“Connected to”, str(esp.ssid, ‘utf-8’), “ RSSI:”, esp.rssi)
print(“My IP address is”, esp.pretty_ip(esp.ip_address))
print(“IP lookup adafruit.com: %s” % esp.pretty_ip(esp.get_host_by_name(“adafruit.com”)))
print(“Ping google.com: %d ms” % esp.ping(“google.com”))
#esp._debug = True
print(“Fetching text from”, TEXT_URL)
r = requests.get(TEXT_URL)
print(‘-’*40)
print(r.text)
print(‘-’*40)
r.close()
print()
print(“Fetching json from”, JSON_URL)
r = requests.get(JSON_URL)
print(‘-’*40)
print(r.json())
print(‘-’*40)
r.close()
print(“Done!”)
import board
import busio
from digitalio import DigitalInOut
import adafruit_esp32spi.adafruit_esp32spi_socket as socket
from adafruit_esp32spi import adafruit_esp32spi
import adafruit_requests as requests
print(“ESP32 SPI webclient test”)
TEXT_URL = “http://wifitest.adafruit.com/testwifi/index.html”
JSON_URL = “http://api.coindesk.com/v1/bpi/currentprice/USD.json”
# If you are using a board with pre-defined ESP32 Pins:
esp32_cs = DigitalInOut(board.ESP_CS)
esp32_ready = DigitalInOut(board.ESP_BUSY)
esp32_reset = DigitalInOut(board.ESP_RESET)
# If you have an externally connected ESP32:
# esp32_cs = DigitalInOut(board.D9)
# esp32_ready = DigitalInOut(board.D10)
# esp32_reset = DigitalInOut(board.D5)
spi = busio.SPI(board.SCK, board.MOSI, board.MISO)
esp = adafruit_esp32spi.ESP_SPIcontrol(spi, esp32_cs, esp32_ready, esp32_reset)
requests.set_socket(socket, esp)
if esp.status == adafruit_esp32spi.WL_IDLE_STATUS:
print(“ESP32 found and in idle mode”)
print(“Firmware vers.”, esp.firmware_version)
print(“MAC addr:”, [hex(i) for i in esp.MAC_address])
for ap in esp.scan_networks():
print(“ %s RSSI: %d” % (str(ap[‘ssid’], ‘utf-8’), ap[‘rssi’]))
print(“Connecting to AP.。.”)
while not esp.is_connected:
try:
esp.connect_AP(b‘MY_SSID_NAME’, b‘MY_SSID_PASSWORD’)
except RuntimeError as e:
print(“could not connect to AP, retrying: ”,e)
continue
print(“Connected to”, str(esp.ssid, ‘utf-8’), “ RSSI:”, esp.rssi)
print(“My IP address is”, esp.pretty_ip(esp.ip_address))
print(“IP lookup adafruit.com: %s” % esp.pretty_ip(esp.get_host_by_name(“adafruit.com”)))
print(“Ping google.com: %d ms” % esp.ping(“google.com”))
#esp._debug = True
print(“Fetching text from”, TEXT_URL)
r = requests.get(TEXT_URL)
print(‘-’*40)
print(r.text)
print(‘-’*40)
r.close()
print()
print(“Fetching json from”, JSON_URL)
r = requests.get(JSON_URL)
print(‘-’*40)
print(r.json())
print(‘-’*40)
r.close()
print(“Done!”)
,并將其保存到您的板上,名稱(chēng)為code.py。
第一個(gè)連接示例不使用機(jī)密文件-您將首先輸入SSID/密碼來(lái)驗(yàn)證連接性!
然后轉(zhuǎn)到此行
esp.connect_AP(b‘MY_SSID_NAME’, b‘MY_SSID_PASSWORD’)
并更改MY_SSID_NAME和 MY_SSID_PASSWORD 設(shè)置為您的訪問(wèn)點(diǎn)名稱(chēng)和密碼,并將其保留在‘’引號(hào)內(nèi)。 (此示例不使用機(jī)密文件,但它也非常獨(dú)立,因此,如果其他事情似乎不起作用,則可以始終重新加載該文件。您應(yīng)該獲得如下內(nèi)容:
示例代碼。..
使用SPI端口和3個(gè)控制引腳通過(guò)SPI初始化ESP32:
下載:文件
復(fù)制代碼
esp32_cs = DigitalInOut(board.ESP_CS)
esp32_ready = DigitalInOut(board.ESP_BUSY)
esp32_reset = DigitalInOut(board.ESP_RESET)
spi = busio.SPI(board.SCK, board.MOSI, board.MISO)
esp = adafruit_esp32spi.ESP_SPIcontrol(spi, esp32_cs, esp32_ready, esp32_reset) esp32_cs = DigitalInOut(board.ESP_CS)
esp32_ready = DigitalInOut(board.ESP_BUSY)
esp32_reset = DigitalInOut(board.ESP_RESET)
spi = busio.SPI(board.SCK, board.MOSI, board.MISO)
esp = adafruit_esp32spi.ESP_SPIcontrol(spi, esp32_cs, esp32_ready, esp32_reset)
告訴我們的requests庫(kù)我們正在使用的套接字的類(lèi)型(套接字類(lèi)型隨連接類(lèi)型而變化-在此示例中,我們將使用adafruit_esp32spi_socket)。還將接口設(shè)置為
下載:文件
復(fù)制代碼
esp requests
驗(yàn)證找到ESP32,檢查固件和MAC地址
下載:文件
復(fù)制代碼
requests.set_socket(socket, esp) requests.set_socket(socket, esp)
掃描它可以看到的所有訪問(wèn)點(diǎn),并打印出名稱(chēng)和信號(hào)強(qiáng)度:
下載:文件
復(fù)制代碼
if esp.status == adafruit_esp32spi.WL_IDLE_STATUS:
print(“ESP32 found and in idle mode”)
print(“Firmware vers.”, esp.firmware_version)
print(“MAC addr:”, [hex(i) for i in esp.MAC_address]) if esp.status == adafruit_esp32spi.WL_IDLE_STATUS:
print(“ESP32 found and in idle mode”)
print(“Firmware vers.”, esp.firmware_version)
print(“MAC addr:”, [hex(i) for i in esp.MAC_address])
連接到我們?cè)诖颂幎x的AP,然后打印出來(lái)本地IP地址,嘗試進(jìn)行域名查找并ping google.com以檢查網(wǎng)絡(luò)連接(請(qǐng)注意,有時(shí)ping失敗或需要一段時(shí)間,這沒(méi)什么大不了的)
下載:文件
復(fù)制代碼
for ap in esp.scan_networks():
print(“ %s RSSI: %d” % (str(ap[‘ssid’], ‘utf-8’), ap[‘rssi’])) for ap in esp.scan_networks():
print(“ %s RSSI: %d” % (str(ap[‘ssid’], ‘utf-8’), ap[‘rssi’]))
好的,現(xiàn)在我們進(jìn)入真正有趣的部分。使用SAMD51或其他大容量RAM(超過(guò)32 KB)設(shè)備,我們可以做很多巧妙的事情。例如,我們可以像請(qǐng)求一樣實(shí)現(xiàn)一個(gè)接口,這使得獲取數(shù)據(jù)非常簡(jiǎn)單
從Web URL調(diào)用 print(“Connecting to AP.。.”)
esp.connect_AP(b‘MY_SSID_NAME’, b‘MY_SSID_PASSWORD’)
print(“Connected to”, str(esp.ssid, ‘utf-8’), “ RSSI:”, esp.rssi)
print(“My IP address is”, esp.pretty_ip(esp.ip_address))
print(“IP lookup adafruit.com: %s” % esp.pretty_ip(esp.get_host_by_name(“adafruit.com”)))
print(“Ping google.com: %d ms” % esp.ping(“google.com”))
中讀取所有文本-您可以傳入 print(“Connecting to AP.。.”)
esp.connect_AP(b‘MY_SSID_NAME’, b‘MY_SSID_PASSWORD’)
print(“Connected to”, str(esp.ssid, ‘utf-8’), “ RSSI:”, esp.rssi)
print(“My IP address is”, esp.pretty_ip(esp.ip_address))
print(“IP lookup adafruit.com: %s” % esp.pretty_ip(esp.get_host_by_name(“adafruit.com”)))
print(“Ping google.com: %d ms” % esp.ping(“google.com”))
用于SSL連接的URL
下載:文件
復(fù)制代碼
requests.get https
或者,如果數(shù)據(jù)使用結(jié)構(gòu)化JSON,則可以獲取json pre -解析為可以輕松查詢(xún)或遍歷的Python字典。 (同樣,僅適用于nRF52840,M4和其他高RAM板)
下載:文件
復(fù)制代碼
TEXT_URL = “http://wifitest.adafruit.com/testwifi/index.html”
print(“Fetching text from”, TEXT_URL)
r = requests.get(TEXT_URL)
print(‘-’*40)
print(r.text)
print(‘-’*40)
r.close() TEXT_URL = “http://wifitest.adafruit.com/testwifi/index.html”
print(“Fetching text from”, TEXT_URL)
r = requests.get(TEXT_URL)
print(‘-’*40)
print(r.text)
print(‘-’*40)
r.close()
Requests
我們已經(jīng)為Web接口編寫(xiě)了一個(gè)類(lèi)似請(qǐng)求的庫(kù),名為Adafruit_CircuitPython_Requests。該庫(kù)允許您發(fā)送HTTP/1.1請(qǐng)求,而無(wú)需“設(shè)計(jì)”它們,并提供了有用的方法來(lái)解析服務(wù)器的響應(yīng)。
下載:Project Zip 或 requests_simpletest.py | 在Github上查看
復(fù)制代碼
JSON_URL = “http://api.coindesk.com/v1/bpi/currentprice/USD.json”
print(“Fetching json from”, JSON_URL)
r = requests.get(JSON_URL)
print(‘-’*40)
print(r.json())
print(‘-’*40)
r.close() JSON_URL = “http://api.coindesk.com/v1/bpi/currentprice/USD.json”
print(“Fetching json from”, JSON_URL)
r = requests.get(JSON_URL)
print(‘-’*40)
print(r.json())
print(‘-’*40)
r.close()
代碼首先設(shè)置ESP32SPI接口。然后,它使用ESP32 # adafruit_requests usage with an esp32spi_socket
import board
import busio
from digitalio import DigitalInOut
import adafruit_esp32spi.adafruit_esp32spi_socket as socket
from adafruit_esp32spi import adafruit_esp32spi
import adafruit_requests as requests
# If you are using a board with pre-defined ESP32 Pins:
esp32_cs = DigitalInOut(board.ESP_CS)
esp32_ready = DigitalInOut(board.ESP_BUSY)
esp32_reset = DigitalInOut(board.ESP_RESET)
# If you have an externally connected ESP32:
# esp32_cs = DigitalInOut(board.D9)
# esp32_ready = DigitalInOut(board.D10)
# esp32_reset = DigitalInOut(board.D5)
spi = busio.SPI(board.SCK, board.MOSI, board.MISO)
esp = adafruit_esp32spi.ESP_SPIcontrol(spi, esp32_cs, esp32_ready, esp32_reset)
print(“Connecting to AP.。.”)
while not esp.is_connected:
try:
esp.connect_AP(b‘MY_SSID_NAME’, b‘MY_SSID_PASSWORD’)
except RuntimeError as e:
print(“could not connect to AP, retrying: ”,e)
continue
print(“Connected to”, str(esp.ssid, ‘utf-8’), “ RSSI:”, esp.rssi)
# Initialize a requests object with a socket and esp32spi interface
requests.set_socket(socket, esp)
TEXT_URL = “http://wifitest.adafruit.com/testwifi/index.html”
JSON_GET_URL = “http://httpbin.org/get”
JSON_POST_URL = “http://httpbin.org/post”
print(“Fetching text from %s”%TEXT_URL)
response = requests.get(TEXT_URL)
print(‘-’*40)
print(“Text Response: ”, response.text)
print(‘-’*40)
response.close()
print(“Fetching JSON data from %s”%JSON_GET_URL)
response = requests.get(JSON_GET_URL)
print(‘-’*40)
print(“JSON Response: ”, response.json())
print(‘-’*40)
response.close()
data = ‘31F’
print(“POSTing data to {0}: {1}”.format(JSON_POST_URL, data))
response = requests.post(JSON_POST_URL, data=data)
print(‘-’*40)
json_resp = response.json()
# Parse out the ‘data’ key from json_resp dict.
print(“Data received from server:”, json_resp[‘data’])
print(‘-’*40)
response.close()
json_data = {“Date” : “July 25, 2019”}
print(“POSTing data to {0}: {1}”.format(JSON_POST_URL, json_data))
response = requests.post(JSON_POST_URL, json=json_data)
print(‘-’*40)
json_resp = response.json()
# Parse out the ‘json’ key from json_resp dict.
print(“JSON Data received from server:”, json_resp[‘json’])
print(‘-’*40)
response.close()
和# adafruit_requests usage with an esp32spi_socket
import board
import busio
from digitalio import DigitalInOut
import adafruit_esp32spi.adafruit_esp32spi_socket as socket
from adafruit_esp32spi import adafruit_esp32spi
import adafruit_requests as requests
# If you are using a board with pre-defined ESP32 Pins:
esp32_cs = DigitalInOut(board.ESP_CS)
esp32_ready = DigitalInOut(board.ESP_BUSY)
esp32_reset = DigitalInOut(board.ESP_RESET)
# If you have an externally connected ESP32:
# esp32_cs = DigitalInOut(board.D9)
# esp32_ready = DigitalInOut(board.D10)
# esp32_reset = DigitalInOut(board.D5)
spi = busio.SPI(board.SCK, board.MOSI, board.MISO)
esp = adafruit_esp32spi.ESP_SPIcontrol(spi, esp32_cs, esp32_ready, esp32_reset)
print(“Connecting to AP.。.”)
while not esp.is_connected:
try:
esp.connect_AP(b‘MY_SSID_NAME’, b‘MY_SSID_PASSWORD’)
except RuntimeError as e:
print(“could not connect to AP, retrying: ”,e)
continue
print(“Connected to”, str(esp.ssid, ‘utf-8’), “ RSSI:”, esp.rssi)
# Initialize a requests object with a socket and esp32spi interface
requests.set_socket(socket, esp)
TEXT_URL = “http://wifitest.adafruit.com/testwifi/index.html”
JSON_GET_URL = “http://httpbin.org/get”
JSON_POST_URL = “http://httpbin.org/post”
print(“Fetching text from %s”%TEXT_URL)
response = requests.get(TEXT_URL)
print(‘-’*40)
print(“Text Response: ”, response.text)
print(‘-’*40)
response.close()
print(“Fetching JSON data from %s”%JSON_GET_URL)
response = requests.get(JSON_GET_URL)
print(‘-’*40)
print(“JSON Response: ”, response.json())
print(‘-’*40)
response.close()
data = ‘31F’
print(“POSTing data to {0}: {1}”.format(JSON_POST_URL, data))
response = requests.post(JSON_POST_URL, data=data)
print(‘-’*40)
json_resp = response.json()
# Parse out the ‘data’ key from json_resp dict.
print(“Data received from server:”, json_resp[‘data’])
print(‘-’*40)
response.close()
json_data = {“Date” : “July 25, 2019”}
print(“POSTing data to {0}: {1}”.format(JSON_POST_URL, json_data))
response = requests.post(JSON_POST_URL, json=json_data)
print(‘-’*40)
json_resp = response.json()
# Parse out the ‘json’ key from json_resp dict.
print(“JSON Data received from server:”, json_resp[‘json’])
print(‘-’*40)
response.close()
對(duì)象初始化request對(duì)象。
下載:文件
復(fù)制代碼
socket esp
帶有請(qǐng)求的HTTP GET
代碼向Adafruit的WiFi測(cè)試網(wǎng)站-http:/發(fā)出HTTP GET請(qǐng)求/wifitest.adafruit.com/testwifi/index.html。
為此,我們會(huì)將URL傳遞到import board
import busio
from digitalio import DigitalInOut
import adafruit_esp32spi.adafruit_esp32spi_socket as socket
from adafruit_esp32spi import adafruit_esp32spi
import adafruit_requests as requests
# If you are using a board with pre-defined ESP32 Pins:
esp32_cs = DigitalInOut(board.ESP_CS)
esp32_ready = DigitalInOut(board.ESP_BUSY)
esp32_reset = DigitalInOut(board.ESP_RESET)
# If you have an externally connected ESP32:
# esp32_cs = DigitalInOut(board.D9)
# esp32_ready = DigitalInOut(board.D10)
# esp32_reset = DigitalInOut(board.D5)
spi = busio.SPI(board.SCK, board.MOSI, board.MISO)
esp = adafruit_esp32spi.ESP_SPIcontrol(spi, esp32_cs, esp32_ready, esp32_reset)
print(“Connecting to AP.。.”)
while not esp.is_connected:
try:
esp.connect_AP(b‘MY_SSID_NAME’, b‘MY_SSID_PASSWORD’)
except RuntimeError as e:
print(“could not connect to AP, retrying: ”,e)
continue
print(“Connected to”, str(esp.ssid, ‘utf-8’), “ RSSI:”, esp.rssi)
# Initialize a requests object with a socket and esp32spi interface
requests.set_socket(socket, esp)。我們還將將來(lái)自服務(wù)器的響應(yīng)保存到名為import board
import busio
from digitalio import DigitalInOut
import adafruit_esp32spi.adafruit_esp32spi_socket as socket
from adafruit_esp32spi import adafruit_esp32spi
import adafruit_requests as requests
# If you are using a board with pre-defined ESP32 Pins:
esp32_cs = DigitalInOut(board.ESP_CS)
esp32_ready = DigitalInOut(board.ESP_BUSY)
esp32_reset = DigitalInOut(board.ESP_RESET)
# If you have an externally connected ESP32:
# esp32_cs = DigitalInOut(board.D9)
# esp32_ready = DigitalInOut(board.D10)
# esp32_reset = DigitalInOut(board.D5)
spi = busio.SPI(board.SCK, board.MOSI, board.MISO)
esp = adafruit_esp32spi.ESP_SPIcontrol(spi, esp32_cs, esp32_ready, esp32_reset)
print(“Connecting to AP.。.”)
while not esp.is_connected:
try:
esp.connect_AP(b‘MY_SSID_NAME’, b‘MY_SSID_PASSWORD’)
except RuntimeError as e:
print(“could not connect to AP, retrying: ”,e)
continue
print(“Connected to”, str(esp.ssid, ‘utf-8’), “ RSSI:”, esp.rssi)
# Initialize a requests object with a socket and esp32spi interface
requests.set_socket(socket, esp)的變量。
盡管我們從服務(wù)器請(qǐng)求數(shù)據(jù),但我們還是希望服務(wù)器回應(yīng)。由于我們已經(jīng)保存了服務(wù)器的requests.get(),因此可以將其讀回。對(duì)我們來(lái)說(shuō)幸運(yùn)的是,請(qǐng)求將服務(wù)器的響應(yīng)自動(dòng)解碼為人類(lèi)可讀的文本,您可以通過(guò)調(diào)用response將其讀回。
最后,我們將執(zhí)行一些操作通過(guò)調(diào)用response進(jìn)行清理。這樣會(huì)關(guān)閉,刪除和收集響應(yīng)的數(shù)據(jù)。
下載:文件
復(fù)制代碼
response.text response.close()
一些服務(wù)器使用文本響應(yīng),而某些服務(wù)器則使用由屬性-值對(duì)組成的json格式的數(shù)據(jù)進(jìn)行響應(yīng)。/p》
CircuitPython_Requests可以將來(lái)自服務(wù)器的JSON格式的響應(yīng)轉(zhuǎn)換為CPython print(“Fetching text from %s”%TEXT_URL)
response = requests.get(TEXT_URL)
print(‘-’*40)
print(“Text Response: ”, response.text)
print(‘-’*40)
response.close()對(duì)象。
我們還可以獲取和解析 json 數(shù)據(jù)。我們將發(fā)送HTTP Get到一個(gè)我們知道的URL,該URL返回一個(gè)json格式的響應(yīng)(而不是文本數(shù)據(jù))。
然后,代碼調(diào)用print(“Fetching text from %s”%TEXT_URL)
response = requests.get(TEXT_URL)
print(‘-’*40)
print(“Text Response: ”, response.text)
print(‘-’*40)
response.close()將響應(yīng)轉(zhuǎn)換為一個(gè)CPython dict.。
下載:文件
復(fù)制代碼
response.json() dict
帶有請(qǐng)求的HTTP POST
請(qǐng)求還可以通過(guò)調(diào)用print(“Fetching JSON data from %s”%JSON_GET_URL)
response = requests.get(JSON_GET_URL)
print(‘-’*40)
print(“JSON Response: ”, response.json())
print(‘-’*40)
response.close()方法(向其傳遞一個(gè)print(“Fetching JSON data from %s”%JSON_GET_URL)
response = requests.get(JSON_GET_URL)
print(‘-’*40)
print(“JSON Response: ”, response.json())
print(‘-’*40)
response.close()值)將數(shù)據(jù)發(fā)布到服務(wù)器。
下載:文件
復(fù)制代碼
requests.post data
您還可以通過(guò)將data = ‘31F’
print(“POSTing data to {0}: {1}”.format(JSON_POST_URL, data))
response = requests.post(JSON_POST_URL, data=data)
print(‘-’*40)
json_resp = response.json()
# Parse out the ‘data’ key from json_resp dict.
print(“Data received from server:”, json_resp[‘data’])
print(‘-’*40)
response.close()傳遞到data = ‘31F’
print(“POSTing data to {0}: {1}”.format(JSON_POST_URL, data))
response = requests.post(JSON_POST_URL, data=data)
print(‘-’*40)
json_resp = response.json()
# Parse out the ‘data’ key from json_resp dict.
print(“Data received from server:”, json_resp[‘data’])
print(‘-’*40)
response.close()方法中,將json格式的數(shù)據(jù)發(fā)布到服務(wù)器。
下載:文件
復(fù)制代碼
json_data requests.post
高級(jí)請(qǐng)求使用情況
要發(fā)送自定義HTTP, aders,將響應(yīng)解析為原始字節(jié),還是在CircuitPython代碼中處理響應(yīng)的http狀態(tài)代碼?
我們已經(jīng)編寫(xiě)了一個(gè)示例來(lái)顯示下面的請(qǐng)求模塊的高級(jí)用法。
下載:項(xiàng)目Zip 或 requests_advanced.py | 在Github上查看
復(fù)制代碼
json_data = {“Date” : “July 25, 2019”}
print(“POSTing data to {0}: {1}”.format(JSON_POST_URL, json_data))
response = requests.post(JSON_POST_URL, json=json_data)
print(‘-’*40)
json_resp = response.json()
# Parse out the ‘json’ key from json_resp dict.
print(“JSON Data received from server:”, json_resp[‘json’])
print(‘-’*40)
response.close()
WiFi Manager
這個(gè)最簡(jiǎn)單的示例可行,但有點(diǎn)挑剔-您需要不斷檢查WiFi狀態(tài),并具有許多循環(huán)來(lái)管理連接和斷開(kāi)連接。對(duì)于更高級(jí)的用途,我們建議使用WiFiManager對(duì)象。它將為您包裝連接/狀態(tài)/請(qǐng)求循環(huán)-如果WiFi掉線(xiàn),則重新連接,如果ESP32進(jìn)入不良狀態(tài),則重置ESP32,等等。
這是一個(gè)更高級(jí)的示例,其中顯示了WiFi管理器以及如何使用一些額外的標(biāo)題發(fā)布數(shù)據(jù):
下載:Project Zip 或 esp32spi_aio_post.py | 在Github上查看
復(fù)制代碼
import board
import busio
from digitalio import DigitalInOut
import adafruit_esp32spi.adafruit_esp32spi_socket as socket
from adafruit_esp32spi import adafruit_esp32spi
import adafruit_requests as requests
# If you are using a board with pre-defined ESP32 Pins:
esp32_cs = DigitalInOut(board.ESP_CS)
esp32_ready = DigitalInOut(board.ESP_BUSY)
esp32_reset = DigitalInOut(board.ESP_RESET)
# If you have an externally connected ESP32:
# esp32_cs = DigitalInOut(board.D9)
# esp32_ready = DigitalInOut(board.D10)
# esp32_reset = DigitalInOut(board.D5)
spi = busio.SPI(board.SCK, board.MOSI, board.MISO)
esp = adafruit_esp32spi.ESP_SPIcontrol(spi, esp32_cs, esp32_ready, esp32_reset)
print(“Connecting to AP.。.”)
while not esp.is_connected:
try:
esp.connect_AP(b‘MY_SSID_NAME’, b‘MY_SSID_PASSWORD’)
except RuntimeError as e:
print(“could not connect to AP, retrying: ”,e)
continue
print(“Connected to”, str(esp.ssid, ‘utf-8’), “ RSSI:”, esp.rssi)
# Initialize a requests object with a socket and esp32spi interface
requests.set_socket(socket, esp)
JSON_GET_URL = “http://httpbin.org/get”
# Define a custom header as a dict.
headers = {“user-agent” : “blinka/1.0.0”}
print(“Fetching JSON data from %s.。.”%JSON_GET_URL)
response = requests.get(JSON_GET_URL, headers=headers)
print(‘-’*60)
json_data = response.json()
headers = json_data[‘headers’]
print(“Response‘s Custom User-Agent Header: {0}”.format(headers[’User-Agent‘]))
print(’-‘*60)
# Read Response’s HTTP status code
print(“Response HTTP Status Code: ”, response.status_code)
print(‘-’*60)
# Read Response, as raw bytes instead of pretty text
print(“Raw Response: ”, response.content)
# Close, delete and collect the response data
response.close()
您會(huì)在這里注意到,我們使用secrets.py文件來(lái)管理我們的SSID信息。 wifimanager被賦予了ESP32對(duì)象,密碼和一個(gè)用于指示狀態(tài)的新像素。
請(qǐng)注意,您需要在密碼文件中添加一些其他信息,以便代碼可以查詢(xún)Adafruit IO API:
import time
import board
import busio
from digitalio import DigitalInOut
import neopixel
from adafruit_esp32spi import adafruit_esp32spi
from adafruit_esp32spi import adafruit_esp32spi_wifimanager
print(“ESP32 SPI webclient test”)
# Get wifi details and more from a secrets.py file
try:
from secrets import secrets
except ImportError:
print(“WiFi secrets are kept in secrets.py, please add them there!”)
raise
# If you are using a board with pre-defined ESP32 Pins:
esp32_cs = DigitalInOut(board.ESP_CS)
esp32_ready = DigitalInOut(board.ESP_BUSY)
esp32_reset = DigitalInOut(board.ESP_RESET)
# If you have an externally connected ESP32:
# esp32_cs = DigitalInOut(board.D9)
# esp32_ready = DigitalInOut(board.D10)
# esp32_reset = DigitalInOut(board.D5)
spi = busio.SPI(board.SCK, board.MOSI, board.MISO)
esp = adafruit_esp32spi.ESP_SPIcontrol(spi, esp32_cs, esp32_ready, esp32_reset)
“”“Use below for Most Boards”“”
status_light = neopixel.NeoPixel(board.NEOPIXEL, 1, brightness=0.2) # Uncomment for Most Boards
“”“Uncomment below for ItsyBitsy M4”“”
# status_light = dotstar.DotStar(board.APA102_SCK, board.APA102_MOSI, 1, brightness=0.2)
# Uncomment below for an externally defined RGB LED
# import adafruit_rgbled
# from adafruit_esp32spi import PWMOut
# RED_LED = PWMOut.PWMOut(esp, 26)
# GREEN_LED = PWMOut.PWMOut(esp, 27)
# BLUE_LED = PWMOut.PWMOut(esp, 25)
# status_light = adafruit_rgbled.RGBLED(RED_LED, BLUE_LED, GREEN_LED)
wifi = adafruit_esp32spi_wifimanager.ESPSPI_WiFiManager(esp, secrets, status_light)
counter = 0
while True:
try:
print(“Posting data.。.”, end=‘’)
data = counter
feed = ‘test’
payload = {‘value’:data}
response = wifi.post(
“https://io.adafruit.com/api/v2/”+secrets[‘a(chǎn)io_username’]+“/feeds/”+feed+“/data”,
json=payload,
headers={“X-AIO-KEY”:secrets[‘a(chǎn)io_key’]})
print(response.json())
response.close()
counter = counter + 1
print(“OK”)
except (ValueError, RuntimeError) as e:
print(“Failed to get data, retrying ”, e)
wifi.reset()
continue
response = None
time.sleep(15)
您可以轉(zhuǎn)到adafruit.io查看AIO密鑰鏈接獲取這兩個(gè)值并將它們添加到secrets文件中,該文件現(xiàn)在看起來(lái)像這樣:
下載:文件
復(fù)制代碼
aio_username aio_key
下一步,設(shè)置一個(gè)名為Adafruit IO提要# This file is where you keep secret settings, passwords, and tokens!
# If you put them in the code you risk committing that info or sharing it
secrets = {
‘ssid’ : ‘_your_ssid_’,
‘password’ : ‘_your_wifi_password_’,
‘timezone’ : “America/Los_Angeles”, # http://worldtimeapi.org/timezones
‘a(chǎn)io_username’ : ‘_your_aio_username_’,
‘a(chǎn)io_key’ : ‘_your_aio_key_’,
}
如果您不知道如何設(shè)置供稿,請(qǐng)遵循此頁(yè)面并在設(shè)置名為。
然后,我們可以有一個(gè)簡(jiǎn)單的循環(huán),用于將數(shù)據(jù)發(fā)布到Adafruit IO,而無(wú)需處理連接或初始化硬件!
在Adafruit.io上查看您的測(cè)試數(shù)據(jù),每次Cir時(shí),您都會(huì)看到該值增加cuitPython板向其發(fā)布數(shù)據(jù)!

使用CircuitPython編寫(xiě)PyPortal代碼
項(xiàng)目特定庫(kù)
以前,我們?yōu)镻yPortal準(zhǔn)備了所有最常用于PyPortal項(xiàng)目的庫(kù)。如果要為此項(xiàng)目使用最低設(shè)置,就是這樣:
adafruit_bitmap_font
adafruit_bus_device
adafruit_display_text
adafruit_esp32spi
adafruit_miniqr.mpy
》
adafruit_pyportal.mpy
adafruit_sdcard.mpy
adafruit_touchscreen.mpy
neopixel.mpy
CircuitPython代碼
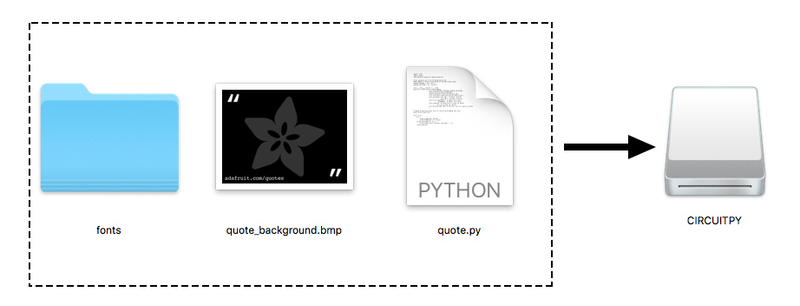
在下面的嵌入式代碼元素中,單擊下載:項(xiàng)目Zip 鏈接,然后將.zip存檔文件保存到您的計(jì)算機(jī)中。
然后,解壓縮.zip文件,它將解壓縮到名為 PyPortal_Quotes 的文件夾。
將 PyPortal_Quotes 目錄的內(nèi)容復(fù)制到PyPortal的CIRC中UITPY驅(qū)動(dòng)器,然后確保將quote.py文件重命名為code.py,以便在PyPortal重新啟動(dòng)時(shí)它將自動(dòng)運(yùn)行。
i》下載:Project Zip 或 quote.py | 在Github上查看
復(fù)制代碼
import time
import board
from adafruit_pyportal import PyPortal
# Set up where we‘ll be fetching data from
DATA_SOURCE = “https://www.adafruit.com/api/quotes.php”
QUOTE_LOCATION = [0, ’text‘]
AUTHOR_LOCATION = [0, ’author‘]
# the current working directory (where this file is)
cwd = (“/”+__file__).rsplit(’/‘, 1)[0]
pyportal = PyPortal(url=DATA_SOURCE,
json_path=(QUOTE_LOCATION, AUTHOR_LOCATION),
status_neopixel=board.NEOPIXEL,
default_bg=cwd+“/quote_background.bmp”,
text_font=cwd+“/fonts/Arial-ItalicMT-17.bdf”,
text_position=((20, 120), # quote location
(5, 210)), # author location
text_color=(0xFFFFFF, # quote text color
0x8080FF), # author text color
text_wrap=(35, # characters to wrap for quote
0), # no wrap for author
text_maxlen=(180, 30), # max text size for quote & author
)
# speed up projects with lots of text by preloading the font!
pyportal.preload_font()
while True:
try:
value = pyportal.fetch()
print(“Response is”, value)
except (ValueError, RuntimeError) as e:
print(“Some error occured, retrying! -”, e)
time.sleep(60)
import time
import board
from adafruit_pyportal import PyPortal
# Set up where we’ll be fetching data from
DATA_SOURCE = “https://www.adafruit.com/api/quotes.php”
QUOTE_LOCATION = [0, ‘text’]
AUTHOR_LOCATION = [0, ‘a(chǎn)uthor’]
# the current working directory (where this file is)
cwd = (“/”+__file__).rsplit(‘/’, 1)[0]
pyportal = PyPortal(url=DATA_SOURCE,
json_path=(QUOTE_LOCATION, AUTHOR_LOCATION),
status_neopixel=board.NEOPIXEL,
default_bg=cwd+“/quote_background.bmp”,
text_font=cwd+“/fonts/Arial-ItalicMT-17.bdf”,
text_position=((20, 120), # quote location
(5, 210)), # author location
text_color=(0xFFFFFF, # quote text color
0x8080FF), # author text color
text_wrap=(35, # characters to wrap for quote
0), # no wrap for author
text_maxlen=(180, 30), # max text size for quote & author
)
# speed up projects with lots of text by preloading the font!
pyportal.preload_font()
while True:
try:
value = pyportal.fetch()
print(“Response is”, value)
except (ValueError, RuntimeError) as e:
print(“Some error occured, retrying! -”, e)
time.sleep(60)
如果遇到任何錯(cuò)誤,例如“ ImportError:沒(méi)有名為“ adafruit_display_text.label”的模塊”,請(qǐng)確保將您的庫(kù)更新到最新的發(fā)行包!
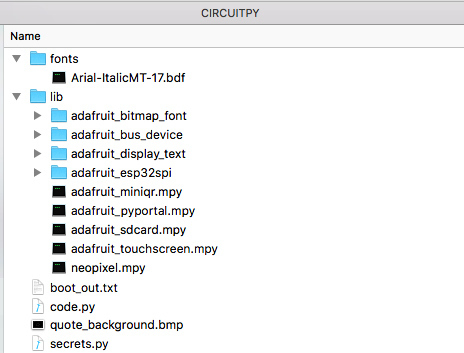
CIRCUITPY驅(qū)動(dòng)器的最終內(nèi)容將如下所示:
PyPortal報(bào)價(jià)委員會(huì)正在做一些漂亮的事情,以提供令人愉悅的y報(bào)價(jià)體驗(yàn)!
Backgr
首先,它將位圖圖形顯示為屏幕的背景。這是 .bmp 格式的320 x 240像素RGB 16位光柵圖形。
字體
然后,它會(huì)顯示引號(hào)和作者的名字,以及使用位圖字體創(chuàng)建的文本覆蓋在背景之上。這里使用的字體是由斜Arial字體制成的位圖字體。您可以在本指南中了解有關(guān)轉(zhuǎn)換類(lèi)型的更多信息。
JSON
整潔的部分是文本不是來(lái)自設(shè)備上的文件,而是從網(wǎng)站上獲取!
Adafruit.com在 adafruit.com/api/quotes.php 頁(yè)面上有一個(gè)PHP腳本。每次被請(qǐng)求時(shí),它都會(huì)從大型報(bào)價(jià)數(shù)據(jù)庫(kù)返回一個(gè)新報(bào)價(jià)。
實(shí)際上,您可以運(yùn)行PyPortal執(zhí)行的相同查詢(xún)來(lái)查看結(jié)果。復(fù)制此鏈接:https://www.adafruit.com/api/quotes.php
到您的瀏覽器,您將看到如下結(jié)果:
[
{
“text”: “Science, my lad, is made up of mistakes, but they are mistakes which it is useful to make, because they lead little by little to the truth”,
“author”: “Jules Verne”
}
]
該結(jié)果的引號(hào)格式為 JSON (JavaScript對(duì)象表示法)數(shù)組。它由具有兩個(gè)鍵的單個(gè)元素組成:文本和作者。
文本鍵是Science, my lad, is made up of mistakes, but they are mistakes which it is useful to make, because they lead little by little to the truth
author 鍵的值是Jules Verne
,因?yàn)榇薐SON對(duì)象具有通過(guò)一致的方式將結(jié)果返回給我們,我們?cè)赑yPortal上運(yùn)行的代碼可以輕松地解析數(shù)據(jù)并顯示它!
您可以在其中看到它的完成方式 code.py 的一部分:
下載:文件
復(fù)制代碼
# Set up where we‘ll be fetching data from
DATA_SOURCE = “https://www.adafruit.com/api/quotes.php”
QUOTE_LOCATION = [0, ’text‘]
AUTHOR_LOCATION = [0, ’author‘] # Set up where we’ll be fetching data from
DATA_SOURCE = “https://www.adafruit.com/api/quotes.php”
QUOTE_LOCATION = [0, ‘text’]
AUTHOR_LOCATION = [0, ‘a(chǎn)uthor’]
然后,在pyportal查詢(xún)中,我們要求提供文本和 author 名稱(chēng),然后使用text_參數(shù)設(shè)置font,position,color,wrap和顯示時(shí)的文本的maxlen。
下載:文件
復(fù)制代碼
pyportal = PyPortal(url=DATA_SOURCE,
json_path=(QUOTE_LOCATION, AUTHOR_LOCATION),
status_neopixel=board.NEOPIXEL,
default_bg=cwd+“quote_background.bmp”,
text_font=cwd+“fonts/Arial-ItalicMT-17.bdf”,
text_position=((20, 40), # quote location
(5, 190)), # author location
text_color=(0xFFFFFF, # quote text color
0x8080FF), # author text color
text_wrap=(35, # characters to wrap for quote
0), # no wrap for author
text_maxlen=(180, 30), # max text size for quote & author
) pyportal = PyPortal(url=DATA_SOURCE,
json_path=(QUOTE_LOCATION, AUTHOR_LOCATION),
status_neopixel=board.NEOPIXEL,
default_bg=cwd+“quote_background.bmp”,
text_font=cwd+“fonts/Arial-ItalicMT-17.bdf”,
text_position=((20, 40), # quote location
(5, 190)), # author location
text_color=(0xFFFFFF, # quote text color
0x8080FF), # author text color
text_wrap=(35, # characters to wrap for quote
0), # no wrap for author
text_maxlen=(180, 30), # max text size for quote & author
)
在while True:的主循環(huán)中,代碼將查詢(xún)Adafruit報(bào)價(jià)頁(yè)面的JSON數(shù)據(jù),并顯示該數(shù)據(jù),然后等待一分鐘,直到重復(fù)該過(guò)程。
希望您的報(bào)價(jià)更新得更快或更慢?只需更改time.sleep()行中指定的秒數(shù)即可。
現(xiàn)在,您可以測(cè)試該程序,一旦該程序連接到WiFi,
下一步,我們將為PyPortal報(bào)價(jià)簿制作外殼。
構(gòu)建書(shū)架

現(xiàn)在,我們將為PyPortal創(chuàng)建一個(gè)漂亮的外殼,以使用書(shū)箱顯示報(bào)價(jià)。您還可以選擇任何小型工藝品盒,食譜盒,雪茄盒或掏空書(shū)本。

為幫助切開(kāi)窗口和孔,可以在打印機(jī)上打印此模板,然后切出內(nèi)部矩形和孔。確保以1:1的比例打印并將縮放比例設(shè)置為100%。
PyPortal框架模板
然后,將框架粘貼到框上并進(jìn)行跟蹤用鉛筆或鋼筆在內(nèi)部矩形和孔中進(jìn)行切割,然后用愛(ài)好刀將其切出。用鉸刀或鉆子打孔或鉆出孔。


切割模板
使用該模板傳遞適當(dāng)?shù)某叽缫郧懈钇聊淮翱?/p>
您可以使用鉛筆或記號(hào)筆來(lái)跟蹤窗口和孔的中心。


切割
使用業(yè)余刀或方箱切割刀和直刃,進(jìn)行多次切割,以逐漸切穿鍋蓋書(shū)箱。
要小心ul,請(qǐng)花點(diǎn)時(shí)間避免滑倒刀片。


鉆探
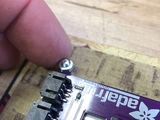
使用錐子,手鉆,鉸刀或手鉆在安裝螺釘上打孔。這些直徑應(yīng)約為3mm。


螺釘
如圖所示,將四顆M3 x 10毫米螺釘擰入書(shū)箱蓋。


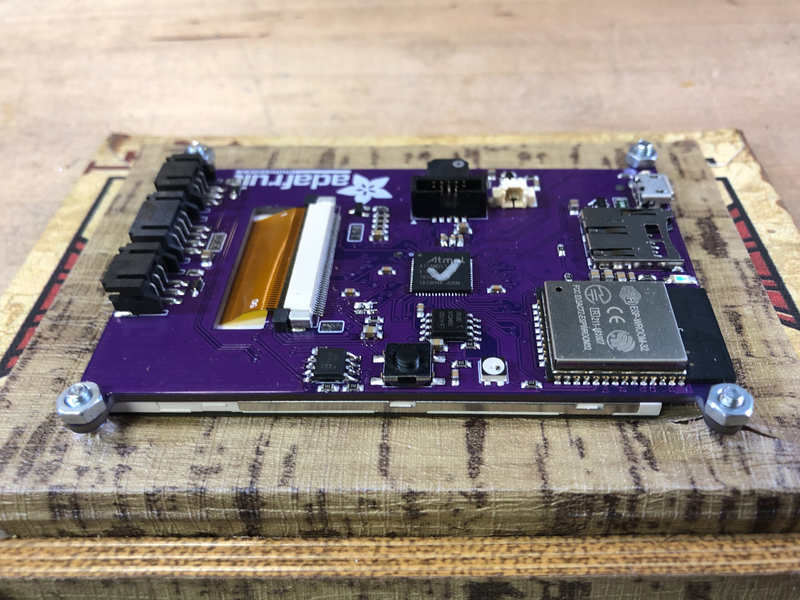
安裝PyPortal
打開(kāi)蓋子,然后將PyPortal安裝孔放在四個(gè)螺釘上,注意將屏幕對(duì)準(zhǔn)
窗口故意比屏幕小,以便將屏幕支撐為三明治
擰緊四個(gè)螺母的手指。請(qǐng)勿過(guò)分用力將其擰入,否則將有可能損壞屏幕或PCB。
請(qǐng)確保匹配此對(duì)齊方式,以便在將書(shū)箱直立放置時(shí),屏幕朝上,USB端口位于右下方。
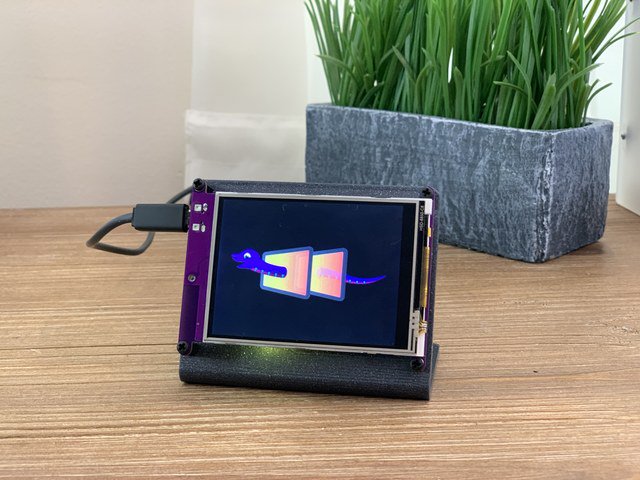
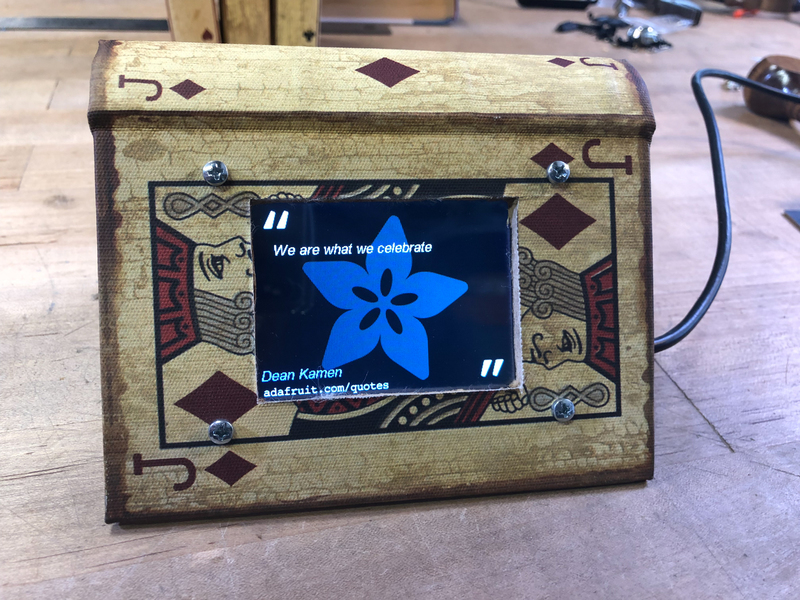
這是顯示報(bào)價(jià)簿的一種方法,使用略微打開(kāi)的書(shū)箱并傾斜顯示。

將USB電纜插入PyPortal為其供電。它將啟動(dòng),顯示背景圖像,然后花一點(diǎn)時(shí)間連接到您的WiFi,然后再提供第一個(gè)報(bào)價(jià)。
如果您的顯示沒(méi)有開(kāi)始更改引號(hào),請(qǐng)仔細(xì)檢查您是否加載了前面提到的所有文件,并編輯了設(shè)置文件以包含您的WiFi憑據(jù)。


電纜端口
如果您想完全合上書(shū)箱,則需要在USB電纜中放入一根剪下。
您可以標(biāo)記位置,然后使用鑿子或小型手鋸切出一個(gè)缺口。


您好!您的PyPortal Adafruit報(bào)價(jià)書(shū)已經(jīng)完成,可以準(zhǔn)備鼓舞人心的話(huà)了!

責(zé)任編輯:wv
-
開(kāi)發(fā)板
+關(guān)注
關(guān)注
25文章
5499瀏覽量
102094
發(fā)布評(píng)論請(qǐng)先 登錄
PCBA 加工環(huán)節(jié)大盤(pán)點(diǎn),報(bào)價(jià)全流程及周期深度剖析
松下影像制作方案分享會(huì)成功舉辦
松下MPS媒體制作平臺(tái)概述
村田貼片電阻電容報(bào)價(jià)是多少

為什么直流電源報(bào)價(jià)需要問(wèn)銷(xiāo)售?

虛擬制作技術(shù)在廣告領(lǐng)域中的應(yīng)用與挑戰(zhàn)
2025 年 SOLIDWORKS 價(jià)格更新:最新報(bào)價(jià)及優(yōu)惠信息


 工商網(wǎng)監(jiān)
評(píng)論